Procedure For The Complete Removal Of The Hicas Rear-steering System
The High Capacity Actively Controlled Suspension, or HICAS, rear-steering system, was a pioneering, if ultimately divisive, technology implemented by Nissan in several of their performance vehicles throughout the late 1980s and 1990s. While designed to improve stability and handling at higher speeds, particularly during lane changes and cornering, many enthusiasts found its behavior unpredictable, particularly after years of wear and tear affected the aging hydraulic and electrical components. Consequently, HICAS removal is a common modification, especially in cars seeing track duty. This article provides a comprehensive technical guide to completely removing the HICAS system, outlining the necessary steps, explaining the reasoning behind each action, and highlighting potential pitfalls.
Understanding the HICAS System
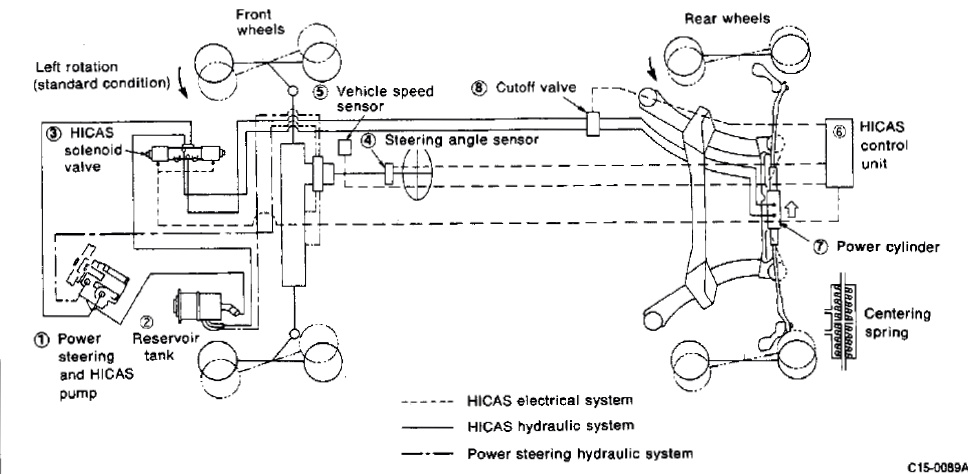
Before diving into the removal process, it's crucial to understand the key components of the HICAS system. This knowledge is fundamental to ensuring a safe and effective modification. The core elements include:
- Hydraulic Actuator: Located at the rear of the car, typically attached to the rear subframe or differential carrier, this actuator is responsible for physically steering the rear wheels. It receives hydraulic pressure and electronic signals from the HICAS computer.
- Hydraulic Pump: Driven by the engine, the hydraulic pump provides the necessary fluid pressure to the actuator. It's usually situated near the power steering pump, as they often share the same reservoir.
- Hydraulic Lines: These hoses connect the pump to the actuator, transmitting the pressurized fluid. They are a common source of leaks as they age.
- Electronic Control Unit (ECU): The HICAS ECU processes sensor data (speed, steering angle, yaw rate) and determines the appropriate rear steering angle. It then sends signals to the actuator.
- Sensors: Various sensors provide feedback to the ECU. The most important are the steering angle sensor (detecting the driver's input) and the vehicle speed sensor.
- Rear Steering Rack (or Ball Joints): The hydraulic actuator connects to the rear hubs either via a short steering rack and tie rods, or, in later iterations, using pivoting ball joints.
The HICAS system operated by subtly adjusting the rear wheel angle in relation to the front wheels. At low speeds, it might steer the rear wheels in the opposite direction to improve maneuverability. At higher speeds, it would steer them in the same direction, allegedly improving stability during lane changes and sweeping corners. The theory was sound, but the execution and longevity proved problematic.
Tools and Materials Required
The following tools and materials will be needed for a successful HICAS removal:
- Jack and Jack Stands: Essential for safely lifting and supporting the vehicle. Never work under a car supported only by a jack.
- Wheel Chocks: To prevent the car from rolling.
- Socket Set and Wrenches: Metric sizes are required. A comprehensive set will cover all necessary bolts and fittings.
- Line Wrenches (Flare Nut Wrenches): Crucial for disconnecting the hydraulic lines without damaging the fittings.
- Pliers: For various tasks, such as removing clips and hose clamps.
- Screwdrivers: Both Phillips head and flathead screwdrivers will be needed.
- Drain Pan: To catch hydraulic fluid spillage.
- Hydraulic Line Plugs or Caps: To seal the hydraulic lines and prevent leakage after disconnecting them. Correct thread size is critical.
- HICAS Lockout Bar (or Similar): This replaces the hydraulic actuator and rigidly locks the rear steering linkage in a fixed position. This is the most important piece of hardware for a safe and functional removal.
- Power Steering Fluid: To top off the power steering reservoir after disconnecting the HICAS pump.
- Penetrating Oil: To loosen stubborn bolts and fittings.
- Torque Wrench: For properly tightening bolts after reassembly.
- Safety Glasses and Gloves: To protect your eyes and hands.
- Rags or Shop Towels: For cleaning up spills.
Step-by-Step Removal Procedure
1. Preparation and Safety
Begin by ensuring the vehicle is parked on a level surface. Engage the parking brake, chock the rear wheels, and disconnect the negative terminal of the battery. This prevents any accidental electrical activation of the system during the process. Gather all necessary tools and materials within easy reach.
2. Accessing the HICAS Components
Using a jack and jack stands, safely raise the rear of the vehicle. Refer to your vehicle's service manual for the correct jacking points. Securely support the car on jack stands before proceeding to any work underneath.
3. Draining the Hydraulic System
Locate the hydraulic pump, typically near the power steering pump. Carefully disconnect the hydraulic lines from the pump using line wrenches. Have a drain pan ready to catch the fluid. Be prepared for some fluid to spill, despite your best efforts. Proper disposal of hydraulic fluid is environmentally crucial. Contact your local recycling center for information. Plug the open ends of the hydraulic lines to prevent further leakage.
4. Removing the Hydraulic Lines
Follow the hydraulic lines from the pump to the rear actuator. Disconnect the lines at the actuator, again using line wrenches and plugging the lines. Remove the lines completely from the vehicle. These lines are often secured with clips or brackets, so be sure to detach these as well.
5. Removing the Rear Actuator
This is where the HICAS lockout bar comes into play. The actuator is typically bolted to the rear subframe or differential carrier. Carefully unbolt the actuator. The exact procedure will depend on the specific vehicle model. Once the actuator is removed, install the HICAS lockout bar in its place. It is absolutely essential that the lockout bar is installed correctly and torqued to the manufacturer's specifications. This bar prevents the rear wheels from independently steering and ensures predictable handling.
6. Disconnecting the Electronic Control Unit (ECU)
The HICAS ECU is usually located in the trunk or under the rear seats. Consult your vehicle's service manual to pinpoint its exact location. Disconnect the wiring harness from the ECU. While you can completely remove the ECU, it's often easier to simply unplug it and leave it in place. Removing it entirely might require tracing wires and removing mounting brackets. Leaving it installed avoids potential wiring harness damage.
7. Addressing the Power Steering System
With the HICAS pump disconnected, the power steering system may be affected. The exact implications depend on whether the HICAS pump was integrated with the power steering pump or a separate unit. If integrated, you may need to replace the power steering pump with a non-HICAS version or modify the existing pump. If the HICAS pump was separate, you may need to loop the power steering lines or install a shorter belt to bypass the HICAS pump pulley. Consult your vehicle's service manual or an experienced mechanic for guidance on this step.
8. Final Inspection and Reassembly
Before lowering the vehicle, double-check all connections and ensure the HICAS lockout bar is securely installed. Verify that all hydraulic lines are plugged and that the power steering system is functioning correctly. Lower the vehicle and torque the wheel lug nuts to the manufacturer's specifications.
Potential Issues and Considerations
- Frozen Fittings: Hydraulic fittings can be notoriously difficult to loosen, especially after years of exposure to the elements. Penetrating oil and patience are key. If a fitting is severely corroded, it may need to be replaced.
- Incorrect Lockout Bar: Using the wrong type or size of lockout bar can be dangerous. Ensure you purchase a bar specifically designed for your vehicle model.
- Power Steering Complications: The integration of the HICAS pump with the power steering system can present challenges. Carefully research the correct procedure for your vehicle to avoid damaging the power steering system. Some users prefer to install an electric power steering pump instead of dealing with the modifications to the existing pump.
- ABS Interaction: In some cases, the HICAS system interacts with the ABS system. Removing HICAS might require modifications to the ABS system as well. This is rare but worth investigating.
- Rear Alignment: After removing HICAS and installing the lockout bar, a rear wheel alignment is essential. This ensures proper handling and tire wear.
- Legal Considerations: Depending on your location, modifying safety-related systems like HICAS may be subject to legal restrictions. Check local regulations before proceeding.
Conclusion
Removing the HICAS system is a complex modification that requires careful planning, attention to detail, and a thorough understanding of the system's components. While it can improve handling predictability and eliminate a potential source of problems, it's crucial to perform the removal correctly and address any potential issues that may arise. Always prioritize safety and consult with experienced mechanics if you're unsure about any aspect of the procedure. A properly executed HICAS removal, combined with a quality alignment, can significantly enhance the driving experience of these classic performance vehicles.