Procedure For The Removal And Deletion Of The Idle Air Control Valve (iacv) On A 240sx
Hey there, 240SX enthusiasts! Having trouble with erratic idle, stalling, or generally rough running? It might be time to investigate your Idle Air Control Valve (IACV). This little component plays a big role in keeping your KA24E or KA24DE engine purring smoothly, especially when the throttle is closed.
Now, the IACV can become gummed up with carbon deposits and grime over time, leading to these symptoms. While cleaning is often the first course of action, sometimes the valve is simply beyond repair and needs to be removed and, if necessary, deleted (in cases where you're running an aftermarket ECU or simplified setup). This article will walk you through the procedure for both removal and deletion. Remember to always prioritize safety and consult your vehicle's service manual for specific torque specifications.
Understanding the IACV on Your 240SX
Before we dive into the removal process, let's quickly cover what the IACV does and why you might want to consider removing it. The IACV is essentially a controlled bypass valve that allows air to flow around the throttle plate when it's closed. The ECU uses this valve to regulate engine idle speed based on various factors like engine temperature, electrical load (e.g., headlights, AC), and transmission status (e.g., in gear or neutral).
Reasons for IACV Removal:
- Malfunctioning Valve: As mentioned earlier, a dirty or damaged IACV can cause idle problems.
- Aftermarket ECU: Many aftermarket ECUs can control idle speed directly through the throttle body, rendering the IACV redundant.
- Simplified Engine Bay: Some owners opt to remove the IACV for a cleaner, more streamlined engine bay appearance.
- Race Applications: In some high-performance applications, the IACV may not be necessary, and its removal can simplify the system.
Tools and Materials Needed
Before you start wrenching, gather the following tools and materials:
- Socket set (metric)
- Wrench set (metric)
- Screwdrivers (Phillips and flathead)
- Pliers
- Penetrating oil (e.g., PB Blaster)
- Throttle body cleaner
- Rags or shop towels
- New gasket (if reusing the IACV or if deleting it)
- Coolant (to top off after disconnecting coolant lines)
- Vacuum caps (for capping off vacuum lines if deleting the IACV)
- Block-off plate (if deleting the IACV - aftermarket purchase)
- Torque wrench
- Safety glasses
- Gloves
Step-by-Step IACV Removal Procedure
Step 1: Disconnect the Battery. This is a crucial safety step. Disconnect the negative battery terminal to prevent any accidental electrical shorts.
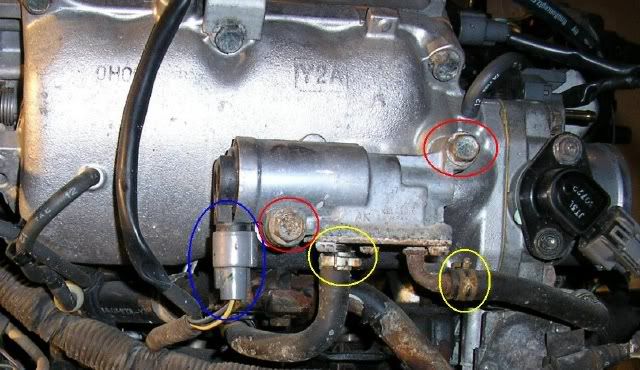
Step 2: Locate the IACV. The IACV is typically mounted on the throttle body. On the KA24E/DE, it's usually a cylindrical component with a wiring harness and two coolant hoses connected to it.
Step 3: Disconnect the Wiring Harness. Carefully disconnect the electrical connector from the IACV. Be gentle, as the plastic connectors can become brittle with age.
Step 4: Disconnect the Coolant Hoses. This is where things can get a bit messy. The IACV has two coolant hoses connected to it. Before disconnecting them, have rags handy to catch any coolant that spills. Use pliers to loosen the hose clamps and carefully slide the hoses off the IACV. Expect some coolant to escape, so be prepared.
Step 5: Remove the Mounting Bolts. The IACV is typically held in place by two or three bolts. Use the appropriate socket or wrench to remove these bolts. You might want to apply some penetrating oil to the bolts if they're corroded.
Step 6: Remove the IACV. Once the bolts are removed, carefully detach the IACV from the throttle body. It might be slightly stuck, so gently wiggle it until it comes loose. Inspect the gasket between the IACV and the throttle body. If it's damaged, you'll need to replace it.
Deleting the IACV (Optional)
If you're deleting the IACV, proceed with the following steps. If you're simply removing it for cleaning or replacement, skip ahead to the "Reinstallation or Replacement" section.
Step 1: Obtain a Block-Off Plate. You'll need a block-off plate specifically designed for your KA24E or KA24DE throttle body. These plates are readily available from aftermarket performance parts suppliers.
Step 2: Install the Block-Off Plate. Place the block-off plate over the IACV mounting surface on the throttle body. Use a new gasket to ensure a proper seal. Secure the block-off plate with the original IACV mounting bolts. Torque the bolts to the manufacturer's specified torque.
Step 3: Cap Off Coolant Lines. Since you've removed the IACV, you'll need to cap off the coolant lines that previously connected to it. Use appropriate-sized vacuum caps and hose clamps to seal the lines. This will prevent coolant leaks.
Step 4: Cap off Vacuum Lines (If Applicable). Some IACV setups have associated vacuum lines. If your setup does, identify and cap off any remaining vacuum lines to prevent vacuum leaks.
Reinstallation or Replacement (If Not Deleting)
If you're reinstalling the IACV after cleaning or replacing it with a new unit, follow these steps:
Step 1: Clean the Mating Surfaces. Thoroughly clean the mating surfaces on the throttle body and the IACV. Remove any old gasket material or debris.
Step 2: Install a New Gasket. Always use a new gasket when reinstalling the IACV. This will ensure a proper seal and prevent vacuum leaks.
Step 3: Reinstall the IACV. Carefully position the IACV on the throttle body, aligning the bolt holes. Install the mounting bolts and torque them to the manufacturer's specified torque. Do not overtighten the bolts, as this can damage the IACV or the throttle body.
Step 4: Reconnect the Coolant Hoses. Reconnect the coolant hoses to the IACV. Make sure the hose clamps are secure.
Step 5: Reconnect the Wiring Harness. Reconnect the electrical connector to the IACV.
Final Steps
Step 1: Reconnect the Battery. Reconnect the negative battery terminal.
Step 2: Top Off Coolant. Check the coolant level in the radiator and top it off as needed.
Step 3: Start the Engine. Start the engine and let it idle. Monitor the idle speed. If you deleted the IACV and are running an aftermarket ECU, you'll need to adjust the idle settings in the ECU software. If you cleaned or replaced the IACV, the idle speed should be more stable than before.
Step 4: Check for Leaks. Carefully check for any coolant or vacuum leaks around the IACV and the coolant lines. If you find any leaks, address them immediately.
Troubleshooting
If you're still experiencing idle problems after removing or replacing the IACV, consider the following:
- Vacuum Leaks: Vacuum leaks can cause erratic idle. Check all vacuum lines and connections for leaks.
- Throttle Position Sensor (TPS): A faulty TPS can also cause idle problems. Test the TPS to make sure it's functioning properly.
- Dirty Throttle Body: A dirty throttle body can restrict airflow and affect idle speed. Clean the throttle body with throttle body cleaner.
- ECU Issues: In rare cases, ECU problems can cause idle issues.
Approximate Repair Costs
Here's a rough estimate of the costs associated with IACV removal, deletion, or replacement:
- IACV Cleaning: $0 (DIY with cleaning supplies)
- New IACV: $50 - $200 (depending on brand and quality)
- IACV Block-Off Plate: $20 - $50
- Professional Installation: $100 - $300 (labor costs vary depending on the shop)
Important Note: These are just estimates. The actual costs may vary depending on your location and the specific parts and services you need.
Final Thoughts
Removing or deleting the IACV on your 240SX can be a rewarding experience. By following these steps and taking your time, you can improve your engine's performance and reliability. Remember to always prioritize safety and consult your vehicle's service manual for specific torque specifications. Good luck, and happy wrenching!