Proper Selection And Safe Installation Of Wheel Spacers On A Nissan 240sx
The Nissan 240SX, a darling of the drifting and tuner communities, often finds itself subject to modifications aimed at improving its handling and aesthetics. Among these modifications, wheel spacers stand out as a relatively simple, yet potentially impactful, adjustment. While they can widen the stance, improve appearance, and even correct wheel offset for aftermarket brake calipers, improper selection and installation can lead to catastrophic consequences. This guide provides an in-depth look at selecting the correct wheel spacers for your 240SX and ensuring their safe and reliable installation.
Understanding Wheel Spacers: Function and Types
Wheel spacers effectively move the wheel outwards from the hub. This has several effects:
- Wider Track Width: Increasing the distance between the wheels on an axle can theoretically improve lateral stability, especially during cornering. However, this effect is more nuanced than simply "wider is better," as it changes the vehicle's roll center and can introduce unwanted bump steer if not carefully considered alongside other suspension modifications.
- Aesthetics: Filling out the wheel wells for a more aggressive and visually appealing stance is a common motivator.
- Clearance: Spacers can provide necessary clearance for larger brake calipers or prevent tires from rubbing against suspension components or fender liners.
There are two primary types of wheel spacers:
Slip-On Spacers
These are simple plates that slide onto the hub between the wheel and the hub face. They are typically used for smaller offsets, usually 5mm to 10mm. These spacers require the use of longer wheel studs, as the stock studs will likely not have sufficient thread engagement to safely secure the wheel. The lack of hubcentric design can lead to vibration, especially with thinner spacers, if the wheel isn't perfectly centered by the studs alone. Avoid cheap universal slip-on spacers.
Bolt-On Spacers (Adapters)
These spacers bolt directly to the existing wheel studs using lug nuts. They then have their own set of studs protruding from the spacer, onto which the wheel is mounted. Bolt-on spacers are generally thicker, often ranging from 15mm to 50mm, and incorporate a hubcentric design. This design features a raised lip that matches the hub's diameter and the wheel's center bore, ensuring proper centering and minimizing vibration. High-quality bolt-on spacers are generally considered safer than slip-on spacers, especially for larger offsets, because they offer a more robust and reliable connection. However, using low-quality or incorrectly sized adapters can be extremely dangerous.
Selecting the Right Wheel Spacers for Your 240SX
Choosing the appropriate wheel spacers requires careful consideration of several factors:
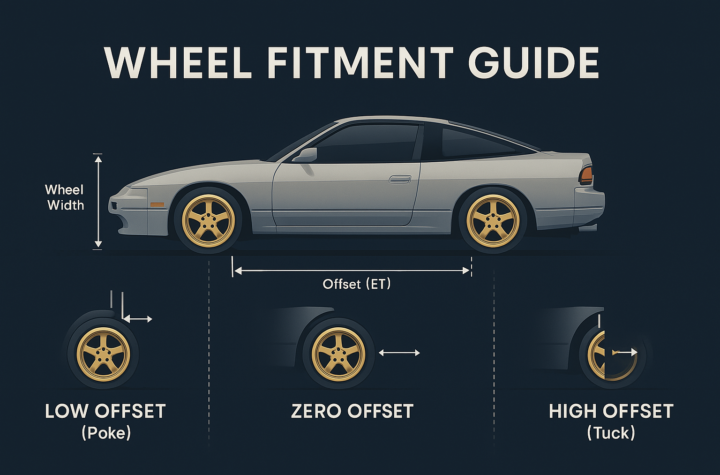
Offset Calculation
Determining the required spacer thickness involves understanding wheel offset. Wheel offset is the distance between the wheel's mounting surface and its centerline. A positive offset means the mounting surface is closer to the outside of the wheel, while a negative offset means it's closer to the inside. The goal is to achieve the desired final offset. Measure the current distance between your tire and the fender. Then, factor in the desired appearance and any potential clearance issues. Remember, exceeding the fender line can attract unwanted attention from law enforcement and may require fender rolling or pulling.
Use the following formula to calculate the required spacer thickness:
Required Spacer Thickness = Desired Offset Change (in mm)
For example, if your current wheel offset is +30mm and you want to achieve a final offset of +15mm, you would need a 15mm spacer.
Hubcentric vs. Non-Hubcentric
Always prioritize hubcentric spacers. The hubcentric design ensures that the wheel is centered on the hub rather than solely relying on the lug studs. This significantly reduces the risk of vibration and stud failure. The 240SX uses a 66.1mm hub bore diameter. Ensure that the spacer you choose has a matching hubcentric lip of 66.1mm to interface correctly with the vehicle's hub. Furthermore, make sure the spacer has a hubcentric lip that fits the wheel's center bore.
Material and Construction
Wheel spacers should be manufactured from high-quality materials like forged aluminum (6061-T6 or 7075-T6) for maximum strength and durability. Avoid spacers made from cast aluminum or steel, as they are more prone to cracking and failure. The spacer's surface finish should be corrosion-resistant, such as anodizing. The included studs (for bolt-on spacers) should be of high tensile strength, ideally Grade 10.9 or higher.
Stud Length and Thread Engagement
Adequate thread engagement is crucial for safety. With slip-on spacers, you must replace the stock studs with longer ones to compensate for the added spacer thickness. A general rule of thumb is that the lug nut should engage the stud for at least the length of the stud's diameter. Use a thread pitch gauge to confirm that you're using the correct lug nuts and wheel studs. The 240SX typically uses M12x1.25 studs. For bolt-on spacers, ensure the studs on the spacer are long enough to provide adequate thread engagement for your wheels. Use an open-ended lug nut if necessary to avoid bottoming out the lug nut before proper clamping force is achieved.
Safe Installation Procedures
Proper installation is paramount to the safe and reliable use of wheel spacers. Follow these steps carefully:
- Preparation: Gather all necessary tools and materials: torque wrench, lug wrench, jack and jack stands, wheel chocks, wire brush, brake cleaner, anti-seize compound (sparingly), and new wheel studs (if needed).
- Vehicle Lift: Park the vehicle on a level surface, engage the parking brake, and chock the rear wheels. Loosen the lug nuts on the wheel(s) to be removed. Jack up the vehicle and securely support it with jack stands placed on designated jacking points. Never work under a vehicle supported only by a jack.
- Wheel Removal: Remove the wheels completely.
- Hub Cleaning: Thoroughly clean the hub surface with a wire brush and brake cleaner to remove any rust, dirt, or debris. A clean, smooth surface is essential for proper spacer seating.
- Stud Installation (if applicable): If installing longer studs, use a stud installation tool or a lug nut and washers to press or pull the new studs into the hub. Ensure the studs are fully seated and flush with the hub flange. A small amount of anti-seize can be used on the threads.
- Spacer Installation: For slip-on spacers, slide the spacer onto the hub, ensuring it sits flush against the hub face. For bolt-on spacers, align the spacer with the wheel studs and tighten the provided lug nuts in a star pattern to the manufacturer's specified torque.
- Wheel Installation: Mount the wheel onto the spacer's studs (or the extended studs if using slip-on spacers). Tighten the lug nuts in a star pattern to the manufacturer's specified torque. Refer to your vehicle's owner's manual for the correct torque specification. A typical torque specification for M12x1.25 lug nuts on a 240SX is around 80 ft-lbs (108 Nm), but it's crucial to confirm the correct value.
- Lowering and Final Torque: Lower the vehicle to the ground and remove the jack stands. Perform a final torque check on all lug nuts, ensuring they are tightened to the specified torque.
- Test Drive and Re-Torque: Take the vehicle for a short test drive, listening for any unusual noises or vibrations. After approximately 50-100 miles, re-torque all lug nuts to the specified torque. This is critical as the initial clamping force may relax as the components settle.
Potential Risks and Precautions
While wheel spacers can offer certain benefits, it's essential to be aware of the potential risks involved:
- Stud Failure: Insufficient thread engagement or using low-quality studs can lead to stud failure, resulting in wheel separation.
- Vibration: Non-hubcentric spacers or improperly installed spacers can cause vibrations, which can be uncomfortable and potentially damaging to other components.
- Wheel Bearing Wear: Increasing the track width can increase the load on the wheel bearings, potentially shortening their lifespan.
- Suspension Geometry Changes: Wheel spacers alter the suspension geometry, which can affect handling characteristics. Be prepared to make other adjustments, such as aligning the vehicle, to optimize performance.
Always prioritize safety over aesthetics. If you are unsure about any aspect of wheel spacer selection or installation, consult with a qualified mechanic.
By carefully selecting high-quality components and following proper installation procedures, you can safely and effectively use wheel spacers to enhance the look and potentially improve the handling of your Nissan 240SX. Remember, diligence and attention to detail are paramount to a successful and safe modification.