Rear Quarter Glass Seal Replacement And Adjustment
The rear quarter glass, often overlooked, plays a vital role in a vehicle's structural integrity, weather sealing, and aesthetics. A compromised seal can lead to water leaks, wind noise, and even contribute to rust. While a seemingly simple component, its replacement and adjustment require a methodical approach and an understanding of the forces at play. This guide delves into the nuances of rear quarter glass seal replacement, offering insights into the tools, techniques, and adjustments necessary for a professional-grade result.
Understanding the System
Before diving into the replacement process, it's crucial to understand the system's fundamental components and their interactions. The rear quarter glass typically consists of:
- Glass Pane: The actual glass component, often tempered or laminated for safety and structural integrity.
- Seal (Gasket or Molding): The flexible material surrounding the glass, responsible for creating a watertight and airtight barrier between the glass and the vehicle's body. Materials vary, including rubber, EPDM (Ethylene Propylene Diene Monomer), and polyurethane.
- Retaining Clips or Adhesive: Depending on the vehicle model, the glass may be held in place by mechanical clips, adhesive bonding, or a combination of both. Older vehicles often rely heavily on rubber gaskets that compress into place, while newer models frequently employ urethane adhesives for a stronger and more permanent bond.
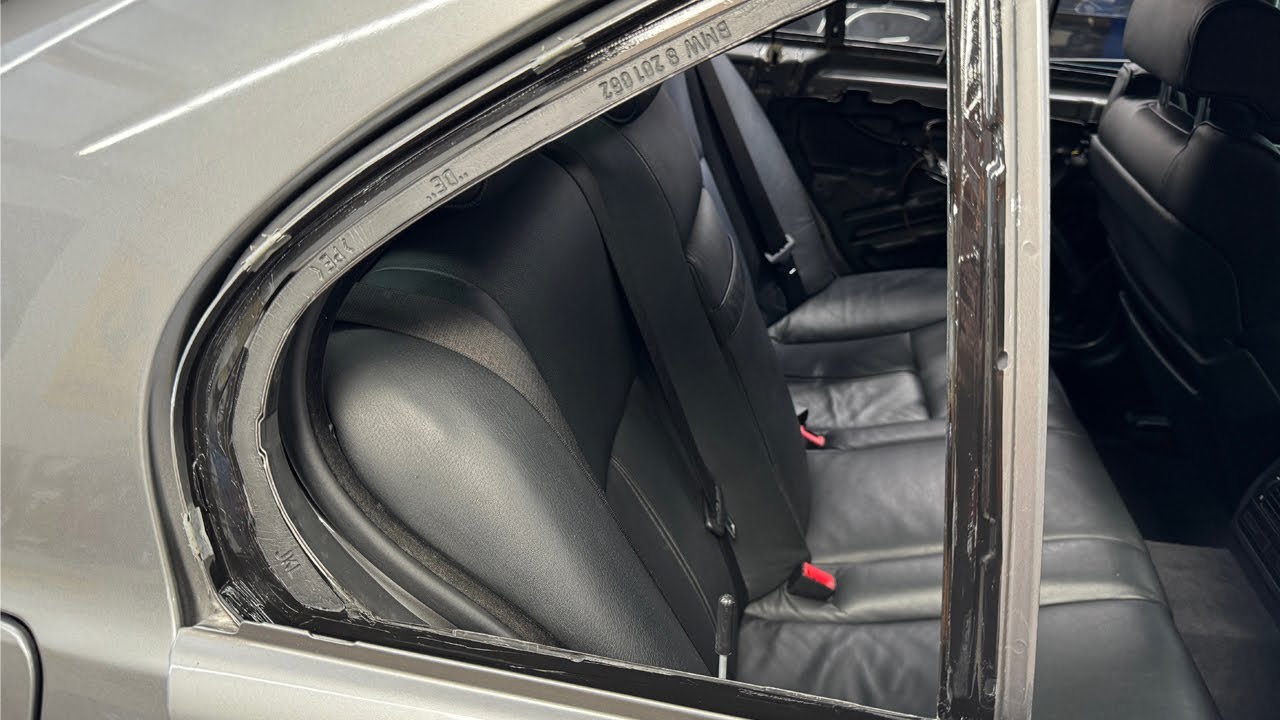
- Body Aperture: The shaped opening in the vehicle's body panel that the glass and seal fit into. This aperture must be clean and free of corrosion for a proper seal.
The seal's primary function is to compensate for minor variations in the body aperture and glass dimensions, preventing direct contact and potential damage. It also absorbs vibrations and road noise, contributing to a quieter cabin experience.
Tools and Materials Required
A successful rear quarter glass seal replacement hinges on having the right tools and materials. Here's a comprehensive list:
- Safety Glasses and Gloves: Essential for personal protection. Glass shards and chemicals can cause serious injury.
- Trim Removal Tools: Plastic pry tools designed to prevent damage to interior trim panels. A metal pry bar should never be used unless absolutely necessary and with extreme caution.
- Heat Gun (Optional): For softening adhesive bonds, particularly on newer vehicles. Use with extreme caution to avoid damaging paint.
- Urethane Adhesive Cutting Tool (Oscillating Multi-Tool or Cold Knife): For cutting through the urethane adhesive bead. An oscillating multi-tool with a flexible blade is often preferred for its precision and ease of use. A cold knife (manual blade with a handle) is an alternative, but requires more physical effort.
- Glass Suction Cups: For safely lifting and maneuvering the glass pane.
- Urethane Adhesive: Specifically designed for automotive glass. Ensure compatibility with your vehicle and follow the manufacturer's instructions meticulously.
- Urethane Primer: Promotes adhesion between the urethane adhesive and both the glass and the body aperture.
- Surface Cleaner: For cleaning the glass and body aperture prior to applying primer and adhesive. Isopropyl alcohol works well.
- Sealant Applicator Gun: For applying the urethane adhesive evenly and consistently.
- Razor Blades or Scrapers: For removing old sealant and debris.
- Shop Rags: For cleaning surfaces and wiping up spills.
- New Rear Quarter Glass Seal: Purchase a seal specifically designed for your vehicle's make and model. Check online parts retailers, dealerships, or auto parts stores.
- Masking Tape: For protecting surrounding paint surfaces.
- Rust Converter (If Necessary): If rust is present in the body aperture, address it before installing the new seal.
Removal Procedure
The removal process varies depending on the vehicle's design. Here's a general guideline:
- Preparation: Protect the surrounding area with masking tape. Disconnect the negative battery terminal to prevent accidental electrical shorts. Carefully remove any interior trim panels that obstruct access to the rear quarter glass.
- Adhesive Cutting (If Applicable): If the glass is bonded with urethane adhesive, use the urethane cutting tool to carefully separate the glass from the body. Start at a corner and slowly work your way around the perimeter, keeping the blade close to the glass to avoid damaging the body panel. Use a heat gun sparingly to soften the adhesive if necessary.
- Mechanical Fastener Release (If Applicable): If the glass is held in place by clips or screws, carefully release them. Some clips may require specialized tools to disengage.
- Glass Removal: Using suction cups, carefully lift the glass pane away from the body. Have an assistant help if the glass is large or heavy.
- Seal Removal: Remove the old seal from the glass and the body aperture. If the seal is glued in place, use a razor blade or scraper to carefully detach it.
- Surface Preparation: Thoroughly clean the glass and the body aperture. Remove any remaining adhesive, sealant, or debris. Use a rust converter to treat any corrosion in the body aperture. Ensure the surfaces are completely dry before proceeding.
Installation and Adjustment
The installation process requires precision and attention to detail.
- Seal Installation: Install the new seal onto the glass pane. Ensure it is properly seated and aligned. Some seals may require adhesive to secure them to the glass.
- Primer Application: Apply urethane primer to the glass perimeter where the adhesive will be applied. Also, apply primer to the body aperture where the seal will make contact. Allow the primer to dry completely according to the manufacturer's instructions. Skipping this step can lead to premature adhesive failure.
- Adhesive Application: Using the sealant applicator gun, apply a continuous bead of urethane adhesive to the primed surface of the glass. Ensure the bead is of consistent thickness and height. Follow the adhesive manufacturer's recommendations for bead size and application technique.
- Glass Placement: Carefully position the glass pane into the body aperture. Align it properly and press it firmly into place. Ensure the seal is making good contact with the body panel.
- Mechanical Fastener Engagement (If Applicable): Reinstall any clips or screws that were removed during the removal process.
- Curing Time: Allow the urethane adhesive to cure completely according to the manufacturer's instructions. This can take several hours or even overnight. During this time, avoid moving or disturbing the glass. Use masking tape to secure the glass in place if necessary.
- Trim Reinstallation: Once the adhesive is fully cured, reinstall any interior trim panels that were removed.
Adjustment and Fine-Tuning
Even with careful installation, minor adjustments may be necessary to ensure a perfect seal and prevent leaks.
- Visual Inspection: Carefully inspect the seal around the entire perimeter of the glass. Look for gaps, bulges, or uneven compression.
- Water Test: Use a garden hose to spray water onto the glass and seal. Check for leaks inside the vehicle.
- Wind Noise Test: Drive the vehicle at highway speeds and listen for wind noise around the rear quarter glass.
If leaks or wind noise are detected, several adjustments can be made:
- Seal Repositioning: If the seal is not properly seated, carefully reposition it. Use a trim removal tool to gently pry the seal away from the body panel and then reseat it.
- Adhesive Reinforcement: If there are small gaps in the adhesive bead, apply additional urethane adhesive to fill them.
- Clip Adjustment: If the glass is held in place by clips, adjust the clips to increase or decrease the pressure on the seal.
In some cases, the body aperture itself may be slightly warped or distorted. This can make it difficult to achieve a perfect seal. In such cases, it may be necessary to consult with a professional body shop to have the aperture repaired.
Common Pitfalls and Troubleshooting
Several common pitfalls can hinder a successful rear quarter glass seal replacement:
- Using the Wrong Adhesive: Using an inappropriate adhesive can lead to poor adhesion, leaks, and premature failure. Always use an adhesive specifically designed for automotive glass.
- Insufficient Surface Preparation: Failing to properly clean and prime the glass and body aperture can also lead to poor adhesion.
- Rushing the Curing Process: Allowing the adhesive to cure completely is crucial. Prematurely driving the vehicle can weaken the bond and lead to leaks.
- Damaging the Paint: Using metal pry bars or aggressive solvents can damage the paint around the body aperture. Use plastic trim removal tools and mild cleaners.
- Ignoring Rust: Rust in the body aperture can compromise the seal and accelerate further corrosion. Address any rust before installing the new seal.
By understanding the system, using the correct tools and materials, and following a methodical approach, you can successfully replace your vehicle's rear quarter glass seal and restore its weather sealing and structural integrity. However, if you lack experience or are uncomfortable with any aspect of the procedure, it is always best to consult with a qualified automotive technician.