Rear Seat Delete Kit Structural And Weight Analysis
So, you're thinking about deleting your rear seats and installing a rear seat delete kit? That's a modification we see more and more often, especially amongst enthusiasts focused on performance and weight reduction. However, before you jump in, let's talk about the structural impact and weight savings involved. It’s not quite as simple as ripping out the seats and calling it a day. This article will walk you through the pros, cons, and considerations to help you make an informed decision.
Understanding the Rear Seat's Role
First, let's acknowledge what your rear seats are actually doing. While their primary purpose is passenger seating, they also contribute to the overall structural integrity of your car. Modern vehicles are designed with crumple zones to absorb impact in a collision. The rear seat structure, including the seatbacks and bracing, can be part of that system, providing additional support to the chassis.
Removing these seats, especially without proper reinforcement, can compromise the vehicle's rigidity. This might not be noticeable in everyday driving, but it can become apparent in situations like:
- High-speed cornering: You might experience increased body roll or a feeling of instability.
- Uneven road surfaces: The chassis might flex more, leading to creaks and groans.
- In the event of an accident: The rear of the vehicle could potentially crumple differently than designed, possibly affecting passenger safety.
That said, a well-designed rear seat delete kit can mitigate these risks. Let’s explore that further.
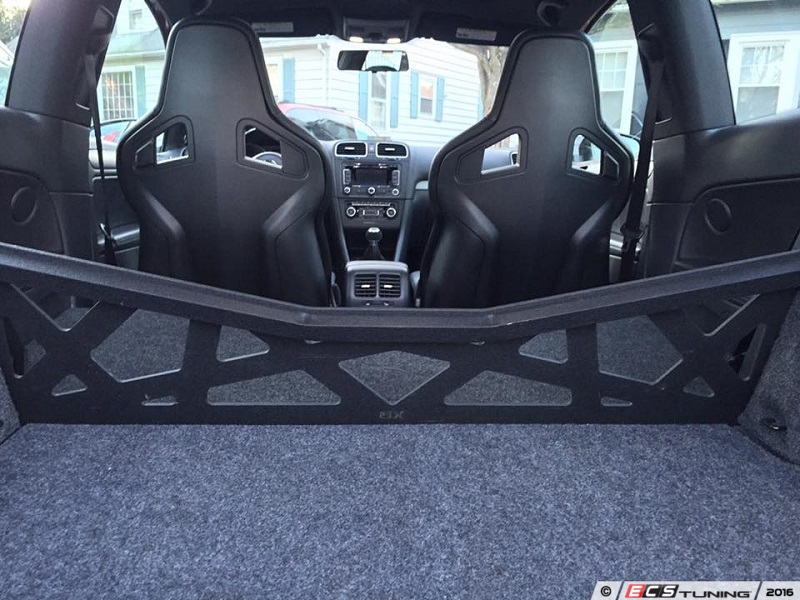
Rear Seat Delete Kits: More Than Just Carpet
A proper rear seat delete kit isn't just about covering up the exposed area after removing the seats. A good kit will typically include:
- A rigid floor panel: This replaces the support that the seat bases provided. Often made of plywood, aluminum, or composite materials.
- Structural bracing: Some kits include metal bars or supports that tie into existing mounting points, reinforcing the chassis and mimicking the rigidity of the original seats.
- Carpet or upholstery: For a clean and professional look.
- Mounting hardware: All necessary bolts, nuts, and brackets.
The quality of the kit is critical. A poorly designed or cheaply made kit can actually be worse than having no kit at all. It might add weight without providing any structural benefit.
Weight Savings: How Much Can You Really Expect?
The amount of weight you'll save depends heavily on the car model and the specific kit you choose. Generally, you can expect to shed anywhere from 30 to 70 pounds. While this might not sound like a huge amount, remember that every pound counts, especially when it comes to performance. Removing weight from the rear of the car can also improve weight distribution, leading to better handling.
To give you a rough idea, here's a breakdown:
- Typical rear seats: 50-100 lbs (depending on size and features)
- Rear seat delete kit: 20-40 lbs (depending on material and design)
So, the net weight savings is the difference between these two figures. For example, if your rear seats weigh 80 lbs and the kit weighs 30 lbs, you've saved 50 lbs.
Installation: DIY or Professional?
Installing a rear seat delete kit is usually a fairly straightforward process, but it's important to be comfortable working on your car. Here's a general outline of the steps involved:
- Remove the rear seats: This typically involves unbolting the seat bases and seatbacks. Refer to your vehicle's service manual for specific instructions.
- Remove any remaining brackets or hardware: Clean up the area to ensure a smooth surface for the kit.
- Install the floor panel: Align the panel and secure it using the provided hardware.
- Install any structural bracing: This is the most important step from a structural standpoint. Make sure the bracing is properly aligned and securely fastened.
- Install the carpet or upholstery: This is usually the final step, and involves gluing or attaching the carpet to the floor panel.
Tools you'll likely need:
- Socket set and wrenches
- Screwdrivers
- Torque wrench (to ensure proper tightening of bolts)
- Drill (for drilling pilot holes, if necessary)
- Pry bar (for removing stubborn components)
- Utility knife or scissors (for trimming carpet)
- Gloves and safety glasses
If you're not comfortable with any of these steps, it's best to have a professional install the kit. A qualified mechanic will have the experience and tools to ensure the kit is installed correctly and safely. Improper installation can compromise the structural integrity of the vehicle and potentially void your warranty.
Cost Considerations
The cost of a rear seat delete kit can vary significantly depending on the brand, quality, and materials used. Expect to pay anywhere from $200 to $1000 or more. Installation costs can also vary, but generally range from $100 to $300, depending on the complexity of the job and the hourly rate of the mechanic.
Here's a breakdown of the approximate costs:
- Rear seat delete kit: $200 - $1000+
- Professional installation: $100 - $300
So, the total cost can range from $300 to $1300 or more.
Important Considerations Before You Commit
Before you decide to delete your rear seats, consider the following:
- Legality: Check your local laws and regulations regarding vehicle modifications. Some jurisdictions may have restrictions on removing seats or altering the vehicle's structure.
- Resale value: Removing the rear seats can negatively impact the resale value of your car. It might be difficult to find a buyer who is interested in a vehicle with a rear seat delete.
- Practicality: Obviously, you'll lose the ability to carry passengers in the rear seats. Consider whether this is a significant inconvenience for you.
- Insurance: Inform your insurance company about the modification. They may need to adjust your coverage or premiums.
- Warranty: Removing the rear seats may void your vehicle's warranty, especially if it affects the structural integrity of the car.
Choosing the Right Kit
When selecting a rear seat delete kit, pay attention to the following factors:
- Material: Plywood, aluminum, and composite materials are all common choices. Aluminum is generally the strongest and lightest, but also the most expensive.
- Construction: Look for a kit with solid construction and high-quality hardware. The seams should be well-welded or securely fastened.
- Fit and finish: The kit should fit your car model perfectly and have a professional-looking finish.
- Reviews: Read online reviews from other users to get an idea of the kit's quality and performance.
- Brand reputation: Choose a reputable brand with a proven track record.
Some popular brands for rear seat delete kits include Hard Motorsport, VAC Motorsports, and various custom fabrication shops specializing in specific vehicle makes. Do your research and choose a kit that meets your needs and budget.
Alternatives to a Full Rear Seat Delete
If you're hesitant to completely remove your rear seats, consider these alternatives:
- Lightweight rear seats: Replace your stock seats with lighter aftermarket seats. This can save some weight without completely sacrificing the ability to carry passengers.
- Remove the seat bottoms only: This is a less extreme option that can save some weight and create more storage space.
- Fold down the rear seats: This is the simplest option, but it doesn't save any weight. However, it can provide more cargo space when needed.
In Conclusion
Deleting your rear seats can be a worthwhile modification for those seeking improved performance and weight reduction. However, it's important to understand the potential structural implications and choose a high-quality kit that addresses those concerns. Carefully weigh the pros and cons before making a decision, and consider consulting with a qualified mechanic to ensure the installation is done correctly and safely. Remember, doing it right is key to maintaining both performance and safety.