Rebuilding And Replacing The Power Steering Rack And Pinion In A 240sx
Power steering is a vital component in modern vehicles, providing assisted steering that makes driving easier and more comfortable. In vehicles like the Nissan 240SX, the power steering rack and pinion system is responsible for translating the steering wheel's rotation into the lateral movement of the wheels. Over time, this system can wear out, leading to leaks, play in the steering, and ultimately, the need for replacement or rebuild. This guide will walk you through the process of rebuilding or replacing the power steering rack and pinion in a 240SX, providing you with the information needed to decide which path is best for you and how to execute the chosen repair.
Understanding the 240SX Power Steering Rack and Pinion System
The power steering rack and pinion system in a 240SX consists of several key components:
- Rack and Pinion Housing: The main body that houses the internal components.
- Pinion Gear: Rotates based on the steering wheel's movement.
- Rack: A toothed bar that moves laterally, pushing or pulling the tie rod ends.
- Power Steering Fluid Lines: Carry hydraulic fluid to assist the steering.
- Seals and O-rings: Prevent fluid leaks.
When the system functions correctly, the driver's effort to turn the steering wheel is reduced by the hydraulic pressure supplied by the power steering pump. However, age, wear, and tear can lead to issues.
Signs Your 240SX Power Steering Rack Needs Attention
Recognizing the symptoms of a failing power steering rack is crucial for timely repairs. Common indicators include:
- Difficulty Steering: Increased effort required to turn the wheel.
- Steering Wheel Play: Excessive free movement in the steering wheel before the wheels respond.
- Power Steering Fluid Leaks: Visible leaks under the car, especially near the rack and pinion.
- Noises: Groaning, whining, or squealing sounds when turning the steering wheel.
- Uneven Tire Wear: Can indicate alignment issues caused by rack and pinion problems.
If you observe any of these symptoms, it's time to inspect your power steering system and consider either rebuilding or replacing the rack and pinion.
Rebuilding vs. Replacing: Which is Right for You?
Choosing between rebuilding and replacing the power steering rack is a significant decision. Here’s a breakdown to help you decide:
Rebuilding the Rack and Pinion
Rebuilding involves disassembling the existing rack, cleaning all components, replacing worn seals and O-rings, and reassembling the unit. This option can be cost-effective if the main components (rack and pinion gear) are in good condition.
Pros:
- Potentially lower cost than replacement.
- Maintains the original rack housing (if desired for originality).
Cons:
- Requires specialized tools and knowledge.
- Time-consuming process.
- May not address internal wear beyond seals.
- Finding a rebuild kit for the 240sx can be challenging, and often requires sourcing individual components.
Replacing the Rack and Pinion
Replacement involves removing the old rack and installing a new or remanufactured unit. Remanufactured units are rebuilt by professionals and often come with a warranty.
Pros:
- Faster and easier installation.
- Guaranteed performance with a new or remanufactured unit.
- Removes the uncertainty of internal wear.
Cons:
- Higher initial cost.
Recommendation: For most DIYers, replacing the rack and pinion with a remanufactured unit is the recommended option. The added cost is often justified by the ease of installation and the assurance of a fully functioning system.
Tools and Materials Needed
Before starting the job, gather all the necessary tools and materials:
- New or Remanufactured Power Steering Rack and Pinion (240SX specific)
- Power Steering Fluid (correct type for 240SX – check your owner’s manual)
- Jack and Jack Stands
- Wheel Chocks
- Socket Set (metric)
- Wrench Set (metric)
- Torque Wrench
- Flare Nut Wrenches (for power steering lines)
- Pliers
- Screwdrivers (various sizes)
- Hammer
- Pick Set
- Drain Pan
- Shop Rags or Paper Towels
- Penetrating Oil
- Alignment Tool (optional, but recommended)
Step-by-Step Guide to Replacing the 240SX Power Steering Rack and Pinion
Safety First: Always prioritize safety. Wear safety glasses and gloves. Work in a well-ventilated area, and make sure the vehicle is properly supported on jack stands.
- Prepare the Vehicle:
- Park the 240SX on a level surface.
- Engage the parking brake and use wheel chocks for added safety.
- Loosen the lug nuts on the front wheels.
- Jack up the front of the vehicle and securely support it with jack stands.
- Remove the front wheels.
- Disconnect the Battery:
- Disconnect the negative battery terminal to prevent electrical shorts.
- Drain the Power Steering Fluid:
- Locate the power steering reservoir.
- Use a siphon or turkey baster to remove as much fluid as possible.
- Disconnect the return line from the reservoir and direct it into a drain pan.
- Start the engine briefly (for no more than 5-10 seconds) to pump out any remaining fluid. *Do not run the engine for an extended period without power steering fluid.*
- Disconnect the Power Steering Lines:
- Use flare nut wrenches to disconnect the high-pressure and return lines from the rack and pinion.
- Be prepared for some fluid spillage. Have shop rags ready.
- Plug the lines and the rack openings to prevent contamination.
- Remove the Steering Shaft Connection:
- Locate the U-joint connecting the steering shaft to the pinion gear.
- Loosen the pinch bolt(s) securing the U-joint.
- Use penetrating oil if necessary to loosen the connection.
- Carefully slide the U-joint off the pinion gear.
- Disconnect the Tie Rod Ends:
- Loosen the jam nuts on the tie rod ends.
- Use a tie rod end puller or a hammer to separate the tie rod ends from the steering knuckles. Be careful not to damage the tie rod ends or the steering knuckles.
- Alternatively, you can measure the distance from the tie rod end to the jam nut and then unscrew the tie rod end from the old rack. This will allow you to install it on the new rack in the same position, which will help maintain your alignment.
- Remove the Rack and Pinion Mounting Bolts:
- Locate the mounting bolts that secure the rack and pinion to the chassis.
- Remove the bolts, supporting the rack as you remove the last bolt.
- Carefully maneuver the rack and pinion out of the vehicle.
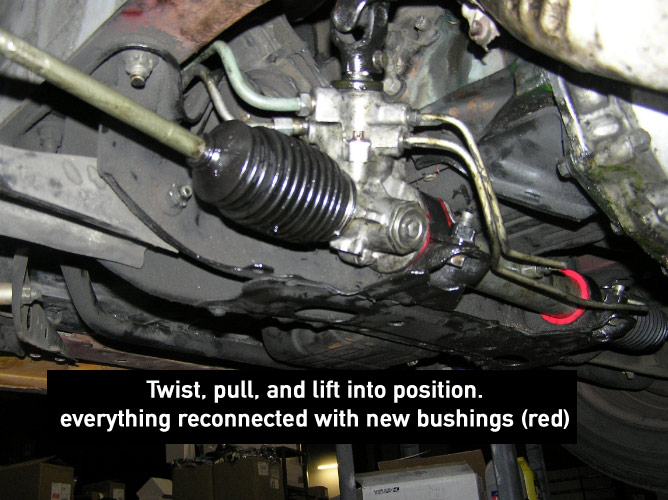
- Install the New Rack and Pinion:
- Position the new rack and pinion in place.
- Install the mounting bolts and torque them to the manufacturer’s specifications.
- Reconnect the Tie Rod Ends:
- If you didn’t remove the tie rod ends from the old rack, reconnect them to the new rack. If you used the measurement method, install the tie rod ends to the same position as they were on the old rack.
- If you removed the tie rod ends from the steering knuckles, install them and torque the nuts to the manufacturer's specifications.
- Tighten the jam nuts.
- Reconnect the Steering Shaft:
- Slide the U-joint back onto the pinion gear.
- Align the marks on the steering shaft and pinion gear.
- Tighten the pinch bolt(s) to the manufacturer’s specifications.
- Reconnect the Power Steering Lines:
- Reconnect the high-pressure and return lines to the rack and pinion.
- Tighten the flare nuts securely, but be careful not to overtighten.
- Refill the Power Steering Fluid:
- Fill the power steering reservoir with the correct type of fluid.
- Bleed the Power Steering System:
- With the front wheels off the ground, slowly turn the steering wheel from lock to lock several times.
- Check the fluid level and add more if needed.
- Repeat the process until the fluid level stabilizes and there are no air bubbles.
- Reinstall the Wheels:
- Reinstall the front wheels.
- Lower the vehicle to the ground.
- Torque the lug nuts to the manufacturer’s specifications.
- Test Drive and Alignment:
- Take the 240SX for a test drive.
- Check for any leaks or unusual noises.
- Have the vehicle's alignment checked by a professional. A proper alignment is crucial after replacing the power steering rack and pinion.
Tips for a Smooth Installation
- Penetrating Oil: Apply penetrating oil to rusted bolts and fittings well in advance to ease removal.
- Organization: Keep all removed parts organized to ensure easy reassembly.
- Torque Specifications: Always use a torque wrench and adhere to the manufacturer's torque specifications.
- Cleanliness: Keep the work area clean to prevent contamination of the power steering system.
- Professional Help: If you are uncomfortable with any part of the process, seek assistance from a qualified mechanic.
Conclusion
Rebuilding or replacing the power steering rack and pinion in a 240SX can significantly improve the vehicle's handling and driving experience. While rebuilding can be a cost-effective option for experienced mechanics, replacing the rack with a remanufactured unit is generally the better choice for most DIYers. By following this guide and taking your time, you can successfully complete the repair and restore the power steering performance of your 240SX. Remember to always prioritize safety and consult with a professional if needed. A properly functioning power steering system is critical for both safety and enjoyment on the road.