Removal, Cleaning, And Reinstallation Of The S13 Fuel Tank
If you're tackling a fuel system project on your Nissan S13 (1989-1994 240SX), chances are you'll need to remove, clean, and potentially reinstall the fuel tank. This guide provides a comprehensive overview of the process, helping you complete the task safely and effectively. Working with fuel systems requires caution, so prioritize safety throughout.
Safety First: Important Precautions
Before starting any work on your S13's fuel system, understanding and adhering to safety precautions is paramount. Fuel is highly flammable, and improper handling can lead to serious injury or property damage.
- Disconnect the Battery: Always disconnect the negative battery terminal before working on any electrical components, including the fuel pump. This prevents accidental sparks.
- Work in a Well-Ventilated Area: Fuel vapors are heavier than air and can accumulate in enclosed spaces, creating an explosive atmosphere. Work outdoors or in a garage with excellent ventilation. Open doors and windows.
- No Smoking or Open Flames: Keep all sources of ignition, including cigarettes, open flames, and sparks, away from the work area.
- Use Appropriate Tools: Use tools specifically designed for automotive work, and ensure they are in good condition. Avoid using tools that could create sparks.
- Wear Safety Glasses and Gloves: Protect your eyes and skin from fuel and debris. Safety glasses and fuel-resistant gloves are essential.
- Have a Fire Extinguisher Nearby: Keep a Class B fire extinguisher (suitable for flammable liquids) within easy reach. Know how to use it.
- Dispose of Fuel Properly: Do not pour fuel down drains or onto the ground. Dispose of it properly at a designated hazardous waste collection facility.
Tools and Materials You'll Need
Gather these tools and materials before you begin the fuel tank removal process. Having everything on hand will make the job smoother and more efficient.
- Jack and Jack Stands: To safely lift and support the vehicle.
- Wheel Chocks: To prevent the vehicle from rolling.
- Socket Set and Wrenches: Metric sockets and wrenches for removing bolts and fittings.
- Screwdrivers: Assorted screwdrivers (Phillips and flathead).
- Pliers: For hose clamps and other connections.
- Fuel Line Disconnect Tool: Essential for safely disconnecting fuel lines without damaging them. Specific tools may be required depending on the type of fuel line fittings.
- Drain Pan: To catch spilled fuel. A large drain pan is preferable.
- Empty Fuel Can: For storing the fuel drained from the tank. Make sure it's a properly sealed fuel container.
- Shop Rags or Absorbent Pads: To clean up spills.
- Wire Brush: For cleaning rust and debris.
- Penetrating Oil: To loosen corroded bolts.
- New Fuel Filter (Optional): A good time to replace the fuel filter.
- New Fuel Lines and Clamps (Optional): Replace any damaged or worn fuel lines.
- Rust Inhibitor/Paint (Optional): To treat any rust on the fuel tank or surrounding area.
- Cleaning Solution: For cleaning the fuel tank (see cleaning section below).
- Safety Glasses
- Fuel-Resistant Gloves
Step-by-Step Fuel Tank Removal
Follow these steps carefully to remove the fuel tank from your S13.
- Prepare the Vehicle: Park the vehicle on a level surface, engage the parking brake, and chock the rear wheels.
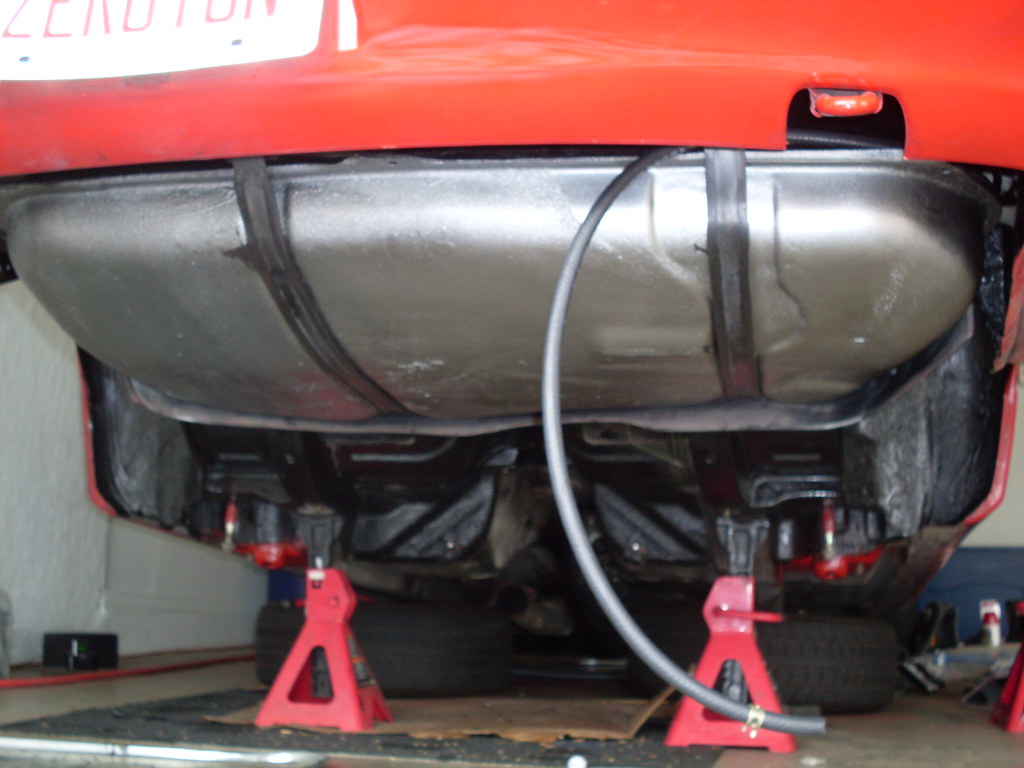
- Raise the Vehicle: Use a jack to lift the rear of the vehicle and securely support it with jack stands. Never work under a vehicle supported only by a jack.
- Depressurize the Fuel System: The fuel system needs to be depressurized. The best way is to locate the fuel pump relay (consult your S13 service manual for location). Remove the fuel pump relay, start the engine, and let it run until it stalls. This will remove most of the fuel pressure. Caution: This may take several attempts, and you might need to crank the engine longer than usual.
- Drain the Fuel Tank: This is a critical step. There are a couple of options:
- Siphon Method: Use a siphon hose to drain the fuel into a suitable container. This method is slower but avoids removing any fuel lines initially.
- Fuel Pump Access: Locate the fuel pump access panel inside the trunk (usually under the carpet). Disconnect the fuel pump wiring harness and the fuel lines connected to the pump. Attach a hose to the fuel outlet and drain the fuel into a container. Be prepared for some spillage.
- Disconnect Fuel Lines: Using the fuel line disconnect tool, carefully disconnect the fuel lines from the fuel tank. There will be at least two: a supply line and a return line. Be extremely cautious as there will likely be residual fuel in the lines. Have rags ready to catch any spills. Label the lines to ensure correct reinstallation.
- Disconnect the Fuel Filler Neck: Loosen the clamp that secures the fuel filler neck to the fuel tank. Carefully remove the filler neck.
- Disconnect the Vent Hoses: Locate and disconnect any vent hoses connected to the fuel tank. These hoses help regulate pressure within the tank.
- Remove the Fuel Tank Straps: The fuel tank is held in place by straps. Loosen and remove the bolts that secure the straps. You may need to use penetrating oil if the bolts are corroded. Support the fuel tank while removing the straps to prevent it from falling.
- Lower the Fuel Tank: Carefully lower the fuel tank to the ground. You may need a helper for this step, as the tank can be heavy.
Cleaning the Fuel Tank
Once the fuel tank is removed, cleaning it is crucial to remove any contaminants that could damage your fuel system. Before you start the cleaning process, make sure the tank is completely empty of fuel and properly ventilated.
- Rinse the Tank: Rinse the inside of the tank with clean water to remove any loose debris.
- Choose a Cleaning Solution: Several cleaning solutions are suitable for fuel tanks:
- Commercial Fuel Tank Cleaner: These are specifically formulated to remove rust, varnish, and other contaminants from fuel tanks. Follow the manufacturer's instructions carefully.
- Mixture of Hot Water and Dish Soap: A mild solution can be effective for removing light deposits.
- Citric Acid Solution: A diluted citric acid solution can help remove rust.
- Fill the Tank with the Cleaning Solution: Fill the tank with the chosen cleaning solution and let it soak for several hours or overnight. Agitate the tank periodically to help loosen deposits.
- Rinse Thoroughly: After soaking, drain the cleaning solution and rinse the tank thoroughly with clean water until all traces of the cleaning solution are gone.
- Dry the Tank: Allow the tank to air dry completely. You can use a fan to speed up the drying process. Make sure there's no moisture left inside, as this can cause rust.
- Inspect for Rust: Inspect the inside of the tank for rust. If rust is present, you may need to use a rust remover or consider having the tank professionally cleaned and sealed.
Reinstalling the Fuel Tank
Reinstallation is essentially the reverse of the removal process. Pay close attention to these steps to ensure a secure and leak-free installation.
- Inspect the Fuel Tank: Before reinstalling the tank, inspect it for any damage, such as dents or cracks. Repair or replace the tank as needed.
- Clean the Mounting Area: Clean the area where the fuel tank mounts to remove any dirt or debris.
- Position the Fuel Tank: Carefully lift the fuel tank into position. Again, a helper is recommended.
- Install the Fuel Tank Straps: Secure the fuel tank with the straps. Tighten the bolts to the manufacturer's specified torque. Don't overtighten, as this could damage the tank.
- Reconnect the Fuel Filler Neck: Reattach the fuel filler neck and tighten the clamp securely.
- Reconnect the Vent Hoses: Reconnect all vent hoses to the fuel tank.
- Reconnect the Fuel Lines: Reconnect the fuel lines to the fuel tank, ensuring they are properly seated and secured with the fuel line disconnect tool. Double-check that the lines are connected to the correct ports.
- Reconnect the Fuel Pump: If you disconnected the fuel pump wiring harness, reconnect it now.
- Lower the Vehicle: Carefully lower the vehicle to the ground.
- Refill the Fuel Tank: Add a small amount of fuel to the tank.
- Check for Leaks: Start the engine and carefully inspect all fuel lines and connections for leaks. If you find any leaks, shut off the engine immediately and tighten the connections.
- Top Off the Fuel Tank: Once you are confident that there are no leaks, fill the fuel tank completely.
Troubleshooting Tips
Here are some common issues you might encounter and how to address them:
- Stuck Fuel Line Fittings: Use penetrating oil and the correct fuel line disconnect tool. Be patient and avoid forcing the fittings, as this can damage them.
- Corroded Bolts: Apply penetrating oil and allow it to soak for several hours before attempting to remove the bolts. If necessary, use a breaker bar or impact wrench.
- Fuel Leaks: Check all fuel lines, connections, and the fuel tank itself for leaks. Tighten connections, replace damaged fuel lines, or repair the fuel tank as needed.
- Fuel Pump Not Working: Check the fuel pump fuse and relay. If they are good, test the fuel pump for power and ground. If the pump is not receiving power, check the wiring harness for damage. If the pump is receiving power but not working, it may need to be replaced.
Conclusion
Removing, cleaning, and reinstalling the fuel tank on your S13 can be a challenging but rewarding project. By following these steps and taking the necessary safety precautions, you can ensure a successful outcome and keep your S13 running smoothly. Remember to consult your S13 service manual for specific instructions and torque specifications for your vehicle.