Repair Procedure For The Nissan 240sx Power Window Amplifier
Repair Procedure For The Nissan 240SX Power Window Amplifier
The Nissan 240SX, a beloved sports coupe, is known for its sleek design and engaging driving experience. However, like any vehicle of its age, certain components are prone to failure. One such component is the power window amplifier. This amplifier plays a crucial role in controlling the power windows, and when it malfunctions, it can lead to frustrating issues such as windows that are slow to move, intermittent operation, or complete failure.
This article provides a comprehensive guide to repairing the power window amplifier in your Nissan 240SX. We'll cover identifying symptoms of a faulty amplifier, troubleshooting techniques, and a step-by-step repair procedure. Before attempting any repair, it is crucial to disconnect the negative battery terminal for safety.
Identifying a Faulty Power Window Amplifier
Recognizing the symptoms of a failing power window amplifier is the first step in diagnosing the problem. Common signs include:
- Slow window operation: The windows move noticeably slower than usual, struggling to go up or down.
- Intermittent window operation: The windows work sometimes but not others, with no apparent pattern.
- Complete window failure: The windows don't move at all, regardless of switch position.
- Clicking sound from the amplifier: You may hear a clicking sound originating from the amplifier when attempting to operate the windows.
- Dimming headlights when operating the windows: This indicates a significant draw on the electrical system, potentially due to a faulty amplifier.
It's important to note that these symptoms can also be caused by other issues, such as faulty window motors, wiring problems, or a bad window switch. Thorough troubleshooting is essential to pinpoint the root cause.
Troubleshooting the Power Window System
Before diving into amplifier repair, perform these troubleshooting steps to rule out other potential problems:
1. Check the Window Switches
The window switches are the most frequently used component in the system and are susceptible to wear and tear. Use a multimeter to test the continuity of the switches in both the up and down positions. Replace any switches that show no continuity or intermittent connection.
2. Inspect the Wiring
Carefully inspect the wiring harness leading to the window motor and the amplifier. Look for any signs of damage, such as frayed wires, cracked insulation, or loose connections. Pay particular attention to the wiring in the door jamb, as this area is subject to frequent bending and flexing. Use a multimeter to check for voltage at the window motor when the switch is activated.
3. Test the Window Motor
If the switch and wiring appear to be in good condition, the window motor may be the culprit. You can directly test the window motor by applying 12 volts directly to its terminals. If the motor does not respond, it needs to be replaced.
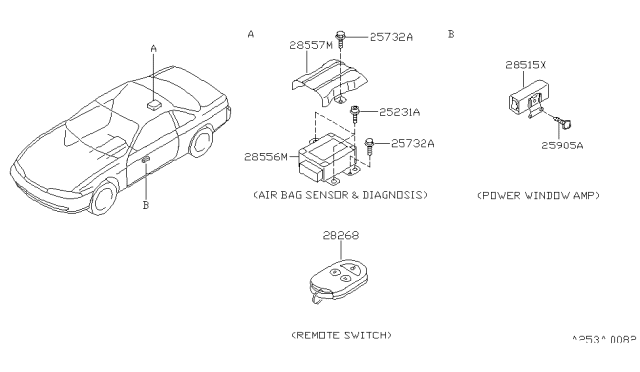
4. Locate the Power Window Amplifier
The power window amplifier is typically located under the driver's side dash, near the fuse box. Consult your vehicle's repair manual for the exact location. Once located, visually inspect the amplifier for any signs of damage, such as burnt components or corrosion.
Repair Procedure for the Power Window Amplifier
Warning: Repairing electronic components requires a degree of technical skill and experience. If you are not comfortable working with electronics, it is best to seek the assistance of a qualified technician.
Disclaimer: This procedure is provided for informational purposes only. The author and publisher are not responsible for any damages or injuries that may result from following these instructions.
Tools and Materials Required:
- Soldering iron
- Solder
- Desoldering pump or wick
- Multimeter
- Screwdrivers
- Pliers
- Replacement components (capacitors, resistors, etc.) - identified through visual inspection and component testing.
- Safety glasses
- Repair manual/schematic for your 240SX (highly recommended)
Step-by-Step Repair Guide:
1. Disconnect the Battery
Disconnect the negative battery terminal to prevent electrical shock and damage to the vehicle's electrical system.
2. Remove the Amplifier
Carefully disconnect the wiring harness from the power window amplifier. Remove any screws or fasteners holding the amplifier in place and remove it from the vehicle.
3. Open the Amplifier Housing
The amplifier is typically housed in a plastic or metal case. Carefully open the case, taking care not to damage any internal components.
4. Visually Inspect the Circuit Board
Thoroughly inspect the circuit board for any signs of damage, such as burnt components, cracked solder joints, or corrosion. Pay close attention to the capacitors, resistors, and transistors.
5. Identify and Replace Faulty Components
Based on your visual inspection and component testing with a multimeter, identify any faulty components. Use a soldering iron and desoldering pump or wick to remove the faulty components. Install the new components, ensuring proper polarity and orientation.
Important Note: Common failure points in these amplifiers often include electrolytic capacitors. These can dry out and lose capacitance over time, leading to erratic window operation. Replacing these capacitors can often restore functionality. Carefully note the polarity of the capacitors before removal and ensure the replacements are installed with the correct orientation.
6. Resolder Any Cracked Joints
Inspect all solder joints on the circuit board and resolder any that appear cracked or weak. This can improve the reliability of the amplifier.
7. Clean the Circuit Board
Use a circuit board cleaner to remove any dirt, dust, or flux residue from the circuit board.
8. Reassemble the Amplifier
Carefully reassemble the amplifier housing, ensuring that all components are properly seated.
9. Reinstall the Amplifier
Reinstall the amplifier in the vehicle, connecting the wiring harness and securing it with screws or fasteners.
10. Reconnect the Battery
Reconnect the negative battery terminal.
11. Test the Power Windows
Test the power windows to ensure that they are functioning properly. If the windows still do not work, further troubleshooting may be necessary.
Preventative Maintenance
To prolong the life of your 240SX's power window amplifier, consider these preventative measures:
- Avoid overloading the system: Do not hold the window switch in the up or down position after the window has reached its full travel.
- Keep the window tracks clean and lubricated: This reduces the strain on the window motor and amplifier.
- Inspect the wiring regularly: Check for any signs of damage or wear.
Alternative Solutions
If you are unable to repair the power window amplifier yourself, consider these alternative solutions:
- Purchase a refurbished amplifier: Refurbished amplifiers are often available at a lower cost than new ones.
- Replace with a new amplifier: This is the most reliable solution, but it can also be the most expensive.
- Consult a qualified technician: A qualified technician can diagnose and repair the power window system for you.
By following these steps, you can diagnose and repair the power window amplifier in your Nissan 240SX, restoring functionality and ensuring smooth window operation. Remember to always prioritize safety and consult a professional if you are unsure about any aspect of the repair process. Properly diagnosing the issue is key to not spending unnecessary time and money on parts that won't fix the issue.