Replacement Of The S13 Pop-up Headlight Shroud/bezel
Alright, let's talk about replacing those sometimes brittle, often faded, and occasionally completely missing pop-up headlight shrouds (or bezels) on your S13. This is a fairly straightforward job, but there are a few nuances that, if ignored, can lead to frustration and potentially damage. We'll break it down step-by-step, assuming you have basic hand tools and a reasonable comfort level working on your car.
Understanding the Components
Before we dive in, let's clarify what we're dealing with. The headlight shroud, also known as the bezel, is the cosmetic trim piece that surrounds the headlight lens when it's in the up position. It's typically made of plastic and is attached to the headlight assembly. Its primary function is aesthetic, providing a clean and finished look. Over time, these shrouds can become brittle due to UV exposure and general wear and tear, leading to cracks, discoloration, or even complete disintegration. This can detract from the overall appearance of your S13. Sometimes, the mounting points themselves on the shroud can break, necessitating a replacement.
The headlight assembly itself is the entire mechanism, including the motor, linkage, and the actual headlight unit. While we're primarily focused on the shroud, accessing it requires interacting with the assembly, so it's good to have a basic understanding of its components.
Tools and Materials Needed
Gathering your tools before you start will save you time and frustration. Here's what you'll need:
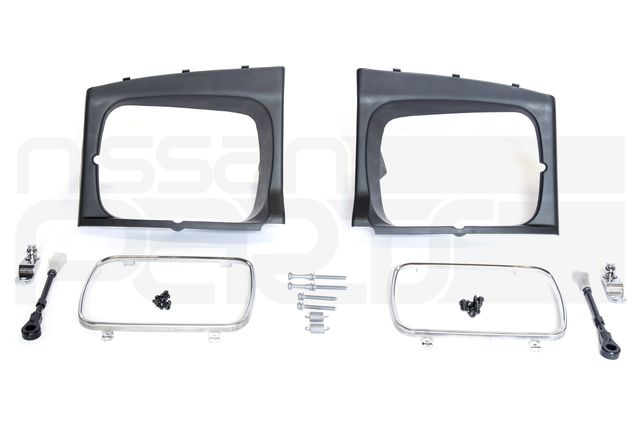
- New headlight shroud/bezel (left and right side if replacing both): Ensure you purchase the correct part for your year and model S13. There can be slight variations, so double-check before ordering.
- Socket set with extensions: Metric sizes, specifically a 10mm and 12mm socket are most often used.
- Wrench set: Again, metric sizes. Having a set will be helpful for accessing hard to reach bolts.
- Screwdriver set: Both Phillips head and flathead. The size will vary depending on any additional fasteners involved (like aftermarket modifications).
- Panel removal tool (optional but recommended): These plastic tools help to avoid scratching the paint when removing trim pieces.
- Pliers: For disconnecting electrical connectors.
- Penetrating oil (e.g., PB Blaster): Helpful for loosening corroded bolts.
- Shop towels: To wipe up any spills and keep things clean.
- Work light: Adequate lighting is essential for seeing what you're doing.
- Safety glasses: Always protect your eyes.
- Gloves: To protect your hands from grease and grime.
Step-by-Step Removal and Installation
Now, let's get down to the nitty-gritty. Follow these steps carefully:
Step 1: Disconnect the Battery
This is a crucial safety step. Disconnect the negative (-) terminal of your battery to prevent any accidental electrical shorts or shocks.
Step 2: Raise the Headlight Assembly
You'll need the headlight assembly in the "up" position to access the shroud. If the headlight motor is functional, turn on the headlights. If the motor is not functioning, you'll need to manually raise the assembly. Locate the manual crank (typically a small knob or slot on the back of the headlight assembly) and use a screwdriver or wrench to manually raise the headlight.
Step 3: Access the Mounting Bolts
The location and number of mounting bolts can vary slightly depending on the specific S13 model and any aftermarket modifications. However, you'll typically find bolts along the top and sides of the headlight assembly that secure it to the car's body. You might need to remove some surrounding trim pieces to gain access. Use your panel removal tool to carefully pry off any necessary trim. Remember to take your time and be gentle to avoid breaking any clips or damaging the paint.
Step 4: Disconnect Electrical Connectors
Before completely removing the headlight assembly, disconnect any electrical connectors attached to it. This includes the headlight bulb connector and the headlight motor connector. Be careful not to pull on the wires themselves. Instead, grasp the connector housing and gently pull it apart. If the connector is stubborn, try wiggling it back and forth while pulling. Sometimes, a small amount of dielectric grease on the connector pins can help with future connections.
Step 5: Remove the Headlight Assembly
With the mounting bolts removed and the electrical connectors disconnected, carefully remove the entire headlight assembly from the car. This might require some gentle maneuvering to clear any obstructions. Place the assembly on a clean, stable surface.
Step 6: Remove the Old Shroud/Bezel
Now comes the heart of the operation: removing the old shroud. The shroud is typically attached to the headlight assembly with screws or clips. Carefully inspect the shroud to identify the fastening method. If it's screws, use a screwdriver to remove them. If it's clips, use a flathead screwdriver or a panel removal tool to gently pry them loose. Be very careful during this step, especially if the plastic is brittle. Apply penetrating oil to screws that are resistant to turning.
Pay close attention to the orientation of the old shroud as you remove it. Take photos if necessary, so you know how the new one should be installed.
Step 7: Install the New Shroud/Bezel
With the old shroud removed, it's time to install the new one. Align the new shroud with the mounting points on the headlight assembly. Secure it using the same screws or clips that were used to attach the old shroud. Make sure the shroud is securely fastened and that there are no gaps or loose areas. Don't overtighten the screws, as this can damage the plastic.
Step 8: Reinstall the Headlight Assembly
Carefully reinstall the headlight assembly back into the car. Reconnect all the electrical connectors. Align the assembly with the mounting holes and reinstall the mounting bolts. Tighten the bolts securely, but don't overtighten them. Ensure that the headlight assembly is properly aligned before fully tightening the bolts. Double-check that all connectors are seated and locked in place.
Step 9: Test the Headlight Operation
Reconnect the battery. Turn on the headlights to ensure that they are working properly. Check that the headlight motor is functioning correctly and that the headlights raise and lower smoothly. Adjust the headlight aim if necessary.
Step 10: Reinstall Trim Pieces
Reinstall any trim pieces that you removed to access the headlight assembly. Make sure all clips are properly seated and that the trim pieces are securely fastened.
Troubleshooting
Even with careful planning, you might encounter some snags. Here are a few common issues and their solutions:
- Stripped screws: If you strip a screw head, try using a rubber band or a piece of steel wool between the screwdriver and the screw head to get a better grip. If that doesn't work, you may need to use a screw extractor.
- Broken clips: If you break a clip, you can often purchase replacement clips at an auto parts store.
- Headlight motor not working: If the headlight motor is not working, check the fuses. If the fuses are good, the motor itself may be faulty and need to be replaced.
- Shroud not fitting properly: Double-check that you have the correct shroud for your year and model S13. If the shroud is slightly off, you may be able to gently file or sand it down to achieve a better fit.
Additional Tips
- Take photos throughout the process: This will help you remember how everything goes back together.
- Work in a well-lit area: This will make it easier to see what you're doing.
- Don't rush: Take your time and be careful to avoid damaging anything.
- Consult a repair manual: A repair manual specific to your S13 can provide detailed instructions and diagrams.
- Apply dielectric grease: Coat the electrical connectors with dielectric grease to prevent corrosion and ensure a good connection.
Replacing your S13's headlight shrouds is a satisfying way to improve the car's appearance. By following these steps and taking your time, you can achieve professional-looking results. Good luck!