Rocket Bunny 240sx V2 Boss Kit: Installation Guide
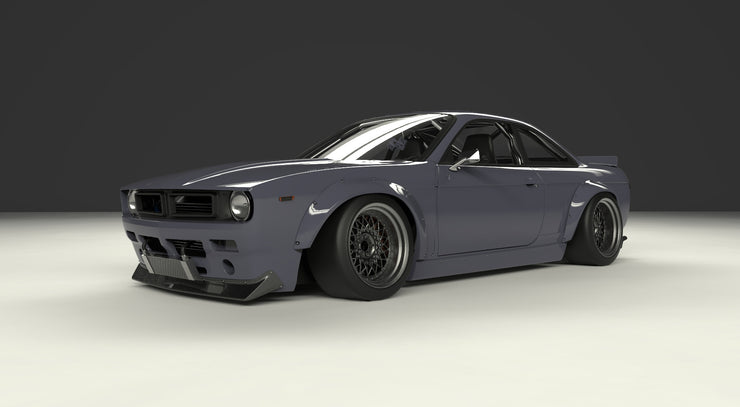
The Rocket Bunny 240SX V2 Boss kit is a highly sought-after aftermarket modification that transforms the iconic Nissan 240SX (S13) into a wide-bodied, aggressively styled showstopper. This kit, known for its distinctive bolt-on fender flares, front and rear bumpers, and iconic ducktail spoiler, requires careful installation to achieve the desired aesthetic and ensure proper fitment. This guide provides a detailed overview of the installation process, offering insights and tips to help you navigate the project successfully.
Understanding the Rocket Bunny 240SX V2 Boss Kit
Before diving into the installation, it’s crucial to understand what the kit entails. Typically, a complete Rocket Bunny 240SX V2 Boss kit includes:
- Front Bumper
- Front Over-Fenders
- Rear Over-Fenders
- Side Skirts
- Rear Ducktail Spoiler
- Mounting Hardware (screws, bolts, rivets)
- Optional: Canards, Diffusers, and other accessories
Keep in mind that the kit usually comes unpainted and may require trimming, sanding, and other preparation before installation. Professional installation is highly recommended, but if you're experienced with bodywork and have the necessary tools, you can tackle this project yourself. Improper installation can lead to fitment issues, damage to your vehicle, or an unsatisfactory final result.
Tools and Materials Required
Having the right tools and materials readily available will streamline the installation process. Here’s a comprehensive list:
- Socket Set
- Wrench Set
- Screwdrivers (Phillips and Flathead)
- Drill with various drill bits
- Riveter (for installing rivets)
- Sander (electric or manual)
- Body Filler (Bondo or similar)
- Sandpaper (various grits – 80, 120, 220, 400)
- Masking Tape
- Primer
- Paint (matching your vehicle's color or desired custom color)
- Clear Coat
- Cutting Tools (Dremel, rotary tool, or cutting wheel)
- Measuring Tape
- Pencil or Marker
- Safety Glasses
- Gloves
- Respirator or Mask (for sanding and painting)
- Jack and Jack Stands
- Wheel Chocks
- Grinder (for minor metal trimming, if needed)
Step-by-Step Installation Guide
1. Preparation and Disassembly
Safety First! Before starting, ensure your 240SX is parked on a level surface, the parking brake is engaged, and the wheels are chocked. Disconnect the negative battery terminal to prevent any electrical issues.
Begin by removing the existing body panels that will be replaced by the Rocket Bunny kit components. This includes the front and rear bumpers, side skirts, and any other relevant trim. Carefully disconnect any wiring harnesses or sensors attached to these panels, labeling them clearly for reinstallation later. Taking photos during disassembly is highly recommended for reference.
2. Test Fitting
This is a crucial step often overlooked. Before any cutting or permanent modifications, test fit each Rocket Bunny component. This allows you to identify any areas that require trimming or adjustment. Hold the over-fenders in place, aligning them with the existing body lines. Use masking tape to secure them temporarily. Check for any gaps or interference. Make notes of where trimming is needed. Pay close attention to wheel clearance; the widebody kit is designed to accommodate wider wheels and tires.
3. Trimming and Modification
Based on your test fitting, carefully trim the Rocket Bunny components as needed. Use a Dremel, rotary tool, or cutting wheel to make precise cuts. Remember to err on the side of caution; you can always remove more material, but you can't add it back. After trimming, smooth the edges with sandpaper to prevent sharp edges and ensure a clean fit.
In some cases, you may need to trim the 240SX's existing fenders to accommodate the over-fenders. This is a permanent modification, so measure carefully and cut conservatively. Use a grinder to remove the excess material, leaving enough of the original fender for structural support and for securing the over-fenders.
4. Mounting the Over-Fenders
With the over-fenders trimmed and fitted, it's time to mount them securely. The Rocket Bunny kit typically uses rivets and screws for attachment. Align the over-fenders with the existing body lines and mark the locations for the rivet holes. Drill pilot holes through the over-fenders and the 240SX's body panels. Install the rivets using a riveter. Use screws in areas where rivets are not practical or where additional strength is needed.
Ensure the rivets are properly seated to prevent water intrusion and rust. You can use seam sealer along the edges of the over-fenders to further protect against the elements.
5. Installing the Bumpers and Side Skirts
The front and rear bumpers are typically attached using screws, bolts, and mounting brackets. Align the bumpers with the front and rear of the 240SX and secure them using the provided hardware. The side skirts are usually attached to the rocker panels using screws and rivets. Ensure the side skirts are properly aligned with the over-fenders and bumpers for a cohesive look.
6. Installing the Ducktail Spoiler
The ducktail spoiler is a defining feature of the Rocket Bunny V2 Boss kit. Position the spoiler on the trunk lid and mark the locations for the mounting holes. Drill pilot holes and secure the spoiler using bolts and washers. Consider using adhesive sealant under the spoiler to prevent leaks and provide additional stability.
7. Bodywork and Finishing
After all the components are mounted, it's time to address any imperfections in the bodywork. Use body filler to fill any gaps or seams between the Rocket Bunny components and the 240SX's body panels. Sand the body filler smooth using progressively finer grits of sandpaper. Mask off any areas that you don't want to paint.
8. Painting
Apply several coats of primer to the entire body kit, sanding between each coat. This will create a smooth and uniform surface for the paint. Apply several coats of paint, allowing each coat to dry thoroughly before applying the next. Finally, apply several coats of clear coat to protect the paint and give it a glossy finish. Wet sand the clear coat with a fine grit sandpaper (2000-3000 grit) and then polish for the best possible shine.
9. Reassembly
Once the paint has dried completely, carefully reassemble any components that were removed during the installation process, such as headlights, taillights, and trim pieces. Reconnect any wiring harnesses or sensors that were disconnected during disassembly. Reinstall the wheels and tires. Double-check all connections and fasteners to ensure everything is secure.
Tips and Considerations
- Professional Installation: If you're not comfortable with bodywork and painting, consider hiring a professional to install the Rocket Bunny kit. This will ensure a high-quality result and prevent any potential damage to your vehicle.
- Wheel and Tire Fitment: The Rocket Bunny kit significantly widens the 240SX's track width. You'll need to choose wheels and tires that are appropriately sized to fill the wider fenders. Consult with a wheel and tire specialist to determine the optimal fitment for your car.
- Suspension Setup: The added width and aggressive styling of the Rocket Bunny kit may require adjustments to your suspension setup. Consider upgrading to coilovers or adjustable suspension components to fine-tune the ride height and handling of your 240SX.
- Permitting and Regulations: Check your local laws and regulations regarding widebody kits and vehicle modifications. Some jurisdictions may require permits or inspections to ensure the modifications are compliant.
Conclusion
Installing a Rocket Bunny 240SX V2 Boss kit is a challenging but rewarding project that can dramatically transform the look of your car. By following this comprehensive guide and taking your time, you can achieve a professional-quality result that will turn heads wherever you go. Remember to prioritize safety, plan carefully, and don't hesitate to seek professional assistance if needed. Good luck, and enjoy your newly transformed 240SX!