Rocket Bunny Diffuser For 240sx: Installation Guide
So, you've got yourself a Rocket Bunny diffuser for your 240SX. Excellent choice! That's a sure-fire way to improve the aesthetics and potentially the aerodynamics of your ride. However, installing it can seem a bit daunting if you haven't tackled something like this before. Don't worry; this guide will walk you through the process, highlighting common pitfalls and offering practical tips to ensure a smooth installation.
Understanding the Challenge
Before we dive in, let's be realistic. Installing a Rocket Bunny diffuser isn't a bolt-on affair like replacing a taillight. It often requires some degree of modification, fabrication, and patience. The quality of aftermarket body kits can vary, so be prepared to address potential fitment issues. This guide aims to minimize those headaches.
Common Installation Issues
Here's a rundown of the typical challenges you might encounter:
- Fitment Issues: Gaps, misalignment, and uneven surfaces are common problems. Expect to spend time adjusting and potentially modifying the diffuser or your car's body to achieve a proper fit.
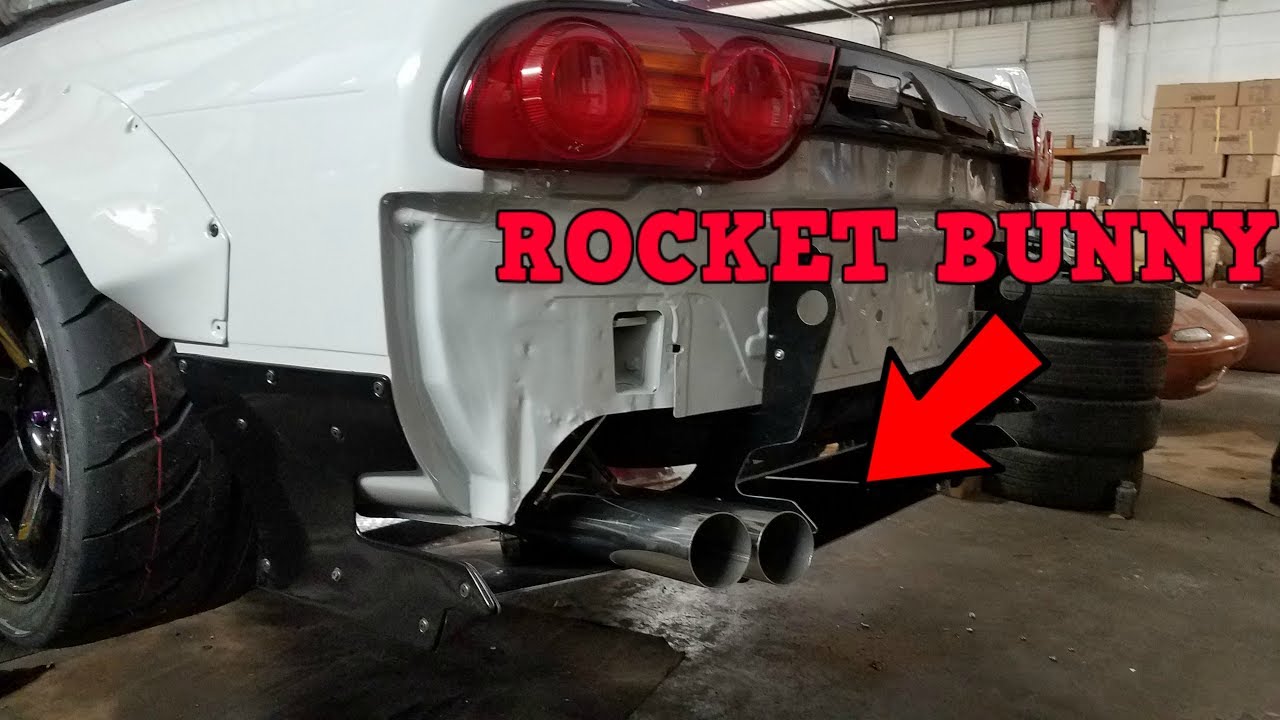
- Drilling and Cutting: You'll likely need to drill new holes in your chassis or bumper for mounting. Accurate measurements and careful execution are crucial.
- Hardware Compatibility: The provided hardware might not always be ideal. You might need to source additional bolts, nuts, washers, and self-tapping screws.
- Exhaust Interference: Depending on your exhaust setup, the diffuser might interfere with the exhaust pipes. Heat shielding or exhaust modifications might be necessary.
- Bumper Removal and Modification: Removing the rear bumper is almost always required. You might also need to trim or modify the bumper for the diffuser to fit properly.
Tools and Materials You'll Need
Having the right tools on hand will make the job much easier. Here's a comprehensive list:
- Socket Set: Metric sockets are essential for removing bolts and nuts.
- Wrenches: A set of metric wrenches, including open-end and box-end wrenches.
- Drill: A power drill with various drill bits for drilling pilot holes and mounting holes.
- Screwdriver Set: Both Phillips head and flathead screwdrivers.
- Measuring Tape: For accurate measurements and alignment.
- Markers: For marking drilling locations.
- Grinder or Rotary Tool: For trimming and modifying the diffuser or bumper (if necessary).
- Sandpaper: For smoothing rough edges after cutting.
- Safety Glasses: Always wear safety glasses when drilling, cutting, or grinding.
- Gloves: Protect your hands from sharp edges and chemicals.
- Jack and Jack Stands: To safely lift the rear of your car.
- Self-Tapping Screws: For securing the diffuser to the bumper (if needed).
- Bolts, Nuts, and Washers: For mounting the diffuser to the chassis. Make sure they are the correct size and material (stainless steel is recommended).
- Masking Tape: To protect your car's paint when drilling or cutting.
- Floor Jack: Lifting car to install the diffuser.
- Heat Shielding (Optional): If your exhaust is close to the diffuser.
- Touch-Up Paint (Optional): To cover any scratches or imperfections.
- Penetrating Oil: For stubborn bolts and nuts.
Step-by-Step Installation Guide
Follow these steps to install your Rocket Bunny diffuser. Remember to take your time and double-check everything before proceeding.
- Preparation:
- Park your 240SX on a level surface.
- Engage the parking brake and chock the front wheels for safety.
- Disconnect the negative terminal of your battery.
- Gather all the necessary tools and materials.
- Bumper Removal:
- Locate and remove all the bolts and screws securing the rear bumper. These are typically located in the wheel wells, along the bottom edge of the bumper, and possibly inside the trunk.
- Carefully detach the bumper from the car. You might need to gently pry it off if it's stuck.
- Disconnect any wiring harnesses connected to the bumper, such as license plate lights.
- Set the bumper aside in a safe place.
- Test Fitting the Diffuser:
- Hold the diffuser up to the rear of the car to get a feel for its fitment.
- Identify any areas where the diffuser makes contact with the bumper or chassis.
- Use masking tape to mark the areas that need to be trimmed or modified.
- Modifications (If Necessary):
- If the diffuser requires trimming, use a grinder or rotary tool to carefully remove the excess material. Work slowly and avoid removing too much material at once.
- Sand down any rough edges to create a smooth surface.
- If the bumper requires modification, use a grinder or rotary tool to trim or reshape it as needed.
- Test fit the diffuser again after each modification to ensure proper fitment.
- Marking Mounting Points:
- Once the diffuser fits properly, use a marker to mark the locations for the mounting holes.
- Ensure the diffuser is perfectly aligned before marking the holes. Use a level or measuring tape to verify alignment.
- Drilling Mounting Holes:
- Use a drill to create pilot holes at the marked locations.
- Increase the size of the drill bit until the holes are large enough to accommodate the mounting bolts.
- Be careful not to drill through any wiring harnesses or fuel lines.
- Attaching the Diffuser:
- Align the diffuser with the mounting holes.
- Insert the mounting bolts through the diffuser and into the chassis or bumper.
- Secure the bolts with nuts and washers.
- Tighten the bolts securely, but avoid over-tightening them, which could damage the diffuser or the chassis.
- Use self-tapping screws to secure the diffuser to the bumper if necessary.
- Exhaust Clearance:
- Check the clearance between the diffuser and your exhaust pipes.
- If the exhaust is too close to the diffuser, you might need to install heat shielding or modify the exhaust system.
- Proper exhaust clearance is essential to prevent the diffuser from melting or catching fire.
- Bumper Reinstallation:
- Reconnect any wiring harnesses to the bumper.
- Carefully reinstall the bumper onto the car.
- Secure the bumper with the original bolts and screws.
- Tighten the bolts and screws securely.
- Final Check:
- Double-check all the mounting bolts and screws to ensure they are tight.
- Inspect the diffuser for any gaps or misalignments.
- Make any necessary adjustments.
- Reconnect Battery:
- Reconnect the negative terminal of your battery.
Tips and Tricks for a Successful Installation
Here are some additional tips to help you avoid common mistakes and achieve a professional-looking installation:
- Take Your Time: Rushing the installation can lead to mistakes and poor fitment. Allow yourself plenty of time to complete the job properly.
- Measure Twice, Cut Once: This old adage is especially important when modifying the diffuser or bumper. Accurate measurements are crucial.
- Use the Right Tools: Using the wrong tools can damage the diffuser or your car. Invest in quality tools and use them properly.
- Enlist a Helper: Having a friend assist you can make the job much easier, especially when lifting and aligning the diffuser.
- Refer to Online Resources: Search online forums and videos for additional tips and tricks specific to your Rocket Bunny diffuser model.
- Consider Professional Installation: If you're not comfortable with the installation process, consider hiring a professional body shop to do the job.
- Document Everything: Take pictures throughout the installation process. This can be helpful if you need to refer back to something later.
- Address Rust: While you have the bumper off, take the opportunity to inspect for and address any rust on the chassis.
Estimated Repair Costs
If you decide to have a professional install your Rocket Bunny diffuser, the cost can vary depending on the body shop's hourly rate and the complexity of the installation. Generally, you can expect to pay anywhere from $500 to $1500 for professional installation, including any necessary modifications and adjustments. This cost *does not* include the price of the diffuser itself. DIY installation will save you labor costs, but requires your time and attention to detail. Budget at least $100 for consumable materials and hardware.
Conclusion
Installing a Rocket Bunny diffuser on your 240SX can be a rewarding experience, but it's important to be prepared for the challenges involved. By following this guide and taking your time, you can achieve a professional-looking installation and enhance the appearance of your ride. Remember to prioritize safety and consult with a professional if you're unsure about any aspect of the installation process. Good luck, and enjoy your upgraded 240SX!