S14 Ls1 Swap Kit Engine Mount And Drivetrain Alignment
The siren song of LS power has lured countless enthusiasts to swap these robust and readily available engines into platforms never originally intended to house them. The Nissan S14, with its inherent chassis balance and tuning potential, is a prime candidate. However, simply shoehorning an LS1 into an S14 requires careful consideration, especially when it comes to engine mount design and, critically, drivetrain alignment. This isn't just about getting the engine to physically fit; it's about optimizing performance, minimizing vibrations, and ensuring long-term reliability.
Understanding the Challenges: More Than Just Bolting It In
The swap presents several core challenges. First, the physical dimensions of the LS1 differ significantly from the original SR20DET or KA24DE engines. Second, the LS1's torque output dwarfs that of the stock engines, necessitating a robust mounting solution that can handle the added stress. Finally, and perhaps most importantly, achieving proper drivetrain alignment is crucial to prevent premature wear on the transmission, driveshaft, differential, and even the engine itself. Misalignment can lead to vibrations, binding in the drivetrain, and ultimately, component failure. Think of it like a bicycle chain constantly running at an angle – it won't last long.
Engine Mount Design: A Balancing Act
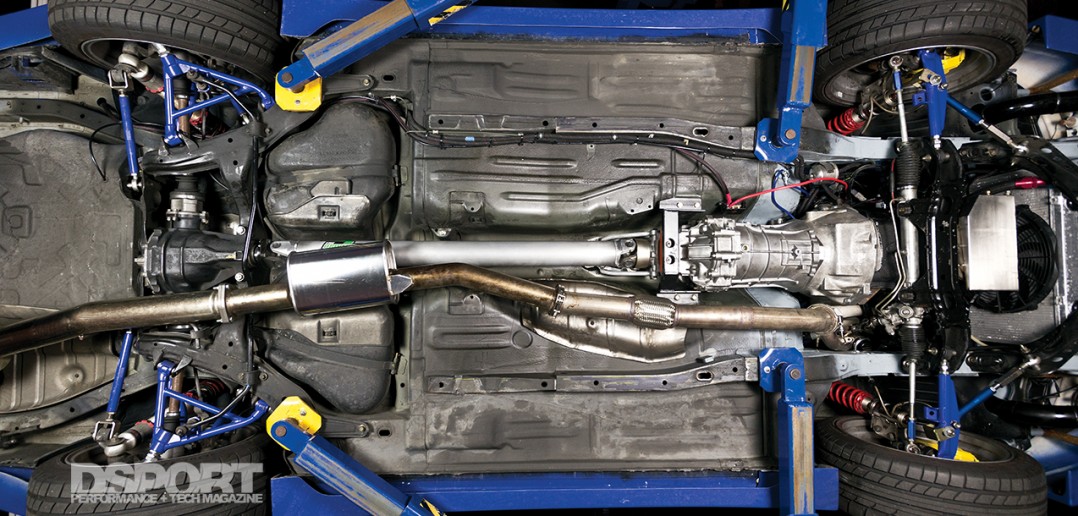
Most S14 LS1 swap kits provide fabricated engine mounts, typically consisting of two main pieces: a bracket that bolts to the engine block and another that attaches to the S14's chassis. The design and material selection of these mounts are paramount. They must be strong enough to withstand the engine's weight and torque, while also providing adequate vibration damping.
Material Selection and Construction
Common materials include steel (often mild steel or chromoly for higher strength) and sometimes even billet aluminum for weight reduction (though this is less common in engine mounts due to cost and potential vibration issues). Steel mounts are usually welded together, with the quality of the welds being a critical factor. Look for smooth, consistent welds with good penetration. Poorly executed welds can crack or fail under stress.
Mount Geometry and Bushing Considerations
The geometry of the mounts plays a crucial role in engine placement and vibration isolation. The mounts typically incorporate bushings, often made of polyurethane, to absorb vibrations. The durometer (hardness) of the polyurethane bushing is a key consideration. Softer bushings provide better vibration damping but may allow more engine movement, while stiffer bushings offer less movement but transmit more vibrations to the chassis. Choosing the right durometer is a compromise that depends on the intended use of the car. For a street car, a softer durometer is generally preferred, while a track car might benefit from stiffer bushings for improved throttle response and reduced engine movement under hard cornering.
Kit-Specific Considerations
Different swap kits may position the engine slightly differently within the engine bay. This can affect things like exhaust header clearance, oil pan clearance, and the location of the accessory drive components. Carefully research the specific kit you are considering and ensure that it addresses these potential issues. Read reviews and look for forum discussions about users' experiences with different kits.
Drivetrain Alignment: The Heart of the Matter
Drivetrain alignment refers to the angular relationship between the engine/transmission output shaft, the driveshaft, and the differential input shaft. Ideally, these components should be perfectly aligned to minimize stress and maximize efficiency. In reality, some degree of misalignment is inevitable, but it should be kept within acceptable tolerances.
Understanding the Angles: Vertical and Horizontal
There are two primary angles to consider: vertical (or driveline) angle and horizontal (or lateral) angle. The driveline angle is the angle between the transmission output shaft and the driveshaft, and the angle between the driveshaft and the differential input shaft. These angles should be equal and opposite to cancel out vibration. The lateral angle refers to any side-to-side offset between the transmission and differential. Excessive lateral misalignment can cause binding in the universal joints (U-joints) of the driveshaft.
Checking and Correcting Alignment
Several methods can be used to check drivetrain alignment. One common method involves using an angle finder or digital protractor to measure the driveline angles at the transmission and differential. The goal is to have equal and opposite angles. Another method involves using a plumb bob or laser level to check the lateral alignment. The transmission output shaft and differential input shaft should be in the same vertical plane.
Correcting misalignment often involves shimming the engine mounts or transmission mount. Shimming the engine mounts can raise or lower the engine, affecting the driveline angle. Shimming the transmission mount can adjust the vertical position of the transmission, also affecting the driveline angle. It's crucial to make small adjustments and re-check the alignment after each adjustment.
The Driveshaft: A Critical Link
The driveshaft plays a vital role in transmitting power from the transmission to the differential. When swapping an LS1 into an S14, a custom driveshaft is almost always required due to the different transmission output shaft and differential input flange configurations, as well as the altered overall length. It is highly recommended to have a driveshaft professionally manufactured to ensure proper length, balance, and U-joint phasing.
Transmission Choice and Its Impact
The choice of transmission (e.g., T56, TR6060) significantly affects the installation process and drivetrain alignment. Different transmissions have different lengths, mounting configurations, and output shaft spline counts. Ensure that the swap kit you choose is compatible with your chosen transmission. Some kits are designed specifically for certain transmissions, while others may require additional modifications.
Troubleshooting and Common Issues
Even with careful planning and execution, issues can arise during an LS1 swap. Here are some common problems and their potential solutions:
- Vibrations: Excessive vibrations are often a sign of misalignment, unbalanced driveshaft, or worn U-joints. Re-check the drivetrain angles and ensure the driveshaft is properly balanced.
- Binding in the Drivetrain: Binding can occur if the lateral misalignment is excessive. Shim the engine or transmission mounts to correct the alignment.
- Clearance Issues: Ensure that the engine, transmission, and exhaust system have adequate clearance from the chassis and other components. Modifications may be necessary.
- Oil Pan Clearance: The LS1's oil pan can sometimes interfere with the S14's crossmember. Aftermarket oil pans designed for LS swaps are often necessary.
- Header Clearance: Aftermarket headers are almost always required for an LS1 swap. Ensure that the headers clear the chassis, steering shaft, and other components.
Beyond the Mounts: Completing the Swap
Engine mounts and drivetrain alignment are crucial, but they are just part of the overall LS1 swap process. Other considerations include:
- Wiring Harness: A custom wiring harness is needed to integrate the LS1's electronics with the S14's electrical system.
- Cooling System: An upgraded radiator and cooling fan are necessary to handle the LS1's heat output.
- Fuel System: The S14's fuel system may need to be upgraded to provide sufficient fuel flow for the LS1.
- Exhaust System: A custom exhaust system is required.
- ECU Tuning: The LS1's ECU will need to be tuned to optimize performance and driveability.
In conclusion, an S14 LS1 swap is a complex undertaking that requires careful planning, attention to detail, and a thorough understanding of automotive engineering principles. While the engine mounts might seem like a simple component, their design and installation, coupled with precise drivetrain alignment, are paramount to a successful and reliable swap. By understanding the challenges and following best practices, you can transform your S14 into a tire-shredding machine while maintaining a smooth and enjoyable driving experience.