S14 Zenki Tail Light Specifications And Retrofitting
The Nissan 240SX, particularly the S14 generation, holds a special place in the hearts of car enthusiasts. Renowned for its balanced chassis, robust SR20DET engine (in certain markets), and potential for modification, it's no surprise that owners often seek to personalize their rides. A popular customization target is the rear lighting, specifically the tail lights. This article delves into the specifications of the S14 Zenki (pre-facelift) tail lights and explores the considerations for retrofitting alternative lighting solutions.
Understanding the S14 Zenki Tail Light Assembly
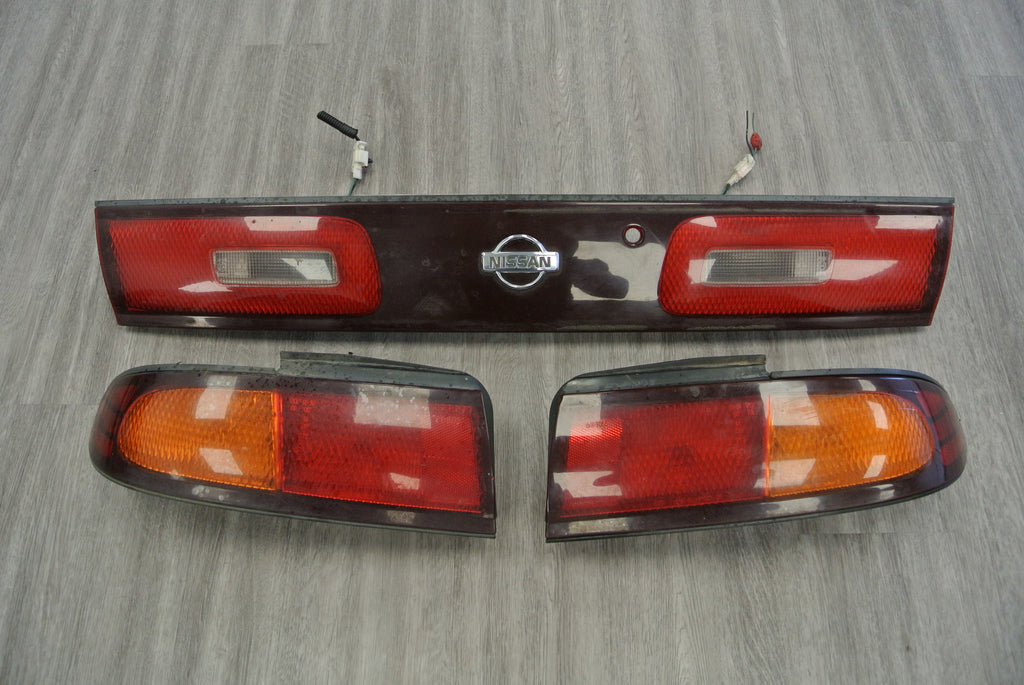
The S14 Zenki tail light assembly, used on models produced from 1994 to 1996, is characterized by its distinct horizontal arrangement. Each side features two distinct lens sections, a large outer section for the brake and tail lights, and a smaller inner section for the turn signal and reverse lights. Let's break down the key aspects:
Physical Dimensions and Mounting
While precise dimensions can vary slightly due to manufacturing tolerances, the overall dimensions of each tail light assembly are approximately:
- Width: ~500mm (19.7 inches)
- Height: ~200mm (7.9 inches)
- Depth: ~150mm (5.9 inches)
The tail lights are secured to the vehicle using a combination of bolts and clips. Typically, there are three bolts accessible from inside the trunk, and several plastic clips that engage with the bodywork. These clips can become brittle with age, so care must be taken during removal and installation to avoid breakage.
Bulb Specifications
The S14 Zenki tail lights utilize standard automotive bulbs. Understanding the correct bulb types is crucial for maintaining proper functionality and brightness. Here's a breakdown:
- Brake/Tail Light: Commonly a dual-filament bulb such as a 1157. This type of bulb has two filaments, one for the dimmer tail light function and another for the brighter brake light function.
- Turn Signal: Typically a single-filament bulb such as a 1156. Amber coloration is required to meet legal standards for turn signal lights.
- Reverse Light: Again, a single-filament bulb, generally a 1156, with a clear or white lens.
It's important to note that upgrading to LED bulbs is a common modification. When doing so, consider the following:
LED bulbs often have different power consumption characteristics than traditional incandescent bulbs. This can lead to issues like hyperflashing (rapid turn signal blinking) due to the vehicle's flasher relay interpreting the lower current draw as a bulb failure. Resistors or a compatible LED flasher relay may be required to correct this.
Lens and Housing Materials
The tail light lenses are typically made from acrylic or polycarbonate plastic. These materials offer good clarity and durability, but they are susceptible to scratching and fading over time due to UV exposure. The housings are usually made from ABS plastic, chosen for its strength, heat resistance, and affordability.
Over time, the lens can become cloudy or yellowed. Polishing kits are available to restore clarity, but severely damaged lenses may require replacement.
Considerations for Retrofitting Tail Lights
Retrofitting alternative tail lights, whether they are aftermarket LED units or even custom-fabricated designs, requires careful planning and execution. Here are several key considerations:
Fitment and Mounting
Ensuring proper fitment is paramount. Aftermarket tail lights designed specifically for the S14 Zenki *should* bolt directly into the factory mounting locations. However, it's always wise to verify compatibility before purchasing. Universal fit tail lights will require custom fabrication of mounting brackets, which demands a good understanding of sheet metal work and welding (or the ability to outsource these tasks). Alignment is critical; gaps or misalignments will detract from the vehicle's appearance and potentially allow water ingress.
Wiring and Electrical Compatibility
One of the biggest challenges in retrofitting tail lights is ensuring electrical compatibility. The wiring harness in the S14 Zenki is designed for incandescent bulbs. As mentioned earlier, LED tail lights have different power consumption characteristics, which can lead to hyperflashing or other electrical anomalies. You may need to:
- Install load resistors: These resistors mimic the power draw of incandescent bulbs, preventing hyperflashing. However, they also generate heat and must be mounted in a safe location.
- Replace the flasher relay: An LED-compatible flasher relay will correctly interpret the lower current draw and eliminate hyperflashing without the need for resistors.
- Modify wiring: In some cases, you may need to re-pin connectors or modify the wiring harness to match the new tail lights. Always refer to the wiring diagrams for both the S14 and the aftermarket tail lights. Proper crimping and soldering techniques are essential to ensure reliable connections.
It's crucial to thoroughly test all tail light functions (brake lights, tail lights, turn signals, reverse lights) after installation to ensure they are working correctly.
Legal Compliance
Tail lights are subject to strict regulations regarding brightness, color, and visibility. Before retrofitting any tail lights, research the applicable laws in your jurisdiction. Look for tail lights that are DOT (Department of Transportation) approved, indicating they meet federal safety standards. Pay close attention to the color of the lenses and the brightness of the bulbs. For example, red is typically required for brake and tail lights, and amber is required for turn signals.
Sealing and Weatherproofing
Tail lights are exposed to the elements, so proper sealing and weatherproofing are crucial to prevent water ingress. Use silicone sealant or weather stripping to create a watertight seal between the tail lights and the body of the vehicle. Check the seals periodically and reapply sealant as needed.
Aesthetic Considerations
While functionality is paramount, aesthetics also play a significant role in choosing tail lights. Consider the overall style of your vehicle and choose tail lights that complement its design. There are numerous aftermarket options available, ranging from subtle updates to radical departures from the factory look. Pay attention to the color of the lenses, the shape of the housings, and the overall design of the tail lights.
Example Retrofit Scenario: LED Tail Lights
Let's consider a specific example: retrofitting LED tail lights into an S14 Zenki. The process would typically involve the following steps:
- Disconnect the battery: This is a crucial safety precaution to prevent electrical shocks.
- Remove the factory tail lights: Access the mounting bolts from inside the trunk and carefully remove the tail lights. Disconnect the wiring harness.
- Install the LED tail lights: Mount the new tail lights using the factory mounting locations (or custom brackets, if necessary).
- Connect the wiring harness: This may involve splicing wires, re-pinning connectors, or using adapters. Be sure to match the wiring colors correctly.
- Install load resistors or replace the flasher relay: If necessary, install load resistors or replace the flasher relay to prevent hyperflashing.
- Test all tail light functions: Thoroughly test all tail light functions to ensure they are working correctly.
- Seal the tail lights: Apply silicone sealant or weather stripping to create a watertight seal.
- Reconnect the battery.
Retrofitting tail lights can be a rewarding project that enhances the appearance and functionality of your S14 Zenki. However, it's essential to approach the task with careful planning, attention to detail, and a thorough understanding of automotive electrical systems. If you are not comfortable working with electrical wiring, it's best to seek the assistance of a qualified mechanic.