Sr20det Swap Wiring Harness And Ecu Configuration
The SR20DET, Nissan's legendary 2.0-liter turbocharged engine, has long been a favorite for engine swaps due to its robust design, readily available parts, and potential for significant power gains. Successfully integrating an SR20DET into a different chassis, however, requires a thorough understanding of the wiring harness and ECU configuration. This guide provides an in-depth look at the process, aiming to demystify the complexities and equip you with the knowledge to tackle this project.
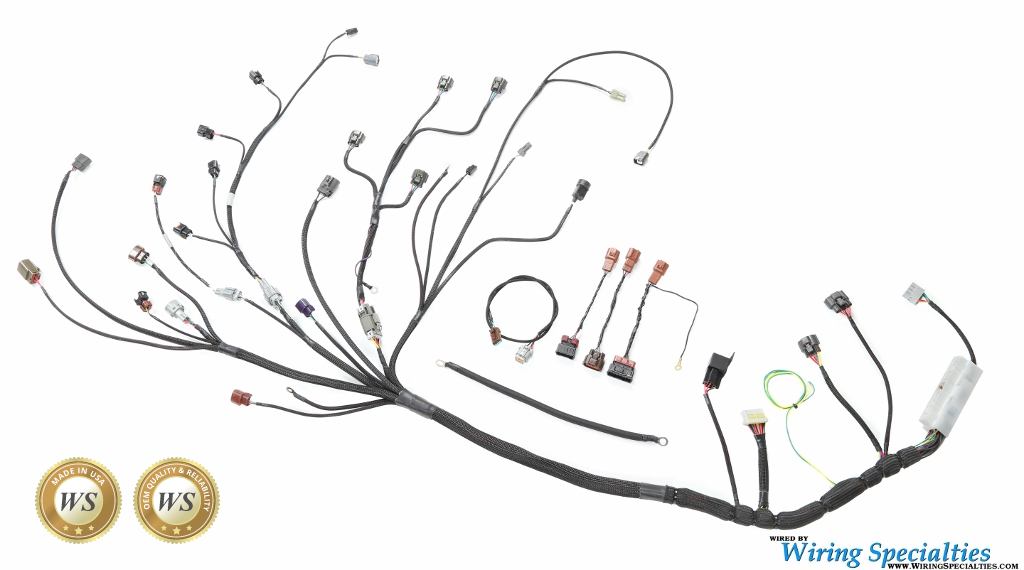
Understanding the SR20DET Wiring Harness
The SR20DET wiring harness serves as the nervous system of the engine, connecting the ECU (Engine Control Unit) to all the critical sensors, actuators, and components. A typical SR20DET harness comprises several key sections:
- Engine Harness: This is the primary harness, directly connecting to the engine's sensors (crank angle sensor, camshaft position sensor, coolant temperature sensor, throttle position sensor, etc.), injectors, ignition coils, and other essential components.
- Body Harness Integration: This section connects the engine harness to the vehicle's existing electrical system. It includes connections for power, ground, ignition, starter, fuel pump relay, and essential gauges like the tachometer and coolant temperature gauge.
- ECU Connector: This connector interfaces the entire harness with the ECU, allowing the ECU to receive sensor data and control engine functions.
The specific pinout and wiring configuration will vary slightly depending on the SR20DET variant (e.g., redtop, blacktop, VVT) and the donor vehicle. It's crucial to obtain the correct wiring diagrams for your specific engine and ECU. These diagrams are readily available online or through aftermarket wiring specialists.
Identifying and Labeling Wires
Before beginning any modifications, thoroughly inspect the harness for any damage, brittle wires, or corroded connectors. Carefully identify and label each wire using masking tape and a permanent marker. Refer to your wiring diagrams and note the wire color, function, and pin location. This meticulous process will save you countless headaches later on.
Tip: Take detailed photographs of the harness before you start disassembling anything. These pictures will serve as invaluable references if you encounter any uncertainties during the reassembly process.
ECU Configuration: The Brain of the Operation
The ECU is the heart of the SR20DET's electronic management system. It receives data from the various sensors, processes the information, and controls actuators like the injectors, ignition coils, and boost control solenoid to optimize engine performance. Understanding the ECU's capabilities and how to configure it is essential for a successful swap.
Stock ECU vs. Aftermarket ECU
You have two primary options for ECU management: the stock SR20DET ECU or an aftermarket standalone ECU.
- Stock ECU: The stock ECU is a viable option, particularly for mild builds aiming for near-stock power levels. It's relatively inexpensive and readily available. However, its tuning capabilities are limited. You'll likely need to use a piggyback ECU or a daughterboard to remap the fuel and ignition curves for optimal performance, especially if you're running larger injectors, a different turbocharger, or other significant modifications. Additionally, the stock ECU may require modification to remove immobilizer functions, depending on the donor vehicle and your application.
- Aftermarket ECU: Aftermarket standalone ECUs offer unparalleled flexibility and control over engine management. These ECUs allow you to fine-tune virtually every aspect of the engine's operation, including fuel maps, ignition timing, boost control, rev limits, and various other parameters. Popular aftermarket ECU choices for the SR20DET include Haltech, AEM, Link ECU, and Megasquirt. While more expensive than the stock ECU, an aftermarket ECU is highly recommended for builds targeting significant power increases or requiring advanced features.
ECU Pinout and Wiring
Regardless of whether you choose to use the stock ECU or an aftermarket option, you'll need to understand the ECU pinout and wiring configuration. This involves identifying the function of each pin on the ECU connector and ensuring that it's correctly wired to the corresponding sensor or actuator. Wiring diagrams are essential for this process.
When wiring an aftermarket ECU, you may need to repin or modify the existing SR20DET harness to match the aftermarket ECU's pinout. This process can be time-consuming and requires careful attention to detail. Many aftermarket ECU manufacturers offer pre-made adapter harnesses specifically designed for the SR20DET, which can simplify the wiring process considerably.
ECU Tuning and Calibration
Once the ECU is properly wired, it's time to tune and calibrate it. This involves adjusting the fuel and ignition maps, boost control settings, and other parameters to optimize engine performance and ensure safe operation. ECU tuning requires specialized software and a thorough understanding of engine management principles. If you're not comfortable with tuning, it's best to seek the assistance of a qualified tuner. A poorly tuned engine can result in reduced performance, poor fuel economy, and even engine damage.
Warning: Incorrect ECU tuning can lead to catastrophic engine failure. It is highly recommended to have your ECU tuned by a professional, especially if you are not experienced with engine management systems.
Common Wiring Challenges and Solutions
Engine swaps are rarely straightforward, and you're likely to encounter some challenges along the way. Here are some common wiring issues and potential solutions:
- Missing or Damaged Wiring: If you're using a used wiring harness, it may be missing wires or have damaged sections. Repair or replace damaged wires and add any missing wires as needed, referring to your wiring diagrams.
- Incorrect Pinouts: Ensure that you're using the correct wiring diagrams for your specific SR20DET variant and ECU. Double-check all connections to verify that they're wired correctly.
- Grounding Issues: Proper grounding is essential for reliable electrical performance. Ensure that all ground connections are clean, secure, and properly grounded to the chassis.
- Sensor Compatibility: In some cases, the sensors from the donor vehicle may not be compatible with your target chassis. You may need to use sensors from the target chassis or aftermarket sensors.
- Immobilizer Issues: Stock SR20DET ECUs often have an immobilizer system that prevents the engine from starting unless it's paired with the original key and immobilizer module. You may need to bypass or remove the immobilizer system.
Tools and Materials
To successfully wire an SR20DET swap, you'll need the following tools and materials:
- Wiring Diagrams: Essential for identifying wire functions and pin locations.
- Multimeter: For testing continuity and voltage.
- Wire Strippers and Crimpers: For preparing and connecting wires.
- Soldering Iron and Solder: For making secure electrical connections.
- Heat Shrink Tubing: For insulating and protecting solder joints.
- Electrical Tape: For wrapping and insulating wires.
- Wire Labels: For identifying wires.
- Connectors and Terminals: For making secure connections.
- Fuses and Relays: For protecting electrical circuits.
- Diagnostic Scan Tool: For reading engine codes and monitoring sensor data.
Conclusion
Successfully wiring an SR20DET swap requires patience, attention to detail, and a thorough understanding of the engine's electrical system. By following this guide and utilizing the resources mentioned, you can confidently tackle this project and enjoy the performance benefits of the legendary SR20DET engine. Remember to prioritize safety and seek professional assistance if you encounter any difficulties. Good luck!