Structural Repair And Replacement Of Corroded Rocker Panels On A 240sx
So, you've got a 240SX with rusty rocker panels? It's a common problem, especially in areas with road salt. While surface rust might seem cosmetic, neglected rust can compromise the structural integrity of your car. This article will guide you through assessing the damage, repairing minor corrosion, and completely replacing heavily corroded rocker panels. We'll focus on maintaining structural strength and achieving a professional-looking result.
Assessment: How Bad Is It?
Before diving in, a thorough assessment is crucial. Don't just look at the visible rust; probe around it. Start with a visual inspection, paying close attention to areas where water and debris tend to accumulate, like the lower seams and areas near the wheel wells. Use a screwdriver or awl to gently poke at the rusted areas. If the metal is easily penetrated, the rust has eaten deeply, and replacement might be necessary.
Here's a breakdown of different damage levels:
- Surface Rust: This is the best-case scenario. It's characterized by a reddish-brown discoloration on the surface of the metal. It can usually be addressed with sanding and rust conversion.
- Moderate Rust: The rust has penetrated deeper, forming pitting and scale. The metal is weakened but still structurally sound in most areas. Repair through cutting and welding in patches can often be performed.
- Severe Rust: The metal is severely compromised, with large holes and extensive rust-through. The rocker panel has lost significant structural integrity. Complete replacement is almost always required.
Don't forget to check the inner rocker panel, which is often overlooked. It's even more susceptible to rust because it traps moisture. You might need a borescope or inspection camera to get a good look. Also, examine the floor pan and other nearby structural components for signs of rust migration. Remember, rust spreads like cancer, so dealing with it early is always better.
Tools and Materials
Having the right tools and materials will make the job much easier and safer. Here's a comprehensive list:
- Safety Gear: Safety glasses, gloves, respirator (for grinding and welding), and ear protection are non-negotiable.
- Cutting Tools: Angle grinder with cutting wheels and grinding discs, spot weld drill, reciprocating saw (Sawzall), metal shears (optional).
- Welding Equipment: MIG welder (Metal Inert Gas) is highly recommended for automotive bodywork. Flux-core welding is an alternative but produces more spatter and requires more clean-up. You'll also need welding wire, shielding gas (if using a MIG), welding helmet, and welding gloves.
- Metal Fabrication Tools: Hammer, dollies, metal forming tools (optional, but helpful for shaping patches).
- Rust Removal Tools: Wire brushes (for angle grinder and hand use), rust converter, sandblaster (optional for heavily rusted areas).
- Bodywork Tools: Body filler (Bondo), sanding blocks, sandpaper (various grits), spreaders.
- Primers and Paints: Self-etching primer, epoxy primer, body filler primer, automotive paint (matching your car's color), clear coat.
- Measuring Tools: Tape measure, ruler, marker.
- Clamps: Various clamps for holding patches in place during welding.
- New Rocker Panel(s): Purchase high-quality replacement rocker panels specifically designed for the 240SX. Aftermarket options are available, so read reviews and choose wisely.
Repairing Minor Corrosion
If you're dealing with surface rust or minor pitting, you can often repair the rocker panel without replacing it. Here's a step-by-step guide:
- Remove Loose Rust: Use a wire brush (either by hand or attached to an angle grinder) to remove as much loose rust as possible. Be thorough, and don't be afraid to get down to bare metal.
- Grind the Area: Use an angle grinder with a grinding disc to feather the edges of the rusted area. This will create a smooth transition for the body filler.
- Apply Rust Converter: Apply a rust converter to the affected area according to the manufacturer's instructions. This will chemically convert the remaining rust into a stable compound, preventing further corrosion.
- Apply Body Filler: Mix and apply body filler to the affected area, following the manufacturer's instructions. Apply thin coats, allowing each coat to dry completely before applying the next.
- Sand the Body Filler: Once the body filler is dry, sand it smooth using progressively finer grits of sandpaper (e.g., 80-grit, 120-grit, 220-grit). The goal is to create a perfectly smooth and level surface.
- Prime and Paint: Apply self-etching primer followed by epoxy primer. After the primer dries, sand it lightly with fine-grit sandpaper. Then, apply several coats of automotive paint, followed by clear coat.
Replacing Severely Corroded Rocker Panels
When the rust is too extensive, replacement is the only viable option. This is a more involved process requiring welding skills, but it's achievable with patience and the right techniques.
- Preparation: Disconnect the battery. Remove any interior trim or components that might be affected by the welding process. This includes carpets, seats, and wiring harnesses. Protect any flammable materials with welding blankets.
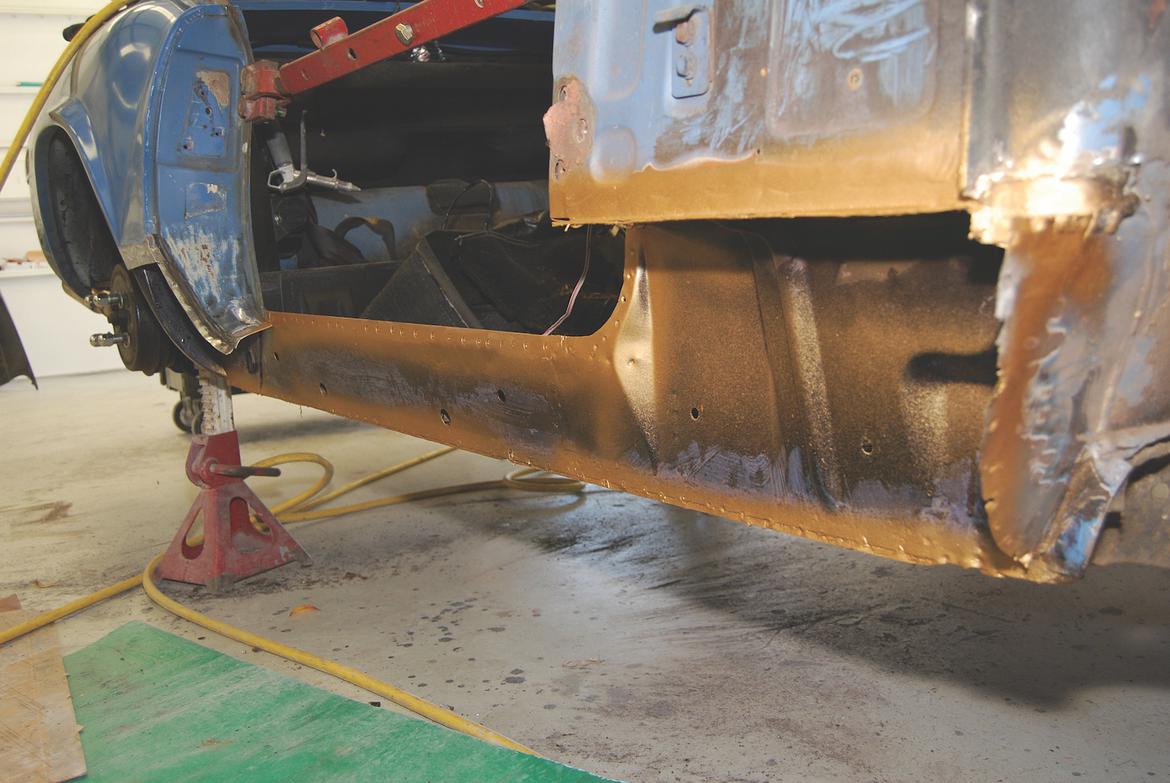
- Cutting Out the Old Rocker Panel: This is where precision and patience are key. Start by identifying the spot welds that hold the rocker panel in place. Use a spot weld drill to carefully drill out these welds. Be careful not to drill through the underlying metal. For areas where spot welds are inaccessible or severely rusted, use a cutting wheel or reciprocating saw to cut through the rocker panel. Cut close to the body seams to minimize damage to the surrounding metal. Remember to continuously monitor temperatures when using power tools on the car.
- Cleaning and Preparing the Area: Once the old rocker panel is removed, thoroughly clean the area. Remove any remaining rust, dirt, and debris. Use a wire brush, grinder, or sandblaster to get down to bare metal. Treat any surface rust on the inner rocker panel or other adjacent areas with rust converter.
- Fitting the New Rocker Panel: Carefully position the new rocker panel in place. Use clamps to hold it securely. Ensure that it aligns properly with the surrounding body panels. Check the fitment carefully before proceeding to welding. You may need to make minor adjustments to the panel to achieve a perfect fit.
- Welding the New Rocker Panel: This is the most critical step. Use a MIG welder to weld the new rocker panel in place. Start by tack welding the panel in several places to secure it. Then, weld along the seams, using short, overlapping welds to minimize heat buildup. Avoid continuous welds, as they can cause warping. Allow the welds to cool between passes. If using the plug welding method, be sure to properly prepare the area for plugging (using a drill/punch to create a hole).
- Grinding and Finishing: Once the welding is complete, grind down the welds to create a smooth, even surface. Use a grinding disc on an angle grinder to remove excess weld material. Be careful not to grind too much, as this can weaken the welds. Apply body filler to any imperfections and sand it smooth.
- Priming and Painting: Apply self-etching primer followed by epoxy primer. After the primer dries, sand it lightly with fine-grit sandpaper. Then, apply several coats of automotive paint, followed by clear coat.
- Rust Prevention: After painting, apply a rust preventative coating to the inside of the rocker panel to help prevent future corrosion. This can be a wax-based coating or a specialized rust inhibitor.
Important Considerations
* Welding Safety: Welding produces intense heat and sparks. Always wear proper safety gear, including a welding helmet, gloves, and a respirator. Work in a well-ventilated area to avoid inhaling fumes. * Metal Thickness: Be mindful of the metal thickness when welding. Use appropriate welding settings (voltage and wire feed speed) to avoid burning through the metal. Practice on scrap metal to get a feel for the settings before welding on the car. * Rust Repair vs. Replacement: While patching is an option for minor rust, don't compromise structural integrity. If the rust is extensive or the metal is severely weakened, replacement is the only safe and reliable solution. * Seam Sealer: Apply seam sealer to all welded seams to prevent water from entering and causing rust. * Inner Rocker Panel: As mentioned earlier, the inner rocker panel is often neglected. Be sure to inspect and repair or replace it as needed. * Consult a Professional: If you're not comfortable with welding or metal fabrication, don't hesitate to consult a professional body shop. Improper repairs can compromise the structural integrity of your car.Replacing rocker panels is a significant undertaking, but with patience, the right tools, and a clear understanding of the process, you can restore the structural integrity and appearance of your 240SX. Remember to prioritize safety and take your time to ensure a high-quality repair.