Technical Review And Setup Of Isr Performance Coilovers For The 240sx
So, you've got yourself a set of ISR Performance coilovers for your 240SX. Good choice! They're a solid option for improving handling and achieving that perfect stance. But before you just slap them on, let's go through a technical review and a proper setup procedure. This isn't just about bolting parts together; it's about understanding how these coilovers work and how to optimize them for your specific needs. Think of this as your pre-install checklist and tuning guide rolled into one.
Initial Inspection and Component Verification
First things first, unpack everything and inventory the parts. You should have two front coilovers, two rear coilovers, adjustment wrenches (often referred to as spanner wrenches), and possibly some documentation. Ensure you have all the components. Look for any signs of damage during shipping – scratches, dents, or leaks. It's much easier to deal with a problem before you've spent hours installing them.
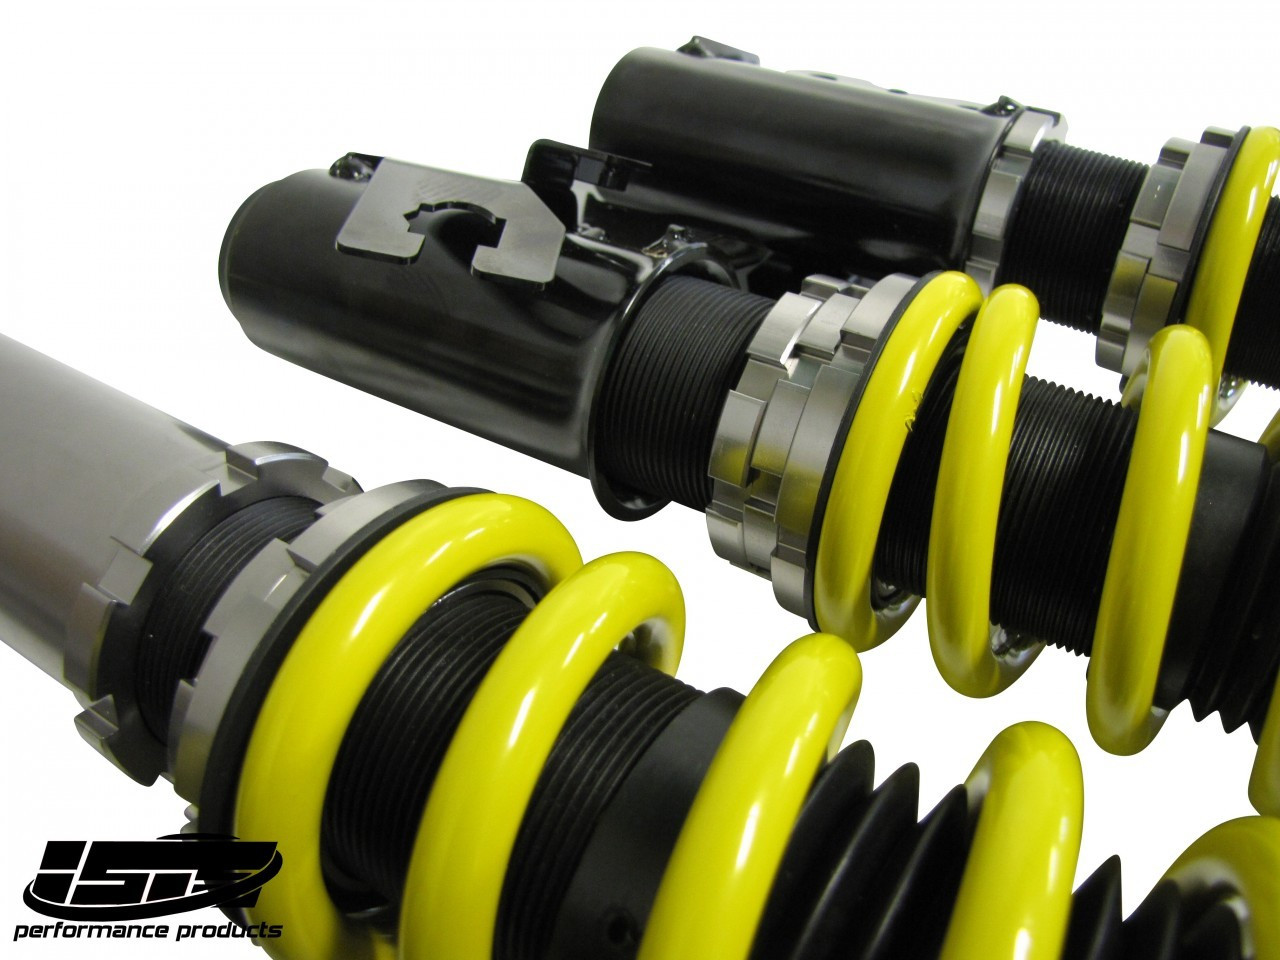
Coilover Construction Overview
Let's break down the anatomy of a coilover. At its core, a coilover is a combination of a shock absorber (also called a damper) and a coil spring. The shock absorber controls the rate at which the suspension compresses and rebounds, damping the movement. The coil spring supports the weight of the vehicle and determines ride height. ISR coilovers typically offer:
- Ride Height Adjustment: This is usually achieved by threading the lower mount up or down on the shock body.
- Damping Adjustment: ISR coilovers usually feature adjustable damping, which allows you to fine-tune the firmness of the ride. More on that later.
- Spring Preload Adjustment: Adjusting spring preload affects how much initial force is required to compress the spring.
Technical Review: Key Aspects to Examine
Before installation, a critical technical review is necessary. We're checking for build quality and addressing potential issues before they become problems on the car.
- Weld Quality: Inspect all welds on the shock body, lower mounts, and spring perches. Look for consistent beads, no pinholes, and no signs of undercutting. Undercutting happens when the weld metal doesn't fully fuse with the base metal, creating a weak point.
- Thread Condition: Run your fingers along all threaded areas – ride height adjustment, spring preload adjustment, and damper adjustment. Ensure they are clean and free of burrs or damage. A little bit of anti-seize on the threads is always a good idea to prevent future seizing.
- Damper Rod Integrity: Carefully extend and compress the damper rod. It should move smoothly without any binding, excessive play, or leaking fluid. A slight amount of resistance is normal, but any sticking or squeaking is a red flag.
- Damper Adjustment Range: Cycle through the damper adjustment range (usually clicks or detents) and ensure each adjustment is distinct and consistent. Note the total number of clicks available. This will be important for setting your baseline damping.
- Spring Rate Verification: While ISR provides the advertised spring rates (usually printed on the springs), it's worth confirming them, especially if you have specific performance goals. You can use a spring rate tester, or if you're familiar with FEA (Finite Element Analysis) software, you can model the spring and calculate its rate. However, for most DIYers, the printed value is sufficient. Consider whether the spring rate is appropriate for your car's weight and intended use (street, track, drift). If the rates are too high, the ride will be harsh. If they're too low, the car will wallow in corners.
Pre-Installation Adjustments and Setup
Now that we've inspected the coilovers, let's make some pre-installation adjustments. This will save you a lot of time and frustration later.
Ride Height Adjustment: Setting a Baseline
Before installing the coilovers, it's wise to set a baseline ride height. You'll fine-tune this later once the coilovers are on the car, but getting close now will minimize the amount of adjustment needed afterward. Measure the distance from the center of the wheel hub to the fender arch on your stock suspension. Aim to replicate this measurement, or slightly lower, on the coilovers. Remember to adjust both sides equally to maintain a level ride.
Spring Preload Adjustment: Understanding the Basics
Spring preload is the amount of compression already applied to the spring when the suspension is at rest. While adjusting spring preload *can* influence ride height slightly, it's primarily used to ensure the spring is always in contact with the spring perches. Too little preload can cause the spring to rattle or become unseated during full suspension extension. Too much preload can reduce suspension travel. A good starting point is to adjust the spring perches until the spring is snug but not compressed significantly. ISR coilovers usually use a double-locking collar design, one to adjust and the other to lock the position. Make sure you tighten the locking collar securely.
Damping Adjustment: Finding a Starting Point
Damping adjustment controls the firmness of the ride and how quickly the suspension responds to bumps and cornering forces. Most ISR coilovers have a single adjustment knob that controls both compression and rebound damping simultaneously. Turning the knob clockwise typically increases damping (firmer ride), while turning it counter-clockwise decreases damping (softer ride). To find a good starting point, set the dampers to the middle of their adjustment range. If your coilovers have, say, 16 clicks of adjustment, start at 8 clicks from full soft (or full hard - consult the documentation). This will give you room to adjust in either direction based on your preferences and driving conditions.
Installation Tips and Considerations
Installation of coilovers on a 240SX is generally straightforward, but here are some key things to keep in mind:
- Safety First: Always use jack stands to support the car. Never work under a car supported only by a jack.
- Penetrating Oil: Generously apply penetrating oil to all bolts and nuts that you'll be removing, especially the lower shock mounts and sway bar end links. Let it soak for at least 30 minutes before attempting to loosen them.
- Sway Bar End Links: Disconnecting the sway bar end links can make it easier to remove the old suspension components.
- Brake Lines and ABS Sensors: Be extremely careful not to damage the brake lines or ABS sensors during installation. Support the brake calipers so they don't hang by the brake lines.
- Torque Specifications: Use a torque wrench to tighten all bolts to the manufacturer's specifications. Consult a service manual for your 240SX to find the correct torque values.
- Camber Adjustment: After installing the coilovers, you'll need to get a proper wheel alignment. Pay particular attention to the camber settings. Adjustable camber plates (if your coilovers have them) allow you to fine-tune the camber angle. Negative camber (where the top of the wheel leans inward) can improve cornering grip.
- Corner Balancing: For serious track use, consider corner balancing. This involves adjusting the ride height at each corner of the car to achieve a balanced weight distribution, which can significantly improve handling. This requires specialized equipment and knowledge.
Post-Installation Tuning and Refinement
Once the coilovers are installed and the car is aligned, it's time to fine-tune the damping and ride height to your liking.
- Damping Adjustment: Start with your baseline damping settings and experiment with small adjustments (one or two clicks at a time). Pay attention to how the car feels over bumps, through corners, and under braking. Softer damping will provide a more comfortable ride but may result in more body roll. Firmer damping will reduce body roll but may make the ride harsher.
- Ride Height Adjustment: After driving the car for a few days, check the ride height again. The springs may settle slightly. Make small adjustments as needed to achieve your desired ride height and appearance.
Remember, suspension tuning is a process of trial and error. Take your time, be patient, and document your changes. With a little bit of effort, you can dial in your ISR Performance coilovers for optimal performance on your 240SX.
Important Note: Always consult the manufacturer's documentation for specific instructions and recommendations for your ISR Performance coilovers. This article is intended as a general guide and should not be substituted for professional advice. Improper installation or adjustment of coilovers can affect vehicle handling and safety.