Technical Review And Setup Of Megan Racing Coilovers For The 240sx
So, you've decided to upgrade your 240SX's suspension with a set of Megan Racing coilovers. Excellent choice! They offer a great balance of performance and adjustability, perfect for everything from spirited street driving to track days. However, simply bolting them on isn't enough. This article walks you through a detailed technical review and setup procedure to ensure optimal performance and longevity. We'll cover pre-installation checks, proper installation techniques, initial adjustments, and some advanced tuning considerations.
Pre-Installation Technical Review
Before you even think about touching a wrench, it's crucial to inspect the coilovers thoroughly. This is about more than just checking for scratches; we're looking for potential issues that could affect performance and safety.
Component Inspection
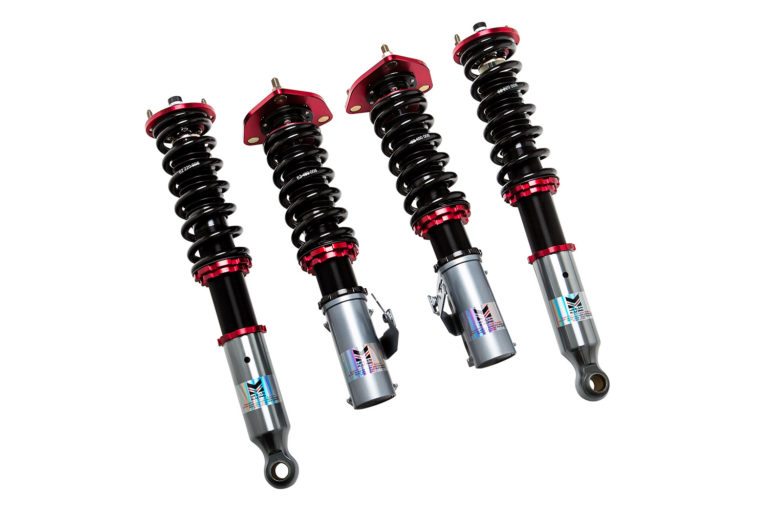
Start by laying out all the components. You should have four coilovers (two front, two rear), adjustment wrenches (usually C-spanners), and any included documentation. Verify that you have all the necessary parts as listed in the product manual. Now, let's get into the details:
- Coil Spring Rate Verification: Check the coil springs for markings indicating their spring rate. This is typically a number followed by "kg/mm" or "lbs/in." Ensure the rates match your intended use. A higher spring rate is stiffer, suitable for track use. A lower spring rate is softer, better for street comfort. Mismatched spring rates front to rear can drastically affect handling balance.
- Damper Function Test: Compress and extend each damper (shock absorber) by hand. It should offer smooth, consistent resistance throughout its travel. Listen for any unusual noises like squeaks or clicks, which could indicate a faulty seal or internal damage. The rebound should be consistent across all four dampers.
- Thread Inspection: Carefully examine the threads on the shock body and spring perches. Look for any signs of damage, like stripped or cross-threaded areas. Apply a small amount of anti-seize compound to the threads before making any adjustments. This will prevent corrosion and make future adjustments much easier.
- Bushing Inspection: Inspect the rubber or polyurethane bushings in the lower mounts. Check for cracks, tears, or excessive play. If the bushings seem damaged, consider replacing them with higher-quality polyurethane bushings for improved durability and performance.
- Hardware Check: Verify that all included hardware (bolts, nuts, washers) is present and of the correct size and thread pitch. It's always a good idea to replace any questionable hardware with new, high-grade replacements. Pay close attention to the torque specifications for each bolt, as using the wrong torque can lead to failure.
Understanding the Adjustments
Megan Racing coilovers typically offer height and damper adjustability. Some models may also feature camber plates. Let's break down what each adjustment does:
- Ride Height Adjustment: This is achieved by rotating the lower spring perch up or down the threaded shock body. Lowering the car's center of gravity improves handling but can also reduce suspension travel and increase the risk of bottoming out.
- Damper Adjustment (Rebound): This controls the rate at which the shock absorber returns to its extended position after being compressed. Higher rebound damping slows down the extension, reducing body roll and improving stability. Too much rebound can cause a harsh ride and reduce grip on uneven surfaces.
- Camber Adjustment (if equipped): Camber is the angle of the wheel relative to the vertical axis. Negative camber (top of the wheel tilted inward) improves cornering grip but can cause uneven tire wear. Camber plates allow you to adjust this angle, optimizing it for your driving style and track conditions.
Installation Procedure
Now, let's get those coilovers installed! This is a general guide; always refer to the specific instructions included with your Megan Racing coilovers.
Preparation
Safety first! Always work on a level surface with the car securely supported by jack stands. Disconnect the battery to prevent any electrical accidents.
- Loosen Lug Nuts: Before lifting the car, loosen the lug nuts on the wheels you'll be removing.
- Raise and Support the Vehicle: Use a jack to lift the car and place jack stands under the frame rails. Make sure the jack stands are securely positioned. Never work under a car supported only by a jack.
- Remove Wheels: Remove the wheels.
- Disconnect Brake Lines and ABS Sensors (if applicable): Carefully disconnect the brake lines and ABS sensors from the strut assembly. Use a wrench to loosen the brake line fitting and secure it out of the way. Be careful not to damage the brake line. Disconnect the ABS sensor wiring harness from the strut.
Front Coilover Installation
- Disconnect Sway Bar End Links: Disconnect the sway bar end links from the stock struts.
- Unbolt the Strut Assembly: Locate and remove the bolts that secure the strut assembly to the hub. These bolts are usually located at the bottom of the strut.
- Remove the Upper Strut Mount Bolts: In the engine bay, remove the bolts that secure the upper strut mount to the chassis. Be careful, as the strut assembly may drop down when the last bolt is removed.
- Install the Megan Racing Coilover: Carefully install the Megan Racing coilover in the reverse order of removal. Secure the upper mount bolts and the lower strut bolts to the hub.
- Reconnect Brake Lines and ABS Sensors: Reconnect the brake lines and ABS sensors to the coilover.
- Reconnect Sway Bar End Links: Reconnect the sway bar end links to the coilover. You may need adjustable end links to compensate for the ride height change.
- Torque Fasteners: Torque all bolts and nuts to the manufacturer's specified torque settings. This is critical for safety.
Rear Coilover Installation
The rear installation is similar to the front, but there are a few key differences.
- Access the Rear Struts: Depending on your 240SX model, you may need to remove interior trim panels to access the upper strut mounts.
- Disconnect the Lower Shock Bolt: Locate and remove the bolt that secures the lower shock mount to the rear control arm.
- Remove the Upper Strut Mount Bolts: Remove the bolts that secure the upper strut mount to the chassis.
- Install the Megan Racing Coilover: Install the Megan Racing coilover in the reverse order of removal.
- Torque Fasteners: Torque all bolts and nuts to the manufacturer's specified torque settings.
Initial Adjustments and Alignment
With the coilovers installed, it's time to make some initial adjustments.
- Set Ride Height: Adjust the ride height on all four corners to your desired level. Measure from the ground to a consistent point on the chassis (e.g., the pinch weld) to ensure even ride height. Remember to account for spring settling, so you may need to readjust after a few days of driving.
- Set Damper Settings: Start with the damper settings in the middle of their adjustment range. This provides a good baseline for further tuning.
- Get an Alignment: A professional wheel alignment is absolutely essential after installing coilovers. This will ensure proper tire wear and handling. The alignment shop will adjust camber, caster, and toe to the manufacturer's specifications or your desired custom settings.
Advanced Tuning Considerations
Once you've got the basics down, you can start experimenting with more advanced tuning techniques.
- Corner Balancing: Corner balancing involves adjusting the ride height to distribute the car's weight evenly across all four wheels. This can improve handling balance and reduce body roll. This requires specialized scales and is best left to a professional.
- Damper Tuning: Experiment with different damper settings to fine-tune the car's handling characteristics. Increasing rebound damping can reduce body roll, while decreasing it can improve grip on bumpy surfaces. The key is to test different settings and find what works best for your driving style and the track conditions.
- Sway Bar Adjustment: Adjustable sway bars can be used to further fine-tune the car's handling balance. Stiffer front sway bars reduce understeer, while stiffer rear sway bars reduce oversteer.
Troubleshooting
Here are some common issues you might encounter and how to address them:
- Coilover Noises: Squeaking or clunking noises can indicate loose bolts, worn bushings, or improperly adjusted preload. Double-check all fasteners and inspect the bushings.
- Harsh Ride: A harsh ride can be caused by overly stiff springs or excessive rebound damping. Try reducing the spring rate or decreasing the rebound damping.
- Poor Handling: Poor handling can be caused by a variety of factors, including incorrect ride height, improper damper settings, or a bad wheel alignment. Start by verifying the wheel alignment and then experiment with different damper settings.
Installing Megan Racing coilovers on your 240SX is a rewarding project that can significantly improve its handling and performance. By following this detailed guide and taking your time, you can ensure a successful installation and unlock the full potential of your suspension.