Thermostat Housing Replacement And Coolant Flow Analysis
The thermostat housing: a seemingly simple component, yet crucial to the efficient operation and longevity of any internal combustion engine. It’s the gatekeeper, the bouncer at the coolant party, controlling the flow of coolant and ensuring the engine maintains its optimal operating temperature. A faulty housing, often manifesting as leaks or a stuck-open/stuck-closed thermostat, can lead to overheating, reduced fuel economy, and even catastrophic engine damage. In this guide, we'll delve into the process of thermostat housing replacement, coupled with a detailed analysis of coolant flow dynamics.
Thermostat Housing: Anatomy and Function
Before diving into the replacement procedure, let's understand the core function of the thermostat housing and its components. The housing itself is typically a cast metal (aluminum or sometimes plastic) enclosure that contains the thermostat. It's strategically positioned within the cooling system, usually at the point where the coolant exits the engine block or cylinder head. Its primary responsibilities include:
- Holding the Thermostat: This is its most obvious role. The thermostat, a temperature-sensitive valve, resides within the housing.
- Directing Coolant Flow: The housing channels coolant either to the radiator (for cooling) or back into the engine (for faster warm-up).
- Providing a Sealed Connection: It creates a watertight seal between the engine and the coolant hoses, preventing leaks.
- Housing Temperature Sensors: Many modern vehicles incorporate temperature sensors directly into the thermostat housing, providing critical data to the engine control unit (ECU).
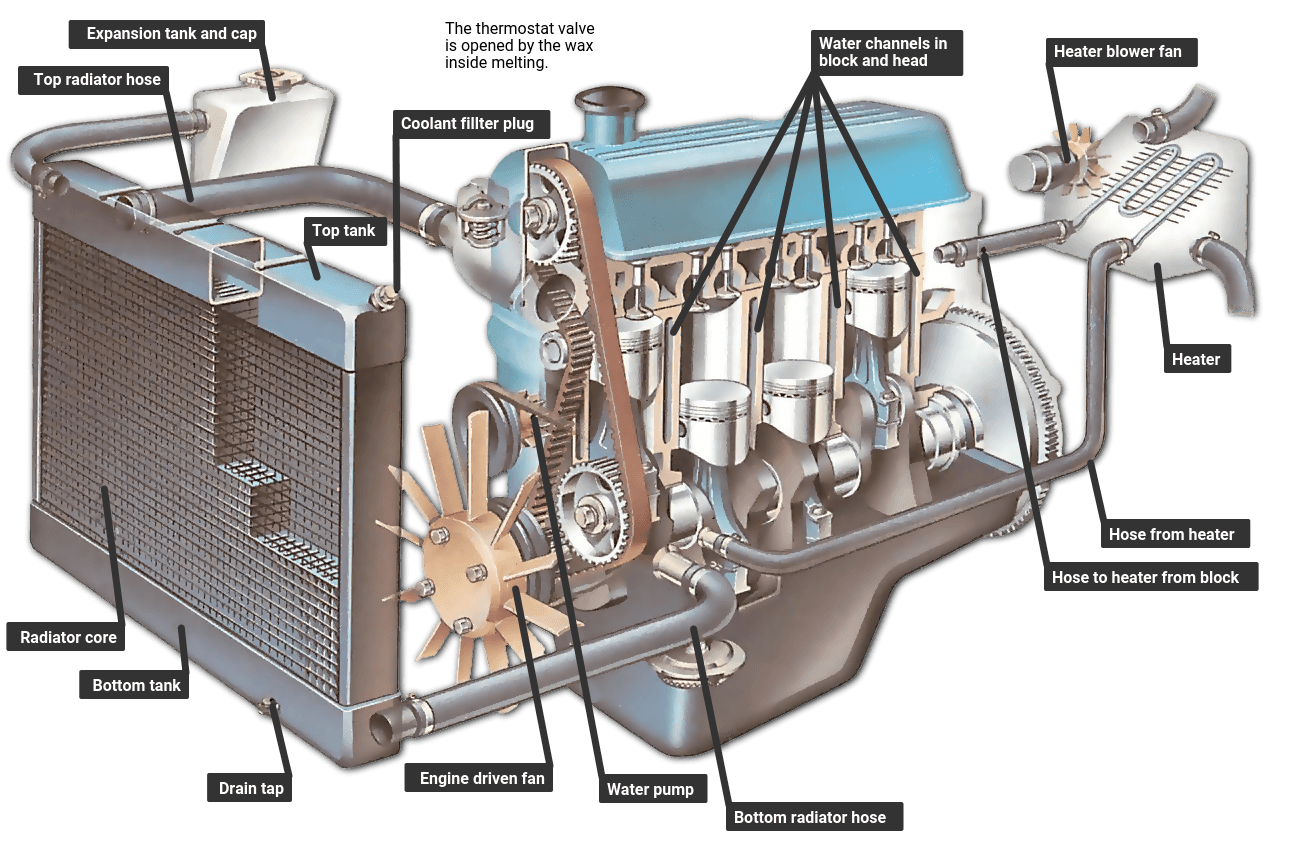
Understanding the interplay of these functions is key. When the engine is cold, the thermostat is closed, restricting coolant flow to the radiator. Instead, the coolant circulates only within the engine block and heater core, allowing the engine to reach operating temperature quickly. As the engine warms up, the thermostat gradually opens, allowing coolant to flow to the radiator for cooling. This constant modulation maintains the engine within a narrow temperature range.
Symptoms of a Failing Thermostat Housing
Recognizing the warning signs of a failing thermostat housing is crucial to preventing more serious problems. Common symptoms include:
- Overheating: This is perhaps the most alarming symptom. A stuck-closed thermostat will prevent coolant from reaching the radiator, causing the engine to overheat.
- Coolant Leaks: Cracks in the housing, damaged gaskets, or corroded connections can lead to coolant leaks. Look for puddles of coolant under the vehicle or a sweet smell coming from the engine compartment.
- Engine Running Too Cold: A stuck-open thermostat will allow coolant to flow to the radiator even when the engine is cold, preventing it from reaching operating temperature. This can lead to reduced fuel economy and increased emissions.
- Fluctuating Temperature Gauge: Erratic temperature readings can indicate a thermostat that is sticking or failing to modulate properly.
- Check Engine Light (CEL): In many cases, a malfunctioning thermostat or temperature sensor will trigger a CEL.
Thermostat Housing Replacement: A Step-by-Step Guide
Replacing a thermostat housing is a relatively straightforward task for a moderately skilled DIY mechanic. However, it's crucial to follow the correct procedure to avoid damaging the engine or causing leaks. Always consult your vehicle's repair manual for specific instructions and torque specifications.
- Safety First: Allow the engine to cool completely before starting any work. Disconnect the negative battery terminal to prevent accidental electrical shorts.
- Drain the Coolant: Locate the radiator drain cock (usually at the bottom of the radiator) and open it to drain the coolant into a clean container. Dispose of used coolant responsibly.
- Disconnect Hoses and Sensors: Carefully disconnect the coolant hoses connected to the thermostat housing. Use hose clamp pliers to release the clamps. Disconnect any electrical connectors for temperature sensors. Be gentle to avoid breaking plastic connectors.
- Remove the Old Housing: Remove the bolts securing the thermostat housing to the engine. Note the location and order of any shims or spacers. Carefully remove the housing.
- Clean the Mating Surfaces: Thoroughly clean the mating surfaces on both the engine and the new thermostat housing. Use a scraper or wire brush to remove any old gasket material or corrosion.
- Install the New Thermostat: Install the new thermostat into the housing, ensuring it is oriented correctly. Some thermostats have a small air bleed valve; this should be positioned at the top.
- Install the New Gasket: Install a new gasket or O-ring between the thermostat housing and the engine. Never reuse an old gasket.
- Reinstall the Housing: Carefully reinstall the thermostat housing, aligning it with the bolt holes. Tighten the bolts to the specified torque. Over-tightening can damage the housing.
- Reconnect Hoses and Sensors: Reconnect the coolant hoses and electrical connectors. Ensure the hose clamps are securely fastened.
- Refill the Coolant: Refill the cooling system with the correct type and amount of coolant. Refer to your vehicle's owner's manual for specifications.
- Bleed the Cooling System: Air trapped in the cooling system can cause overheating. Bleed the system by opening the bleeder valve (usually located on the thermostat housing or radiator) while the engine is running. Add coolant as needed.
- Check for Leaks: Start the engine and allow it to reach operating temperature. Carefully inspect the thermostat housing and hoses for any leaks.
Coolant Flow Analysis: A Deeper Dive
Understanding coolant flow is crucial not only for diagnosing cooling system problems but also for optimizing engine performance. The cooling system is a closed-loop system, relying on the pump to maintain continuous circulation. The rate of flow, dictated by the water pump's speed and impeller design, influences the engine's ability to dissipate heat effectively. Here's a breakdown of key factors:
Coolant Pump Characteristics
The water pump is the heart of the system. Its impeller design directly affects the volume of coolant it can move at a given engine speed. Some performance engines employ high-flow water pumps to enhance cooling capacity, particularly under high-load conditions. An obstructed or failing pump significantly reduces coolant flow, leading to overheating.
Thermostat Modulation and Flow Restriction
The thermostat acts as a variable resistor in the coolant circuit. When closed, it restricts flow almost entirely to the engine block. As it opens, it progressively allows more coolant to flow to the radiator. However, even when fully open, the thermostat still introduces some degree of flow restriction. This restriction is critical; it ensures adequate residence time for the coolant within the engine block to absorb heat. Removing the thermostat entirely can actually reduce cooling efficiency in some engines by allowing coolant to flow too quickly.
Radiator Design and Heat Dissipation
The radiator's design directly impacts its ability to dissipate heat. The number of rows, fin density, and overall surface area determine its heat transfer capacity. A clogged or corroded radiator will impede coolant flow and reduce its cooling efficiency. Furthermore, proper airflow through the radiator is essential. Obstructions like leaves or debris can hinder airflow and reduce cooling effectiveness.
Hose Routing and Diameter
The diameter and routing of coolant hoses also play a role. Sharp bends and overly long hoses can increase flow resistance. Modern engines often use molded hoses with smooth internal surfaces to minimize friction and maximize flow.
Coolant Type and Condition
The type and condition of the coolant itself are important. Using the correct coolant mixture (typically a 50/50 mix of antifreeze and distilled water) ensures optimal heat transfer and corrosion protection. Old or contaminated coolant can lose its heat transfer properties and contribute to corrosion, reducing cooling efficiency.
Troubleshooting Flow Problems
Diagnosing coolant flow problems requires a systematic approach. Here are some techniques:
- Visual Inspection: Check for leaks, damaged hoses, and obstructions in the radiator.
- Temperature Differential: Use an infrared thermometer to measure the temperature difference between the inlet and outlet hoses of the radiator. A large temperature difference indicates good heat transfer, while a small difference suggests reduced cooling capacity.
- Pressure Testing: A pressure tester can be used to check for leaks in the cooling system.
- Flow Testing: Specialized flow meters can be used to measure the coolant flow rate at various points in the system.
By understanding the function of the thermostat housing, recognizing the symptoms of failure, and mastering the replacement procedure, you can ensure the proper operation of your engine's cooling system. Coupled with a solid understanding of coolant flow dynamics, you can effectively diagnose and address cooling system problems, contributing to the longevity and performance of your vehicle.