Timing Chain Installation Procedures And Tensioning Methods
Alright, so you're diving into the world of timing chain replacement or installation. This is a critical job, and getting it right is paramount to engine longevity and performance. This article will walk you through the procedures and tensioning methods, assuming you have a solid foundation in basic automotive repair and safety. Remember to always consult your vehicle's specific repair manual for torque specifications and any model-specific instructions. Working on an engine's timing system requires precision, so double-check everything!
Preparation and Disassembly
Before you even think about touching that timing chain, preparation is key. We're talking meticulous organization and absolute cleanliness.
Safety First
Disconnect the negative battery terminal. This prevents accidental starting or short circuits while you're working. Trust me, a sparking wrench near gasoline fumes is *not* a good time. Wear safety glasses and gloves. Drain the coolant and engine oil. This prevents a mess and allows access to certain components.
Accessing the Timing Chain
This varies greatly depending on your engine. Generally, you'll need to remove the following components:
- Serpentine belt: Note the routing before removal! Take a picture or draw a diagram.
- Accessory drive components: Power steering pump, alternator, A/C compressor. Support these out of the way; don't just let them dangle by their hoses.
- Crankshaft pulley/damper: This often requires a special puller. Avoid damaging the pulley during removal.
- Timing chain cover: This is usually sealed with RTV sealant. Be prepared to clean it thoroughly.
As you remove each component, label it clearly and store it in a labeled bag or container. Taking pictures throughout the disassembly process is a lifesaver when it comes time to reassemble everything.
Important: Before removing the old timing chain, carefully inspect it for wear. Look for stretched links, worn teeth on the sprockets, and any signs of damage. This can provide valuable clues about the cause of the failure and help you diagnose other potential problems.
Setting the Engine to Top Dead Center (TDC)
This is arguably the most crucial step. Incorrect timing will lead to poor performance or, worse, engine damage. You need to ensure that cylinder #1 is at Top Dead Center (TDC) on the compression stroke.
Here's the process:
- Rotate the crankshaft manually (usually clockwise, but confirm in your manual) until the timing mark on the crankshaft pulley aligns with the TDC mark on the engine block. This might involve using a breaker bar on the crankshaft bolt.
- Check the camshaft position. On many engines, there are alignment marks on the camshaft sprockets that should be aligned with corresponding marks on the cylinder head. Verify these marks are correct according to your manual.
- You can confirm TDC on the compression stroke by removing the spark plug from cylinder #1 and placing your finger over the spark plug hole. When you rotate the crankshaft, you should feel air pressure building up as the piston rises.
Note: Some engines use a special tool (a TDC locking pin) to positively lock the crankshaft at TDC. If your engine requires one, use it!
Timing Chain Installation
Now comes the exciting part – installing the new timing chain! Make sure you have the correct timing chain kit for your engine. These kits usually include the chain, sprockets, tensioner, and guides.
Installing the Sprockets
Before installing the new sprockets, inspect the crankshaft and camshaft seals. Now is the perfect time to replace them if they are leaking or showing signs of wear. Install the new sprockets onto the crankshaft and camshafts. Ensure they are properly seated and aligned. Some sprockets have a specific orientation, so consult your manual. Lightly lubricate the sprocket surfaces with engine oil.
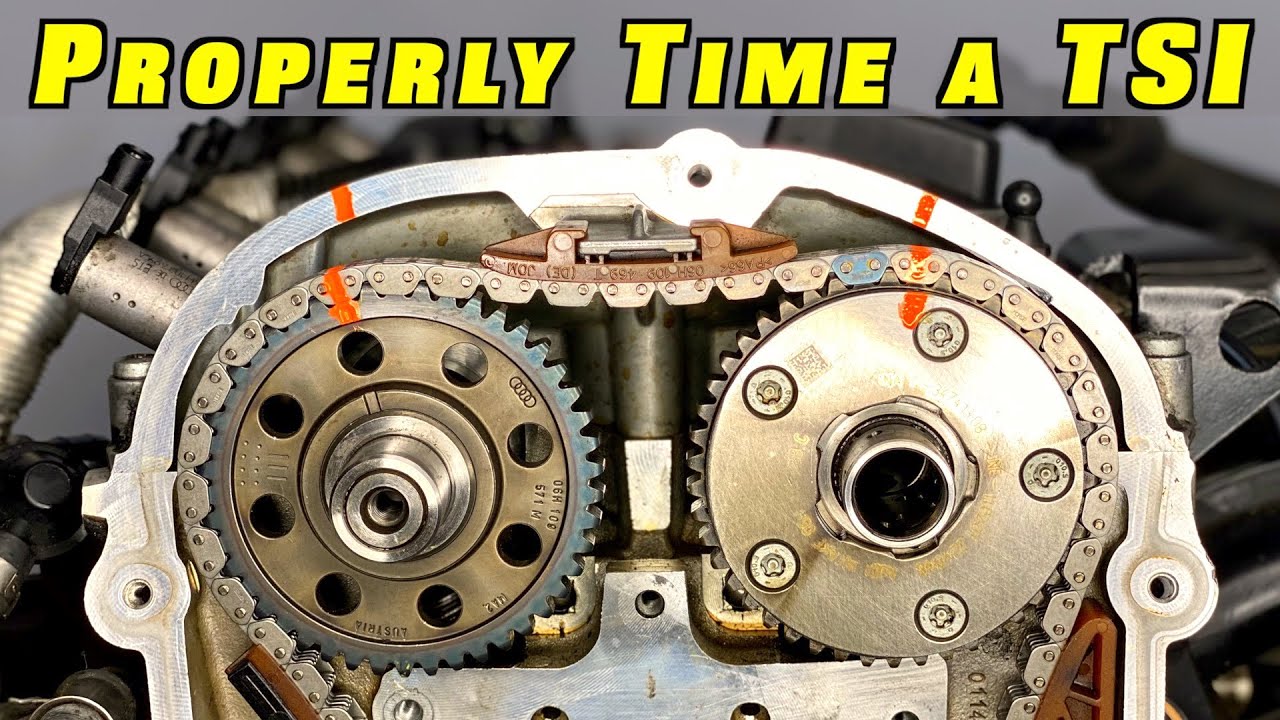
Routing the Timing Chain
This requires careful attention to the timing marks. Most timing chains have colored links or marks that must align with corresponding marks on the crankshaft and camshaft sprockets. Consult your repair manual for the exact alignment procedure for your engine.
- Position the timing chain around the crankshaft sprocket.
- Carefully route the chain up to the camshaft sprocket(s).
- Align the timing marks on the chain with the marks on the sprockets.
- Install the chain guide(s). These guides help to maintain chain alignment and prevent it from slapping against the engine block.
Double-check that all the timing marks are aligned correctly before proceeding! Misalignment can lead to serious engine damage.
Installing the Tensioner
The timing chain tensioner is a crucial component. It maintains the correct chain tension, preventing excessive slack and ensuring proper timing. There are typically two types of tensioners: mechanical and hydraulic.
Mechanical Tensioners: These tensioners use a spring-loaded mechanism to maintain chain tension. Install the tensioner according to your repair manual. Some mechanical tensioners require manual adjustment.
Hydraulic Tensioners: These tensioners use engine oil pressure to maintain chain tension. They often have a ratcheting mechanism that prevents them from retracting. Priming the tensioner with oil before installation can help ensure proper operation.
Tensioner Installation Notes:
- Always use a new tensioner. The old one may be worn or damaged.
- Follow the manufacturer's instructions for installing and priming the tensioner.
- Ensure the tensioner is properly engaged with the chain guide.
Tensioning Methods and Verification
Once the chain, sprockets, and tensioner are installed, it's time to verify the timing and tension. This is a critical step to prevent engine damage.
Manual Tensioning (for some mechanical tensioners)
Some mechanical tensioners require manual adjustment. This usually involves tightening a bolt or screw to increase chain tension. Consult your repair manual for the correct tensioning procedure and torque specifications. Over-tightening can damage the tensioner or chain, while under-tightening can lead to chain slap and timing issues.
Verification Process
Regardless of the type of tensioner, you need to verify that the timing is correct after installation.
- Rotate the crankshaft manually two full revolutions (720 degrees).
- Recheck the alignment of the timing marks on the crankshaft and camshaft sprockets.
- If the timing marks are still aligned, you're good to go. If not, you'll need to remove the chain and sprockets and start the installation process again.
Important: Listen for any unusual noises while rotating the crankshaft. Excessive chain slap or binding can indicate a problem with the installation or tensioner.
Reassembly and Final Checks
Now that you've verified the timing and tension, it's time to reassemble everything. This is essentially the reverse of the disassembly process.
Reassembly Steps
- Install the timing chain cover with a new gasket or RTV sealant. Follow the torque specifications in your repair manual.
- Reinstall the crankshaft pulley/damper.
- Reinstall the accessory drive components.
- Reinstall the serpentine belt, following the routing diagram you made earlier.
- Refill the coolant and engine oil.
- Reconnect the negative battery terminal.
Final Checks
- Start the engine and let it idle for a few minutes.
- Listen for any unusual noises.
- Check for leaks.
- Monitor the engine temperature.
If everything sounds and looks good, take the vehicle for a short test drive. Pay attention to engine performance and any unusual noises or vibrations. If you notice any problems, stop immediately and investigate.
A word of caution: Timing chain work isn't for the faint of heart. If you're not comfortable with any of these procedures, it's best to take your vehicle to a qualified mechanic. Engine damage from incorrect timing can be incredibly expensive.