Troubleshooting And Replacing The Lower Engine Wiring Harness On A 240sx
Alright, let's dive into tackling the lower engine wiring harness on your S13 240SX. This isn't a beginner's project, but with some patience and a methodical approach, you can definitely handle it. This article assumes you've got a solid understanding of basic automotive electrical systems and can read a wiring diagram (Factory Service Manual - FSM - is your best friend here!). We'll cover common issues, troubleshooting steps, and the replacement procedure, all while keeping it clear and straightforward.
Common Problems and Symptoms
The lower engine harness, often exposed to the elements and engine heat, is a notorious trouble spot on the 240SX. It's susceptible to:
- Cracked or brittle insulation: Years of heat cycling cause the insulation to harden and crack, leading to shorts and intermittent connections.
- Corroded connectors: Moisture and road salt creep into connectors, causing corrosion that increases resistance and disrupts signals.
- Damaged wiring: Rubbing against engine components or exhaust can wear through the insulation and expose the wires.
Here are some common symptoms indicating a potential issue with your lower engine wiring harness:
- Erratic engine performance: Misfires, hesitation, or stalling can all be related to sensor signals being disrupted.
- Sensor malfunction codes: Check Engine Light (CEL) illuminating with codes related to the crankshaft position sensor (CKPS), oxygen sensors (O2 sensors), oil pressure sensor, or knock sensor.
- No start condition: If critical sensors like the CKPS aren't functioning, the ECU won't allow the engine to start.
- Electrical shorts: Fuses blowing repeatedly or unexplained electrical issues.
- Decreased Fuel Economy: Faulty sensor readings can cause the ECU to miscalculate the air/fuel ratio.
Troubleshooting the Wiring Harness
Before you even think about replacing the entire harness, let's try to pinpoint the problem. Remember, a systematic approach is key here.
Visual Inspection
Start with a thorough visual inspection of the entire harness. Look for:
- Cracked or brittle insulation: Gently flex the wires to see if the insulation cracks or crumbles.
- Corrosion: Examine connectors for green or white powdery deposits.
- Damaged wires: Look for any cuts, abrasions, or melted insulation.
- Loose connectors: Ensure all connectors are securely attached.
Testing with a Multimeter
A multimeter is your best friend for electrical troubleshooting. Here are some common tests you can perform:
- Continuity test: Check for breaks in the wire. Disconnect the harness from both ends and use the multimeter to measure the resistance between the two ends of the wire. A reading of "OL" (overload) or infinite resistance indicates a break in the wire.
- Voltage drop test: This is crucial for identifying high resistance in a circuit. With the circuit energized, measure the voltage drop across each connector and section of wire. A high voltage drop indicates excessive resistance, likely due to corrosion or a poor connection. A voltage drop of more than 0.3V across a connector is typically considered excessive.
- Short to ground test: Disconnect the harness from the ECU and battery. Use the multimeter to measure the resistance between each wire and ground (the chassis). A low resistance reading (close to 0 ohms) indicates a short to ground.
Important Safety Note: Always disconnect the negative battery terminal before working on any electrical components. Use proper safety precautions when working with electrical systems.
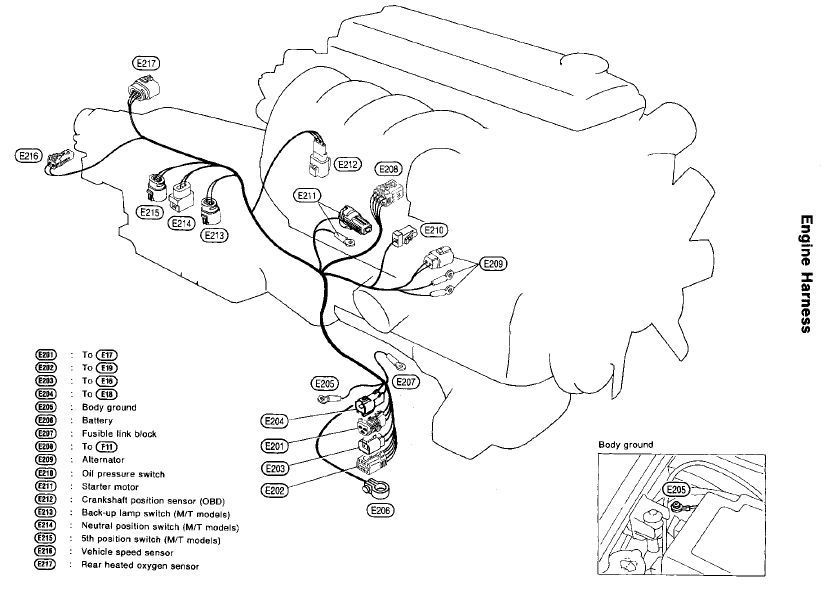
Using a Wiring Diagram
The Factory Service Manual (FSM) is essential. Refer to the wiring diagram for your specific model year. The diagram will show you the wire colors, pin locations, and the components connected to each wire. This will help you trace the circuit and identify the source of the problem.
Example: Let's say you're getting a code for the crankshaft position sensor (CKPS). The wiring diagram will show you the CKPS connector pinout, the wire colors, and where those wires connect to the ECU. You can then use the multimeter to test the continuity of each wire between the CKPS connector and the ECU connector.
Replacing the Lower Engine Wiring Harness
If you've determined that the wiring harness is beyond repair (extensive damage, multiple issues), replacement is the best option. Here's a step-by-step guide:
1. Preparation
- Gather your tools: You'll need a socket set, wrench set, screwdrivers, wire cutters, wire strippers, crimping tool, multimeter, electrical tape, heat shrink tubing, and zip ties.
- Disconnect the battery: Always disconnect the negative battery terminal first!
- Label everything: Use masking tape and a marker to label each connector as you disconnect it. This will save you a lot of headaches during reassembly. Take pictures as well!
- Clean the engine bay: A clean engine bay will make it easier to work.
2. Disconnecting the Old Harness
Carefully disconnect all the connectors on the old harness. Pay attention to how the harness is routed. You'll want to route the new harness in the same way to avoid rubbing and chafing.
- Remove any retaining clips or brackets: The harness is typically secured to the engine block and other components with clips and brackets.
- Disconnect from ECU: Disconnect the harness from the ECU. Be careful not to damage the ECU connector pins.
- Carefully remove the old harness: Once all the connectors are disconnected and the harness is free from the engine, carefully remove it from the engine bay.
3. Installing the New Harness
Route the new harness in the same way as the old harness. Secure it with the retaining clips and brackets.
- Connect to the ECU: Connect the harness to the ECU. Make sure the connector is fully seated and locked in place.
- Connect all the other connectors: Connect all the other connectors, matching them to the labels you made earlier.
- Double-check your work: Before reconnecting the battery, double-check that all the connectors are securely attached and that the harness is routed correctly.
4. Final Steps
- Reconnect the battery: Reconnect the negative battery terminal.
- Start the engine: Start the engine and check for any warning lights or error codes.
- Test drive: Take the car for a test drive to ensure that everything is working properly.
Important Considerations
- Aftermarket Harnesses: Several aftermarket wiring harness options are available. While they can offer improvements like thicker gauge wire or better connectors, quality can vary. Research thoroughly and choose a reputable brand. Some may require modification to fit properly.
- Depinning and Repair: If only a few wires are damaged, consider depinning the connector and replacing individual wires. This can be a more cost-effective solution than replacing the entire harness. You'll need the correct depinning tools and replacement terminals.
- Connector Cleaning: Use electrical contact cleaner to clean connectors before reassembly. This will help ensure good connections and prevent corrosion.
- Proper Grounding: Ensure all ground connections are clean and secure. Poor grounding can cause a variety of electrical problems.
Replacing the lower engine wiring harness can be a challenging but rewarding project. By following these steps and taking your time, you can restore your 240SX's electrical system and enjoy a smoother, more reliable ride. Remember to always consult the Factory Service Manual for your specific model year, and don't hesitate to seek help from a qualified mechanic if you're unsure about any part of the process. Good luck!