Where Is The Fuel Filter On A Nissan Rogue
Maintaining your Nissan Rogue's fuel system is crucial for optimal performance and longevity. A vital component of this system is the fuel filter, responsible for removing contaminants from the fuel before it reaches the engine. Understanding its location is essential for routine maintenance and troubleshooting fuel-related issues. This article will provide a comprehensive guide to help you locate the fuel filter on your Nissan Rogue, covering various model years and providing helpful tips.
Understanding the Role of the Fuel Filter
Before we delve into the specifics of the location, let's briefly discuss the function of the fuel filter. The fuel filter's primary job is to prevent dirt, rust, and other debris from entering the engine. These contaminants can clog fuel injectors, reduce fuel efficiency, and even cause significant engine damage. A clean fuel filter ensures a steady and clean fuel supply, contributing to smooth engine operation and optimal performance.
A clogged or dirty fuel filter can manifest in several ways, including:
- Difficulty starting the engine
- Poor acceleration
- Engine misfires
- Reduced fuel economy
- Stalling
If you experience any of these symptoms, inspecting or replacing your fuel filter is a good starting point. Regular fuel filter replacement is a part of routine vehicle maintenance.
Fuel Filter Location on Nissan Rogue: A Model-Year Breakdown
The location of the fuel filter on a Nissan Rogue can vary slightly depending on the model year. Let's break down the typical locations for different Rogue generations:
First Generation Nissan Rogue (2008-2013)
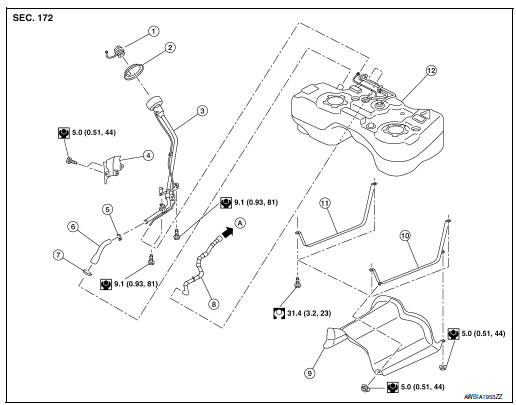
For the first generation Nissan Rogue, the fuel filter is typically located inside the fuel tank. This means it's integrated with the fuel pump module, which sits inside the fuel tank. This design makes accessing and replacing the fuel filter more involved compared to in-line or canister-type filters located outside the tank.
Accessing the Fuel Filter:
To access the fuel filter on a first-generation Rogue, you will generally need to:
- Depressurize the fuel system: This is a crucial safety step. Consult your owner's manual or a repair manual for the proper procedure.
- Gain access to the fuel tank: Typically, this involves removing the rear seat cushion and a metal access panel.
- Disconnect fuel lines and electrical connectors: Carefully disconnect the fuel lines and electrical connectors attached to the fuel pump module.
- Remove the fuel pump module: Extract the entire fuel pump module from the fuel tank.
- Replace the fuel filter: The fuel filter is usually attached to the fuel pump module and can be replaced separately, although sometimes it's sold as part of the entire fuel pump assembly.
Important Note: Working with fuel systems can be dangerous. Always exercise extreme caution, wear appropriate safety gear (gloves and eye protection), and work in a well-ventilated area. If you are not comfortable performing this task yourself, it's best to have a qualified mechanic handle the fuel filter replacement.
Second Generation Nissan Rogue (2014-2020)
Like the first generation, the second generation Nissan Rogue (2014-2020) typically has the fuel filter integrated with the fuel pump inside the fuel tank. The procedure for accessing and replacing the fuel filter is very similar to the first-generation model.
Accessing the Fuel Filter:
- Follow the same steps as outlined for the first generation Rogue: depressurize the fuel system, access the fuel tank through the rear seat, disconnect fuel lines and electrical connectors, and remove the fuel pump module.
- Once the fuel pump module is removed, you can access and replace the fuel filter element.
Again, safety is paramount. Pay close attention to the fuel lines and connections, and ensure they are properly reconnected to prevent leaks.
Third Generation Nissan Rogue (2021-Present)
Information regarding the third-generation Nissan Rogue's fuel filter location suggests it also retains the in-tank fuel filter design, integrated with the fuel pump module. This means the process for accessing the filter remains generally the same as previous generations.
Consult Your Owner's Manual:
While the general location remains consistent across generations, always consult your owner's manual for the most accurate and specific information for your particular model year. The owner's manual may provide diagrams or detailed instructions specific to your vehicle.
Why is the Fuel Filter Inside the Fuel Tank?
The in-tank fuel filter design has become increasingly common in modern vehicles. There are several reasons for this:
- Reduced emissions: In-tank fuel pumps and filters often contribute to tighter emissions control by minimizing fuel vapor leaks.
- Improved fuel system reliability: The submerged fuel pump design can improve cooling and reduce the risk of vapor lock.
- Packaging efficiency: Integrating the fuel filter with the fuel pump saves space and simplifies the fuel system design.
However, the in-tank design also means that replacing the fuel filter is a more involved process compared to older vehicles with easily accessible in-line filters.
Tips for Fuel Filter Replacement
Whether you decide to tackle the fuel filter replacement yourself or have a professional do it, here are some helpful tips:
- Use quality parts: Always use a high-quality replacement fuel filter that meets or exceeds the original equipment manufacturer (OEM) specifications. This ensures proper filtration and performance.
- Replace the fuel pump strainer: While you have the fuel pump module out, consider replacing the fuel pump strainer (also known as a fuel sock). This is a small mesh filter that sits at the bottom of the fuel pump and helps prevent large debris from entering the pump.
- Inspect fuel lines and connections: Carefully inspect all fuel lines and connections for cracks, leaks, or damage. Replace any damaged components to prevent fuel leaks.
- Tighten connections properly: Ensure that all fuel line connections are properly tightened to prevent leaks, but avoid overtightening, which can damage the fittings.
- Dispose of old fuel properly: Fuel is a hazardous material. Dispose of old fuel responsibly according to local regulations.
- Consider professional assistance: If you are not comfortable working with fuel systems or lack the necessary tools and experience, it's best to have a qualified mechanic perform the fuel filter replacement.
When to Replace Your Nissan Rogue's Fuel Filter
The recommended fuel filter replacement interval for your Nissan Rogue can be found in your owner's manual. Generally, it's recommended to replace the fuel filter every 30,000 to 50,000 miles. However, this can vary depending on driving conditions and the quality of fuel used.
If you frequently drive in dusty or dirty conditions, or if you use lower-quality fuel, you may need to replace the fuel filter more frequently. Also, if you experience any of the symptoms of a clogged fuel filter, such as difficulty starting, poor acceleration, or engine misfires, it's time to inspect and potentially replace the fuel filter.
Conclusion
Locating the fuel filter on your Nissan Rogue generally involves accessing the fuel tank and replacing the filter element attached to the fuel pump module. This task requires caution and a good understanding of fuel system components. Refer to your owner's manual for precise instructions specific to your model year. Whether you choose to replace the fuel filter yourself or seek professional assistance, maintaining a clean fuel filter is essential for the performance, efficiency, and longevity of your Nissan Rogue's engine. Regular maintenance, including fuel filter replacement, will help keep your Rogue running smoothly for years to come. By understanding the location of the fuel filter and following the proper replacement procedures, you can ensure your Nissan Rogue continues to deliver reliable and efficient performance.