Dash Lights And What They Mean
Alright, let's dive into the world of dash lights. This isn't just about annoying illuminated symbols; it's about understanding your car's health and preventing major headaches down the road. For the experienced DIYer, knowing what each light signifies is crucial for effective troubleshooting and informed repairs. We’ll break down the components, the cryptic symbols, and how to interpret them, giving you a solid foundation for tackling your own car repairs and modifications.
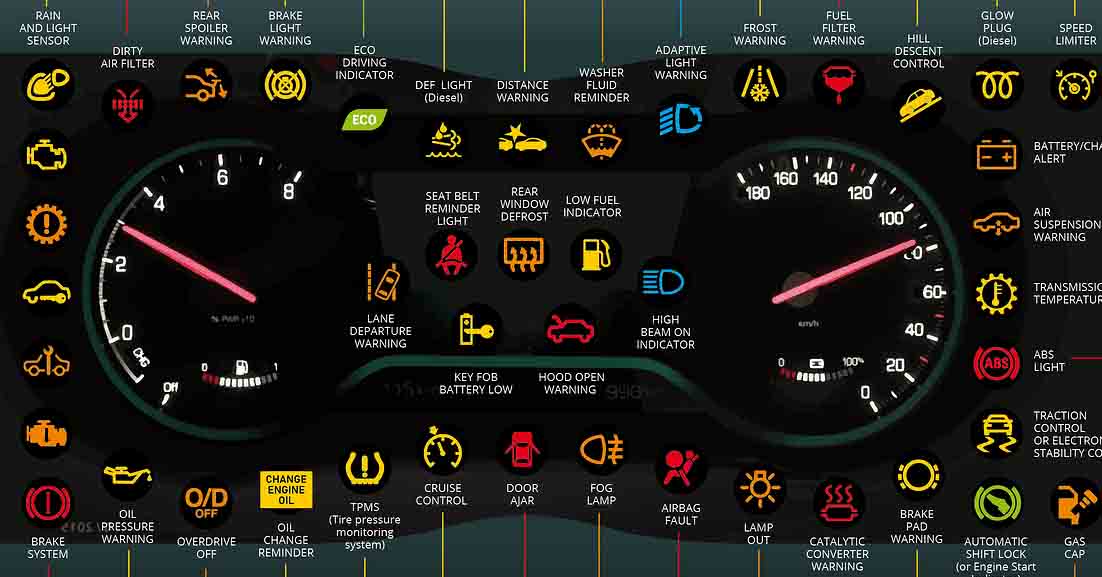
Purpose: Your Dashboard's Diagnostic Window
Why bother learning about dash lights? Simple: they're your car's way of communicating vital information. Ignoring them can lead to expensive repairs, or worse, a breakdown in a dangerous situation. Understanding the meaning behind each light allows you to:
- Diagnose problems early: Catching issues early can save you a fortune by preventing them from escalating.
- Perform basic troubleshooting: You can often pinpoint the source of a problem and attempt simple fixes yourself.
- Communicate effectively with mechanics: Accurately describing the issue to a mechanic can save time and money on diagnostic fees.
- Make informed decisions: Knowing the severity of a problem helps you prioritize repairs.
Think of this guide as your personal decryption key for your dashboard. We even have a comprehensive diagram available for download, so you can have this information at your fingertips.
Key Specs and Main Parts of Your Instrument Cluster
The instrument cluster, or dash, is more than just a collection of lights. It's a sophisticated system that receives data from various sensors and modules throughout the vehicle. Here's a breakdown of the key components:
- Sensors: These are the workhorses of the system, monitoring everything from engine temperature and oil pressure to brake pad wear and tire pressure.
- Wiring Harness: The intricate network of wires that connects the sensors to the vehicle's computer and the instrument cluster.
- ECU/PCM (Engine Control Unit/Powertrain Control Module): This is the car's "brain." It receives data from the sensors, processes it, and determines whether to illuminate a warning light.
- Instrument Cluster Module: The physical housing containing the gauges, lights, and displays. This module interprets the signals from the ECU and activates the appropriate indicators.
- LEDs/Bulbs: The light sources that illuminate the warning symbols. LEDs are increasingly common due to their longevity and energy efficiency.
Understanding these components is crucial for diagnosing electrical issues. A faulty sensor, a broken wire, or a malfunctioning ECU can all trigger warning lights. Knowing where these components are located in your vehicle will significantly aid in your diagnostic process.
Decoding the Symbols: Lines, Colors, and Icons
Dash light symbols use a standardized system, but variations can exist between manufacturers. Here's a general guide to interpreting them:
Colors:
- Red: Indicates a serious problem requiring immediate attention. Stop the car as soon as it's safe to do so and investigate. Examples include low oil pressure, overheating, or brake system failure.
- Yellow/Amber: Indicates a potential problem that needs to be addressed soon. It may not be immediately critical, but ignoring it could lead to more serious issues. Examples include check engine light, low tire pressure, or ABS warning.
- Green/Blue: Indicates that a system is active or functioning correctly. Examples include headlights, turn signals, or cruise control.
Icons:
The icons themselves are designed to be as universal as possible. Here are a few common ones:
- Engine-shaped icon (Check Engine Light): This is the infamous CEL. It can indicate a wide range of issues, from a loose gas cap to a catalytic converter failure. It requires further diagnosis using an OBD-II scanner (On-Board Diagnostics II).
- Oil can icon: Indicates low oil pressure. This is a critical warning. Stop the car immediately to prevent engine damage.
- Battery icon: Indicates a problem with the charging system. This could be a faulty alternator, a loose battery cable, or a dead battery.
- Thermometer icon: Indicates overheating. Pull over and let the engine cool down.
- Brake icon: Can indicate low brake fluid, parking brake engaged, or a problem with the braking system.
- Tire icon (horseshoe shape with exclamation point): Indicates low tire pressure in one or more tires.
- ABS icon: Indicates a problem with the Anti-lock Braking System. The brakes will still function, but ABS will not be active.
Lines and Shapes:
The arrangement of lines and shapes around the icons often provides further context. For example, wavy lines might indicate a fluid level issue, while a circle with an exclamation point could denote a general warning.
How It Works: The Diagnostic Process
When a sensor detects a problem, it sends a signal to the ECU. The ECU then compares the sensor data to pre-programmed parameters. If the data falls outside the acceptable range, the ECU illuminates the corresponding warning light on the instrument cluster.
Here's a simplified example: The engine temperature sensor detects that the coolant temperature is exceeding the normal operating range. It sends this information to the ECU. The ECU compares this temperature to the programmed threshold. Since the temperature is too high, the ECU activates the overheating warning light on the dash.
The ECU also stores a Diagnostic Trouble Code (DTC) in its memory. This code provides more specific information about the problem. You can retrieve these codes using an OBD-II scanner. These scanners plug into a port usually located under the dashboard and allow you to read the stored DTCs. Decoding these codes is crucial for accurate diagnosis.
Real-World Use: Basic Troubleshooting Tips
Here are some basic troubleshooting tips for common dash lights:
- Check Engine Light (CEL): Use an OBD-II scanner to retrieve the DTC. Research the code online to understand the potential causes. Common culprits include a loose gas cap, a faulty oxygen sensor, or a failing catalytic converter.
- Low Tire Pressure Light: Check the tire pressure in all tires and inflate them to the recommended pressure. If the light persists, there may be a problem with the tire pressure monitoring system (TPMS).
- Battery Light: Check the battery terminals for corrosion and ensure they are securely connected. If the light persists, have the battery and charging system tested by a professional.
- Oil Pressure Light: Immediately check the oil level. If the oil level is low, add oil. If the light persists, there may be a problem with the oil pump or oil pressure sensor. Do not drive the car with the oil pressure light illuminated.
Important Note: Some dash lights are triggered by simple, easily fixable issues. However, others indicate serious problems that require professional attention. If you are unsure about the cause of a warning light, it's always best to consult a qualified mechanic.
Safety: Handle with Care
Working on your car involves inherent risks. Always disconnect the negative battery terminal before working on any electrical components. Be especially cautious when working around the following:
- High-voltage components: Some vehicles, particularly hybrids and electric vehicles, contain high-voltage components that can be lethal. Never attempt to work on these systems without proper training and safety equipment.
- Fuel system: Fuel is highly flammable. Take precautions to prevent sparks or open flames when working on the fuel system.
- Brake system: Improperly repaired brake systems can lead to serious accidents. If you are not comfortable working on brakes, leave it to a professional.
Always wear appropriate safety gear, including safety glasses and gloves. Work in a well-ventilated area, and follow all manufacturer's instructions.
We hope this detailed guide has shed light on the often-misunderstood world of dash lights. Remember, understanding these symbols is the first step towards becoming a more confident and capable DIY mechanic. And don't forget, we have a downloadable diagram available to help you quickly reference these symbols. Keep it handy in your garage!