How Do I Get Mold Out Of My Car
Conquering Automotive Mold: A DIY Guide for the Discerning Car Enthusiast
Mold. Just the word conjures up images of damp basements and unpleasant odors. But what about mold in your car? It's not uncommon, especially in humid climates or after a leak, and it's definitely something you want to address promptly. This article will provide you with a comprehensive guide to identifying, removing, and preventing mold growth in your vehicle, equipping you with the knowledge and techniques used by professional detailers and restoration specialists.
Understanding the Mold Menace: Why You Should Care
Mold isn't just unsightly; it's a health hazard. Mold spores, tiny particles released by mold, can cause allergic reactions, respiratory problems, and other health issues. For individuals with pre-existing conditions like asthma, the effects can be more severe. Beyond health concerns, mold can degrade the materials in your car's interior, leading to discoloration, weakening of fabrics, and ultimately, a decrease in the vehicle's resale value. Addressing mold growth promptly is crucial for maintaining both your health and the integrity of your investment.
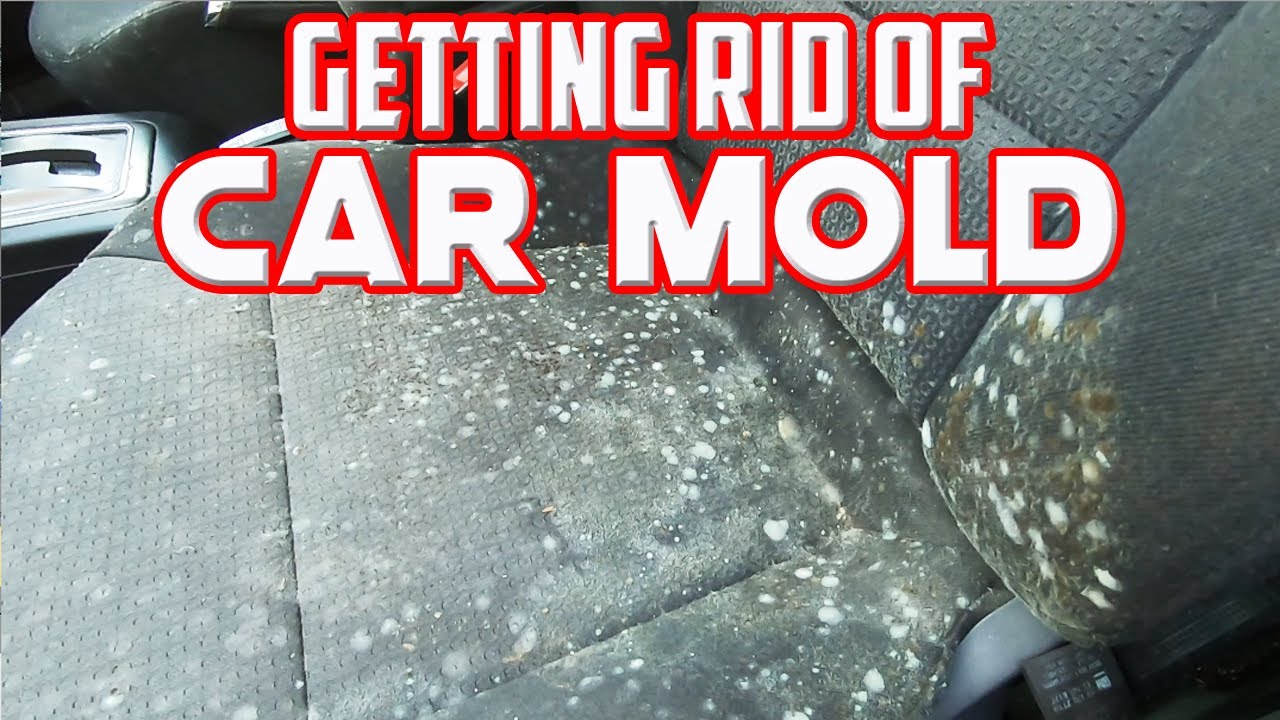
Step 1: Identification – Spotting the Unseen Enemy
The first step is accurately identifying if you actually have mold. It's often mistaken for mildew, which is a less harmful surface growth. Mold typically appears as fuzzy or slimy patches, often in shades of green, black, white, or brown. Mildew, on the other hand, tends to be powdery and grey or white. Here's where to look:
- Upholstery: Check seats, carpets, and headliners, especially in areas that might have been exposed to moisture. Pay particular attention to seams and crevices.
- Floor mats: These are prime breeding grounds for mold due to trapped water and dirt.
- Air vents: Mold can thrive in the dark, damp environment of your car's ventilation system. A musty smell when the AC or heater is running is a key indicator.
- Trunk: Look for leaks around the taillights or weather stripping, as these can lead to moisture accumulation.
- Under seats: Debris and spilled liquids often collect under the seats, providing a perfect environment for mold.
A strong, musty odor, even without visible signs, can also indicate mold growth. If you suspect mold but can't see it, consider using a home mold test kit, which can be purchased at most hardware stores. These kits typically involve collecting a sample and sending it to a lab for analysis.
Step 2: Preparing for Battle – Safety First!
Before you start cleaning, it's crucial to protect yourself. Mold spores can be irritating to the skin and respiratory system, so take these precautions:
- Wear a mask: A NIOSH-approved N95 respirator or higher is essential to prevent inhaling mold spores. Avoid simple dust masks, as they don't provide adequate protection.
- Wear gloves: Use waterproof gloves (nitrile or rubber) to protect your skin from direct contact with mold and cleaning solutions.
- Wear eye protection: Safety glasses or goggles will prevent mold spores or cleaning chemicals from getting into your eyes.
- Ventilate the area: Open all doors and windows to ensure proper airflow. If possible, work in a well-ventilated garage or outdoors.
It's also a good idea to wear old clothes that you don't mind getting dirty or stained. Consider covering nearby surfaces to prevent the spread of mold spores during the cleaning process.
Step 3: Assembling Your Arsenal – Cleaning Supplies and Tools
You'll need a variety of cleaning supplies and tools to effectively remove mold from your car's interior. Here's a list of essentials:
- Vacuum cleaner with HEPA filter: A HEPA (High-Efficiency Particulate Air) filter traps even the smallest mold spores, preventing them from being recirculated into the air.
- Mold-killing cleaner: Several options are available, including:
- Vinegar: A natural and effective mold killer. Use white distilled vinegar undiluted.
- Borax: A mild alkaline mineral that's effective against mold. Mix 1 cup of borax with 1 gallon of water.
- Commercial mold remover: Choose a product specifically designed for automotive use. Follow the manufacturer's instructions carefully. Make sure it is safe for use on the surface you are cleaning.
- Spray bottles: For applying cleaning solutions.
- Scrub brushes: Use a soft-bristled brush for delicate surfaces like upholstery and a stiffer brush for carpets and floor mats.
- Microfiber cloths: For wiping down surfaces and absorbing excess moisture.
- Detailing brushes: For cleaning hard-to-reach areas like air vents and crevices.
- Wet/dry vacuum: For extracting water and cleaning solutions from carpets and upholstery.
- Ozone generator (optional): For removing lingering odors and killing mold spores in the air vents. Use with caution and follow manufacturer's instructions. Ensure the car is unoccupied during use.
Step 4: The Cleaning Process – Eliminating the Infestation
Now for the main event: removing the mold. Follow these steps carefully:
- Vacuum thoroughly: Use the vacuum cleaner with the HEPA filter to remove as much loose mold and debris as possible from the affected areas. Pay attention to seams, crevices, and under seats.
- Apply cleaning solution: Spray the chosen mold-killing cleaner onto the affected areas. Be sure to saturate the moldy surfaces, but avoid over-wetting.
Over-wetting can worsen the problem by providing more moisture for mold to grow.
- Scrub: Use the appropriate brush to scrub the affected areas. For upholstery and delicate surfaces, use a gentle scrubbing motion. For carpets and floor mats, you may need to use more force.
- Wipe down: Use a clean microfiber cloth to wipe down the cleaned surfaces. Remove as much excess moisture as possible.
- Extract (if applicable): If you've used a lot of cleaning solution, use a wet/dry vacuum to extract the excess moisture from carpets and upholstery.
- Dry thoroughly: This is the most crucial step. Mold thrives in damp environments, so it's essential to dry the cleaned areas completely.
- Park the car in direct sunlight with the doors and windows open.
- Use fans to circulate air inside the car.
- Use a dehumidifier to remove moisture from the air.
- Leave the car open for several hours, or even overnight, to ensure thorough drying.
- Clean air vents (optional): Purchase an automotive air vent cleaner (available at auto parts stores) and follow the instructions on the can. This will help to kill mold spores in the ventilation system. Alternatively, consider using an ozone generator as described above, strictly following safety protocols.
Step 5: Prevention – Keeping Mold at Bay
Once you've removed the mold, it's crucial to take steps to prevent it from returning. Here are some tips:
- Address leaks promptly: Fix any leaks in the car's roof, windows, or trunk.
- Use moisture absorbers: Place moisture absorbers, such as silica gel packets or charcoal bags, in the car to absorb excess moisture.
- Clean regularly: Regularly vacuum the car's interior and wipe down surfaces to remove dirt and debris.
- Dry wet items: If you spill liquids in the car or get caught in the rain, dry the affected areas thoroughly as soon as possible.
- Park in a well-ventilated area: Avoid parking the car in damp or shaded areas.
- Run the AC periodically: Even in cold weather, running the AC for a few minutes each week can help to dry out the ventilation system.
Real-World Use – Basic Troubleshooting Tips
Here are a few troubleshooting tips to help you tackle common mold-related issues:
- Persistent odor: If the musty odor persists after cleaning, try using an odor eliminator spray specifically designed for automotive use. You might also need to repeat the cleaning process, paying extra attention to hidden areas.
- Stubborn stains: For stubborn mold stains, you may need to use a stronger cleaning solution or consult a professional detailing service.
- Mold in the air vents: If the mold is primarily located in the air vents, focus your cleaning efforts on this area. Use an air vent cleaner and consider using an ozone generator.
Safety – Highlight Risky Components
While this process is generally safe, be mindful of these potential hazards:
- Electrical components: Avoid getting electrical components wet, such as the car's computer, wiring harnesses, or sensors. Disconnect the battery if necessary to prevent electrical shock.
- Airbags: Be extremely careful when cleaning around airbags. Avoid spraying cleaning solutions directly onto the airbag module.
- Ozone generators: Ozone is a powerful oxidant and can be harmful to your health. Never occupy the car while an ozone generator is in use. Follow the manufacturer's instructions carefully.
- Mixing Chemicals: Never mix different cleaning chemicals, as this can create dangerous fumes. In particular, never mix bleach with ammonia.
By following these steps and taking the necessary precautions, you can successfully remove mold from your car and prevent it from returning. Remember to prioritize safety and be thorough in your cleaning efforts. With a little elbow grease and the right techniques, you can restore your car's interior to its former glory and breathe easy knowing that you've eliminated a potential health hazard.
We have a detailed diagram illustrating the key areas susceptible to mold growth in a typical vehicle's interior. You can download it to aid in your inspection and cleaning process. This visual aid provides a comprehensive overview, ensuring you don't miss any potential problem spots.