How Do You Change Glow Plugs
So, you're tackling glow plugs, huh? Good on you. It's a job that can save you a bundle compared to a shop visit, and with a little patience and the right know-how, it's definitely within the grasp of an experienced DIYer. This guide will walk you through the process, covering everything from identification to replacement, and even a bit of troubleshooting. We'll assume you have a decent grasp of basic automotive tools and safety procedures.
Purpose: Mastering the Glow Plug System
Understanding your glow plug system is crucial for maintaining a healthy diesel engine, especially in colder climates. A malfunctioning system can lead to hard starts, excessive smoke, and reduced fuel economy. This guide isn't just about swapping parts; it's about gaining a deeper understanding of how your diesel engine pre-heats its cylinders for optimal combustion. Whether you're dealing with a nagging cold-start issue, preventative maintenance, or simply wanting to learn more about your vehicle, this information is invaluable. This article will provide you with the information necessary to understand the purpose of glow plugs, how they function, and how to safely and effectively replace them.
Key Specs and Main Parts
Before diving in, let's get familiar with the core components and their specifications. Diesel engines rely on the heat generated by compression to ignite the fuel. However, in cold weather, the engine block and cylinder heads absorb much of this heat, making ignition difficult. That's where glow plugs come in. They are essentially small heating elements that warm the combustion chamber to aid in starting.
Key Components:
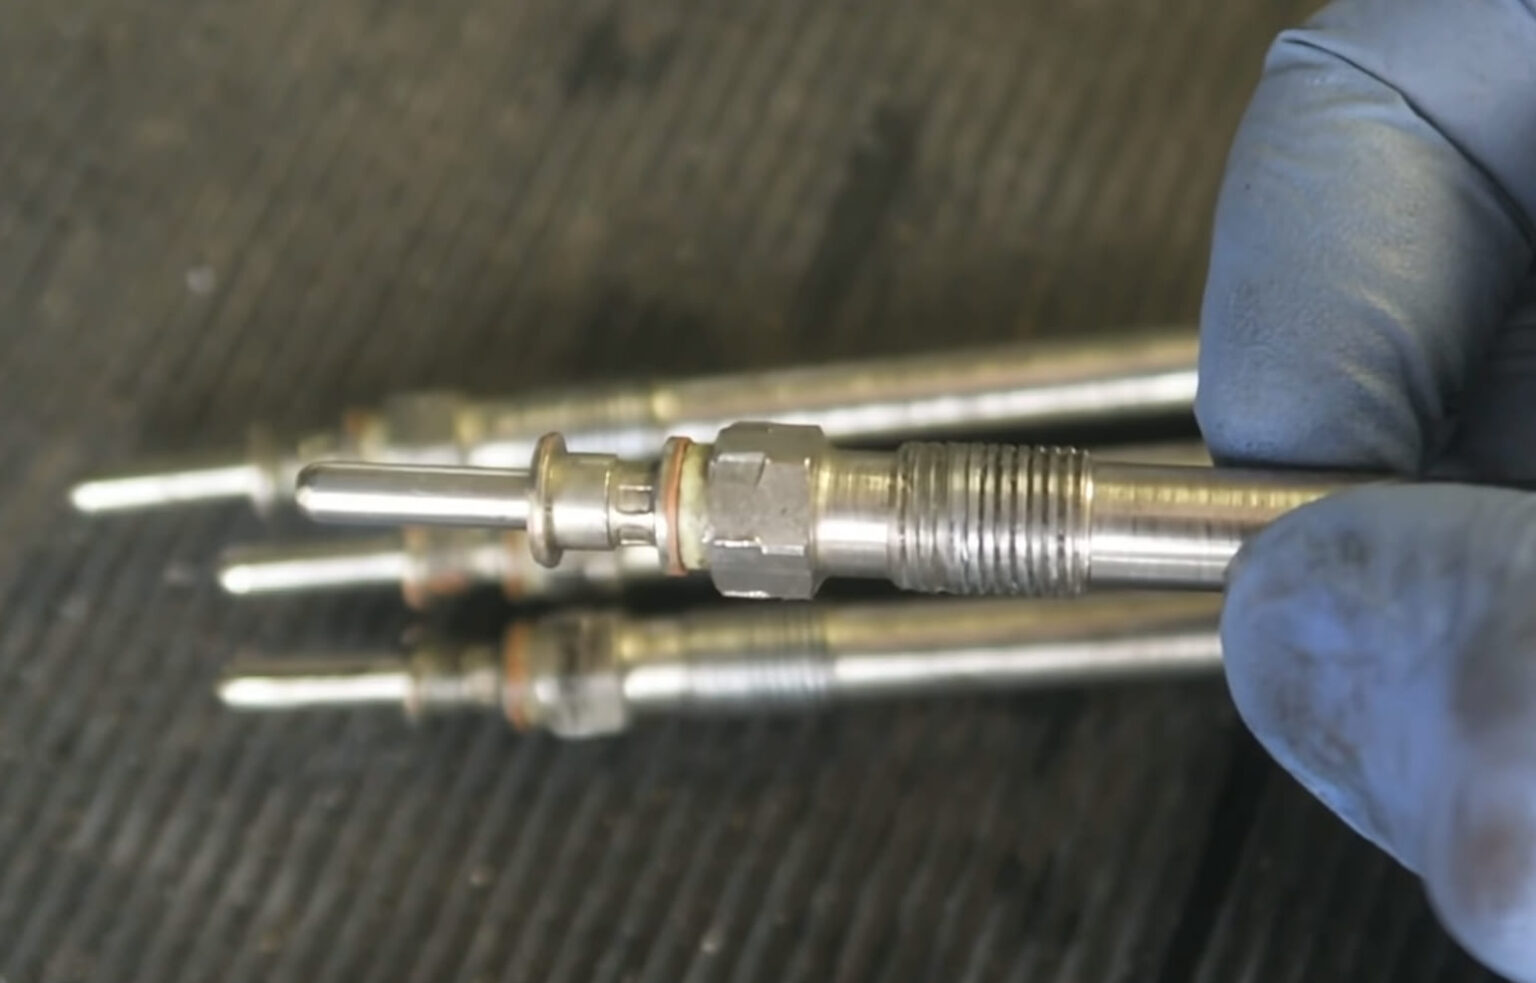
- Glow Plugs: The heating elements themselves. They are typically cylindrical and threaded into the cylinder head. Resistance (measured in ohms) is a critical specification. A healthy glow plug will have a low resistance.
- Glow Plug Relay/Controller: This controls the timing and duration of the voltage supplied to the glow plugs. Modern systems often use a dedicated controller with sophisticated algorithms.
- Wiring Harness: Connects the glow plugs to the relay/controller and the vehicle's electrical system. Look for signs of corrosion or damage.
- Fuse: Protects the glow plug circuit from overloads.
- Temperature Sensor (Coolant Temperature Sensor - CTS): Often plays a role in determining the glow plug activation time. Colder coolant temperatures usually mean longer glow plug activation.
Key Specifications:
- Voltage: Glow plugs are typically rated for 12V, but some newer systems use lower voltages (e.g., 5V) to prolong plug life. Check your vehicle's specific requirements.
- Amperage: The amount of current drawn by each glow plug. This is important for diagnosing issues and ensuring the relay can handle the load.
- Resistance: As mentioned earlier, a healthy glow plug will have a low resistance (usually under 1 ohm). Use a multimeter to measure this.
- Thread Size and Length: Critical for proper fitment. Consult your vehicle's parts catalog.
How It Works: The Glow Plug Cycle
The glow plug system operates in cycles dictated by the engine control unit (ECU) or a dedicated glow plug controller. Here's a simplified breakdown:
- Request to Start: When you turn the ignition key to the "ON" position, the ECU or glow plug controller receives a signal.
- Temperature Monitoring: The controller monitors engine coolant temperature (CTS) to determine the required pre-heating time.
- Glow Plug Activation: The controller activates the glow plug relay, sending voltage to the glow plugs. They begin to heat up rapidly.
- Pre-Heating Phase: The glow plugs heat the combustion chambers for a predetermined time, typically a few seconds to several minutes, depending on the temperature.
- Starting: You crank the engine. The heated air in the combustion chambers aids in ignition.
- After-Glow (Optional): Many modern systems continue to power the glow plugs for a short period after the engine starts. This reduces white smoke and improves cold-weather running.
- Deactivation: Once the engine reaches a certain temperature, the controller deactivates the glow plugs.
Real-World Use: Troubleshooting and Replacement
So, you suspect a glow plug issue? Here's how to diagnose and address it:
Troubleshooting:
- Hard Starting: Especially in cold weather, is a classic symptom.
- Excessive White Smoke: During cold starts, unburnt fuel can cause white smoke.
- Rough Idling: Misfires due to poor combustion can lead to rough idling.
- Check Engine Light (CEL): A glow plug fault might trigger a CEL. Use an OBD-II scanner to read the code.
- Testing Glow Plugs:
- Resistance Test: Disconnect the wiring harness from the glow plugs. Use a multimeter set to ohms. Place one probe on the glow plug terminal and the other on the glow plug body (ground). A healthy plug will have low resistance (typically under 1 ohm). An open circuit (infinite resistance) indicates a failed plug.
- Voltage Test: With the ignition "ON" (but engine not running), use a voltmeter to check for voltage at the glow plug terminals. You should see close to battery voltage when the glow plugs are supposed to be activated. Be careful not to short the terminals to ground.
Replacement Procedure:
- Safety First: Disconnect the negative battery cable.
- Access: Locate the glow plugs. This might involve removing air intake components or other parts to gain access.
- Disconnect Wiring: Carefully disconnect the wiring harness from the glow plugs. Use a small pick or screwdriver if necessary.
- Loosen the Glow Plugs: Use the correct size socket (usually deep-well) to loosen the glow plugs. Be patient and apply penetrating oil if they are stuck. DO NOT force them, as you risk breaking them off in the cylinder head. This is a worst-case scenario.
- Remove the Glow Plugs: Once loosened, unscrew the glow plugs by hand.
- Inspect the Threads: Examine the threads on the new glow plugs. Apply a small amount of anti-seize compound to the threads to prevent future sticking. DO NOT over-apply anti-seize, as it can interfere with proper grounding.
- Install the New Glow Plugs: Carefully thread the new glow plugs into the cylinder head by hand. Torque them to the manufacturer's specification using a torque wrench. DO NOT overtighten.
- Reconnect Wiring: Reconnect the wiring harness to the glow plugs.
- Reassemble: Reinstall any components you removed to gain access.
- Reconnect Battery: Reconnect the negative battery cable.
- Start the Engine: Start the engine and observe for any issues. Monitor for excessive smoke or rough idling.
- Clear Codes (If Necessary): If a CEL was triggered, use an OBD-II scanner to clear the codes.
Safety: Handling High Temperatures and Electrical Components
Working on the glow plug system involves potential hazards:
- Hot Surfaces: The engine block and exhaust components can be extremely hot. Allow the engine to cool down completely before working on the glow plugs.
- Electrical Shock: Be careful when working with electrical components. Disconnect the battery to prevent accidental shorts.
- Broken Glow Plugs: As previously mentioned, a stuck glow plug can break off in the cylinder head. This is a difficult and potentially expensive repair. Use penetrating oil and exercise caution. If you feel significant resistance, consider seeking professional help.
- Fuel: Diesel fuel is flammable. Avoid spills and keep open flames away from the work area.
Disclaimer: This guide is for informational purposes only and should not be considered a substitute for professional advice. Always consult your vehicle's repair manual and follow proper safety procedures. If you are not comfortable performing this repair, seek the assistance of a qualified mechanic.