How Do You Charge A Nissan Leaf
So, you're ready to dive deeper into the fascinating world of EV charging, specifically focusing on the Nissan Leaf. Understanding how your Leaf charges isn't just about plugging it in; it's about grasping the intricate dance of electricity and technology that keeps you on the road. This article will serve as your comprehensive guide to the charging system of the Nissan Leaf, providing you with the knowledge to diagnose problems, understand its limitations, and potentially even explore modifications (with the necessary caution, of course!). We're going to approach this like I'm explaining it to a fellow gearhead – technical, but clear and practical.
Purpose of Understanding the Leaf's Charging System
Why should you, as an intermediate car owner or DIY mechanic, care about the Leaf's charging system? Several reasons:
- Troubleshooting: Knowing the components and their function allows you to diagnose charging issues more effectively. Is it the EVSE (Electric Vehicle Supply Equipment), the onboard charger, or the battery management system (BMS) causing the problem?
- Maintenance: Understanding how the charging system operates helps you avoid common pitfalls that can degrade battery health and shorten the lifespan of charging components.
- Modifications (Proceed with Extreme Caution!): While not for the faint of heart, understanding the charging system is crucial if you ever contemplate modifications like upgrading the onboard charger or exploring faster charging solutions. Remember, messing with high-voltage systems is extremely dangerous and can void warranties.
- General Knowledge: It's simply interesting! The Leaf is a complex piece of technology, and understanding its charging system provides valuable insight into the future of automotive engineering.
Key Specs and Main Parts
The Nissan Leaf's charging system is comprised of several key components working in concert. Here's a breakdown:
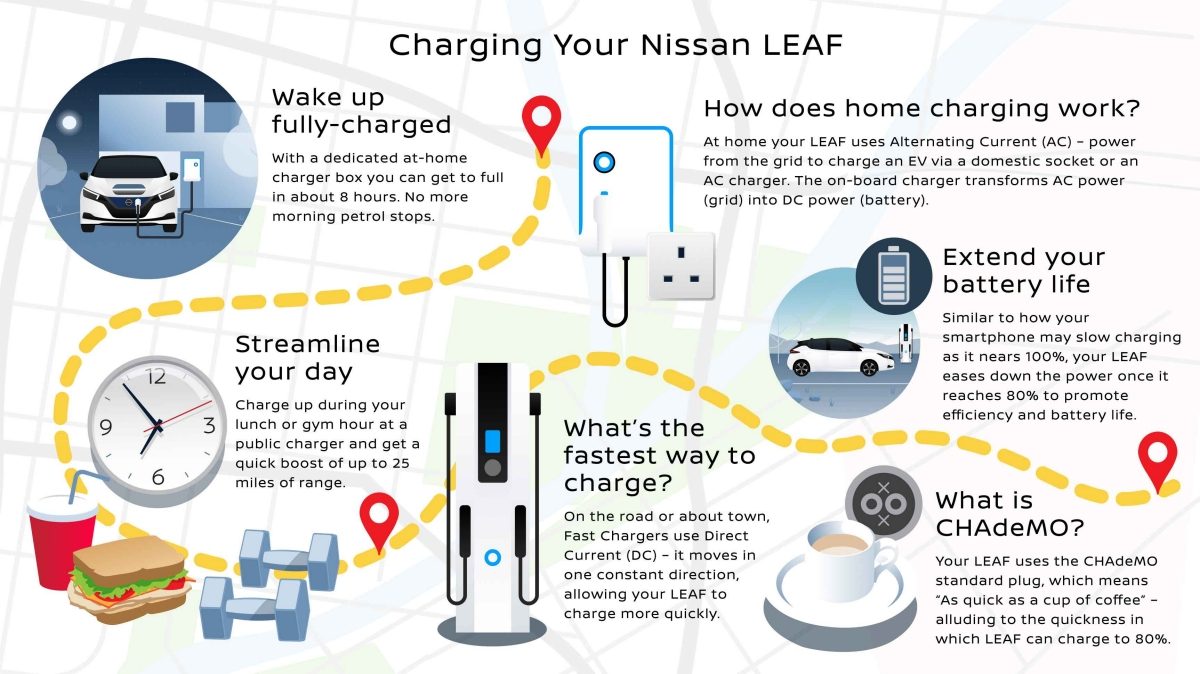
- Charging Port: This is where you physically connect your charging cable. Leafs come with a J1772 port for Level 1 and Level 2 charging and, depending on the model year and trim, a CHAdeMO port for DC fast charging. Later models are moving away from CHAdeMO in favor of CCS (Combined Charging System) standard.
- Onboard Charger (OBC): The OBC converts AC (Alternating Current) power from your wall outlet or Level 2 charger into DC (Direct Current) power that the battery can store. Leafs typically have a 3.3kW or 6.6kW OBC. The kW rating dictates the maximum rate at which the OBC can charge the battery.
- Battery Management System (BMS): The brain of the battery pack. The BMS constantly monitors the battery's voltage, current, temperature, and state of charge (SOC). It controls the charging process to protect the battery from overcharging, over-discharging, and overheating. It's absolutely critical for safety and longevity.
- High Voltage Battery Pack: The heart of the system, storing the energy that powers the motor. Leaf battery packs are composed of numerous individual lithium-ion cells arranged in modules.
- DC-DC Converter: This converts the high-voltage DC power from the battery pack to 12V DC power to run the car's auxiliary systems, like lights, radio, and accessories. It also charges the 12V auxiliary battery.
- EVSE (Electric Vehicle Supply Equipment): This isn't strictly part of the car, but it's crucial for Level 1 and Level 2 charging. The EVSE, often just referred to as the "charger," is actually a glorified extension cord with safety features. It communicates with the car to establish a safe charging current and voltage.
Understanding Charging System Symbols and Diagrams
Electrical diagrams, especially for high-voltage systems, can seem daunting. Here's a breakdown of common symbols you'll encounter in a Nissan Leaf charging system diagram:
- Solid Lines: Typically represent conductors, or wires, carrying electrical current. Thicker lines often indicate larger conductors capable of carrying more current.
- Dashed Lines: Often represent communication lines (e.g., CAN bus) or control signals. These lines carry data and instructions between different components.
- Color Coding: Colors are crucial for identifying different voltage levels and functions. While standards can vary slightly, you'll generally see:
- Orange: High-voltage DC power. EXTREMELY DANGEROUS!
- Black: Ground.
- Red: Typically used for lower-voltage DC power (e.g., 12V).
- Blue/White: Communication signals (e.g., CAN bus).
- Component Symbols: Each component (resistor, capacitor, diode, etc.) has a specific symbol. Learning these symbols is key to reading the diagram. For example, a zigzag line represents a resistor, while two parallel lines represent a capacitor.
- Connector Symbols: These indicate where wires are connected to components or other wires. They often include pin numbers for identification.
Pay close attention to the legends or key provided with the diagram. This will explain any specific symbols or conventions used in that particular diagram.
How It Works: The Charging Process Explained
Let's break down the charging process, from plugging in to a fully charged battery:
- Plugging In: You connect the charging cable to the Leaf's charging port.
- EVSE Communication: The EVSE communicates with the Leaf's OBC. The EVSE signals the maximum available current.
- Onboard Charger Activation: The OBC receives the signal from the EVSE and begins the charging process.
- AC to DC Conversion: The OBC converts the AC power from the EVSE to DC power. The power rating of the OBC limits the maximum rate that it can supply DC power to the battery.
- BMS Monitoring: The BMS continuously monitors the battery's voltage, current, temperature, and SOC.
- Charging Control: The BMS controls the charging process to optimize charging speed and protect the battery. It adjusts the voltage and current to prevent overcharging, over-discharging, or overheating.
- Charging Termination: When the battery reaches its target SOC (usually 80-100%), the BMS signals the OBC to stop charging.
DC fast charging bypasses the OBC. The DC fast charger directly supplies DC power to the battery pack, under the control of the BMS. This allows for much faster charging rates.
Real-World Use: Basic Troubleshooting Tips
Here are some common charging issues and basic troubleshooting steps:
- Car won't charge:
- Check the EVSE: Is it plugged in and powered on? Is the breaker tripped?
- Check the charging cable: Is it damaged? Are the pins clean?
- Check the car's charging port: Is it clean and free of debris?
- Check the charge settings in the car: Is charging scheduled? Is the charge limit set too low?
- Try a different charging station: Rule out a problem with the EVSE.
- Slow charging:
- Check the EVSE's amperage: Is it set to the maximum amperage allowed by your car and your electrical circuit?
- Check the OBC capacity: Is the car equipped with a 3.3kW or 6.6kW OBC?
- Battery temperature: Extreme temperatures can slow down charging.
- Error messages:
- Consult the owner's manual: It will provide specific information about the error message.
- Check the BMS: A faulty BMS can cause a variety of charging issues. This often requires professional diagnosis.
Important: If you suspect a problem with the high-voltage system, do not attempt to diagnose or repair it yourself. Contact a qualified EV technician.
Safety: Highlighting Risky Components
The Nissan Leaf's charging system contains high-voltage components that can be lethal. Exercise extreme caution when working around these components.
- High-Voltage Battery Pack: Contains hundreds of volts DC. Contact can cause severe burns, electric shock, and death.
- Onboard Charger: Converts AC voltage to high-voltage DC. Handle with extreme care.
- Cables and Connectors: High-voltage cables are typically orange. Avoid touching them.
Always disconnect the high-voltage system before working on it. Follow proper lockout/tagout procedures to prevent accidental re-energization. Wear appropriate personal protective equipment (PPE), including insulated gloves and safety glasses.
Disclaimer: This information is for educational purposes only and should not be considered a substitute for professional advice. Working on high-voltage systems is inherently dangerous and should only be performed by qualified technicians.
Remember, diagnosing EV systems requires specialized knowledge and equipment. Start with the basics, and if you're unsure, consult a professional. We have a detailed charging system diagram for the Nissan Leaf. You can download it to further your understanding. This diagram will provide a visual representation of the connections and components discussed in this article.