How Do You Check Glow Plugs
So, you're diving into diagnosing a diesel engine issue, and suspect your glow plugs might be the culprit? Smart move. Glow plugs are a crucial component for cold-weather starting in diesel engines, and knowing how to check them is a valuable skill. This guide will walk you through the process step-by-step, equipping you with the knowledge to diagnose glow plug problems effectively. We’ll cover everything from understanding their purpose to interpreting common symptoms and performing practical tests. Think of this as your comprehensive glow plug troubleshooting manual.
Purpose of Glow Plug Testing
Why bother testing glow plugs? Simple: a faulty glow plug (or plugs) can lead to hard starts, excessive smoke, poor fuel economy, and rough idling, especially in cold weather. Diagnosing glow plug issues early can prevent more significant engine problems down the road. Replacing a single faulty glow plug is a lot cheaper and easier than dealing with a damaged starter motor due to excessive cranking, or worse, fuel washdown damaging cylinder walls.
This guide helps you perform the following:
- Identify potential glow plug failures.
- Distinguish between glow plug issues and other starting problems.
- Save money by performing your own diagnostics and repairs.
- Understand the operation of your diesel engine’s pre-heating system.
Key Specs and Main Parts
Before we jump into testing, let's define some key terms and identify the main components of the glow plug system:
- Glow Plug: A small heating element that protrudes into the cylinder. When energized, it heats up rapidly, raising the temperature inside the cylinder to aid in combustion during cold starts.
- Glow Plug Relay/Controller: This device controls the flow of electricity to the glow plugs. It's usually controlled by the engine control unit (ECU) based on coolant temperature and other factors. Some older systems use a simple timer relay.
- Glow Plug Harness: The wiring that connects the glow plugs to the relay/controller and the vehicle's electrical system.
- Engine Control Unit (ECU): The "brain" of the engine, which monitors various sensors and controls the glow plug system.
- Operating Voltage: Typically 12 volts, but can vary slightly depending on the vehicle.
- Resistance: A healthy glow plug will have a very low resistance, typically between 0.5 and 2 ohms. This is the key measurement we'll be taking during testing. A very high or infinite resistance indicates a faulty plug.
How It Works
The glow plug system is relatively straightforward. When the engine is cold, the ECU (or timer relay) activates the glow plug relay. This relay then sends power to the glow plugs, causing them to heat up rapidly. This localized heat significantly increases the cylinder temperature, making it easier for the fuel to ignite during the initial combustion strokes. Once the engine starts and reaches a certain temperature, the glow plugs are typically deactivated, either immediately or after a short "after-glow" period to further improve combustion and reduce emissions. The after-glow function improves cold running after starting and reduces white smoke.
The ECU monitors various sensors, primarily the coolant temperature sensor (CTS), to determine when to activate the glow plugs. In some vehicles, the ECU may also use information from the intake air temperature sensor (IATS) and even the battery voltage to optimize the glow plug heating cycle.
Real-World Use - Basic Troubleshooting Tips
Here's how to put this knowledge into practice:
Visual Inspection:
Start with a visual inspection. Check the glow plugs themselves for any signs of physical damage, such as cracks or broken tips. Also, inspect the wiring harness and connectors for corrosion, loose connections, or damaged insulation.
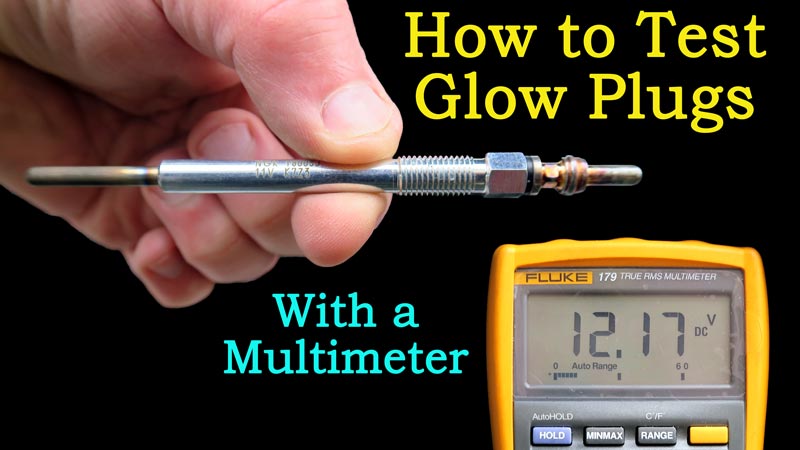
Resistance Test:
The most common and effective way to test glow plugs is with a multimeter. Here's how:
- Disconnect the glow plug harness: This is crucial to isolate the glow plugs from the rest of the electrical system. You'll likely need a small wrench or socket to remove the connectors. Be gentle, as these connectors can become brittle with age.
- Set your multimeter to the ohms setting (Ω): Select the lowest range that is suitable (e.g., 200 Ω).
- Touch one probe of the multimeter to the glow plug terminal: This is the metal terminal that connects to the wiring harness.
- Touch the other probe to the glow plug body (ground): Make sure you have a good, clean contact on the metal body of the plug. You may need to scrape away some dirt or corrosion to get a good reading.
- Read the resistance: A healthy glow plug will typically show a resistance between 0.5 and 2 ohms. A reading of zero ohms indicates a short circuit, while a reading of infinity (OL or similar on the multimeter) indicates an open circuit. Both indicate a faulty glow plug.
- Compare readings: Compare the resistance readings of all the glow plugs. If one or more plugs show significantly different readings compared to the others, it's likely faulty.
Voltage Test:
You can also check if the glow plugs are receiving voltage when they're supposed to. This test requires a bit more caution and ideally a helper.
- Connect your multimeter to ground: Use the black lead connected to a good chassis ground.
- Set your multimeter to DC volts: Choose a range suitable for 12V readings (e.g., 20V).
- Have a helper turn the ignition to the "on" position (but *do not* start the engine): This should activate the glow plug system.
- Carefully touch the red probe of the multimeter to the glow plug terminal (at the connector where the harness plugs in): You should see a voltage reading close to battery voltage (around 12 volts). If you don't see any voltage, the problem may be with the glow plug relay/controller, the wiring, or the ECU.
Troubleshooting Tips:
- Hard starting in cold weather is the most common symptom of faulty glow plugs.
- White smoke during startup can also indicate glow plug problems. This is due to unburned fuel being exhausted.
- If only one or two glow plugs are faulty, you may still experience some starting issues, but the engine may eventually start. If all glow plugs are faulty, the engine will likely not start at all in cold weather.
- Always replace all glow plugs at the same time. Even if only one is faulty, the others are likely nearing the end of their lifespan. Replacing them all ensures consistent performance and prevents future problems.
- Use dielectric grease on the glow plug terminals and connectors to prevent corrosion.
Safety - Highlight Risky Components
Working with electrical systems can be dangerous. Always disconnect the battery's negative terminal before working on any electrical components, including glow plugs. This will prevent accidental short circuits and potential electrical shocks. Be especially careful when performing the voltage test, as you'll be working with live voltage. Ensure your hands are dry and avoid touching any exposed metal parts. Also, glow plugs get very hot when energized. Allow them to cool down completely before handling them.
Fuel lines and injectors are high-pressure components. Avoid tampering with them unless you have the proper training and equipment. Fuel injection systems operate at extremely high pressures, and improper handling can result in serious injury.
Ready to go Further?
Hopefully, this guide has given you a solid understanding of how to check glow plugs. For an even more in-depth understanding, we have a detailed wiring diagram for typical glow plug systems available for download. This diagram provides a visual representation of the entire system, including the glow plugs, relay/controller, ECU, and wiring harness. Having this diagram can be invaluable for troubleshooting complex issues and understanding how all the components interact.
With a bit of knowledge and the right tools, you can confidently diagnose and repair glow plug problems, saving yourself time and money while keeping your diesel engine running smoothly.