How Do You Do An Oil Change
So, you're ready to tackle an oil change yourself? Excellent! Performing regular oil changes is arguably the single most important thing you can do to prolong the life of your engine. It keeps everything lubricated, cool, and relatively clean. This guide is geared towards the experienced DIYer, offering insights beyond the basics, covering key specs, troubleshooting, and crucial safety considerations.
Purpose of Understanding the Oil Change Process
While seemingly simple, understanding the nuances of an oil change provides benefits far beyond just keeping your engine running. It empowers you to:
- Identify Potential Problems Early: Noticing unusual debris in the old oil, like metal shavings, can alert you to developing issues before they become catastrophic.
- Choose the Right Oil and Filter: Different engines have different requirements. Understanding viscosity grades and filter types is crucial.
- Save Money: By performing the oil change yourself, you avoid labor costs and markups on parts at a shop.
- Gain Confidence: Successfully completing an oil change builds confidence and encourages you to tackle other maintenance tasks.
Key Specs and Main Parts
Before you dive in, let's cover the essential components and specifications:
- Engine Oil: The lifeblood of your engine. Its primary function is to lubricate moving parts, reducing friction and wear. Viscosity, measured in SAE grades (e.g., 5W-30), indicates the oil's thickness at different temperatures. Your vehicle's manufacturer specifies the correct viscosity for your engine. Synthetic, semi-synthetic, and conventional oils offer varying levels of performance and protection.
- Oil Filter: Removes contaminants from the oil, preventing them from circulating through the engine. Filters are rated by their micron size (the size of particles they can trap) and their efficiency (how well they remove particles). Spin-on filters are the most common type.
- Oil Drain Plug: Located on the oil pan, this plug allows you to drain the old oil. It typically has a crush washer (aluminum or copper) to ensure a tight seal.
- Crush Washer: This small, often overlooked part is crucial. It deforms slightly when the drain plug is tightened, creating a leak-proof seal. Always replace the crush washer with a new one during each oil change.
- Oil Filler Cap: Located on the engine, this is where you add the new oil.
- Dipstick: Used to check the oil level in the engine.
Essential Tools:
- Wrench or Socket Set: To remove the drain plug.
- Oil Filter Wrench: To remove the old oil filter (different sizes and types exist).
- Drain Pan: To collect the used oil.
- Funnel: To pour the new oil into the engine.
- Jack and Jack Stands (or Ramps): To safely raise the vehicle. Never work under a vehicle supported only by a jack.
- Gloves: To protect your hands.
- Rags or Shop Towels: For cleaning up spills.
How It Works: A Step-by-Step Guide
Here’s the process broken down into manageable steps:
- Preparation: Gather all your tools and materials. Make sure you have the correct oil and filter for your vehicle. Warm up the engine for a few minutes (this helps the oil flow more easily). But do not let the engine get too hot – you want it warm, not scalding.
- Raise the Vehicle: Safely raise the vehicle using a jack and jack stands, or drive it onto ramps. Safety First! Ensure the vehicle is stable and secure before proceeding.
- Locate and Remove the Drain Plug: Position the drain pan under the oil pan. Using the correct wrench or socket, carefully loosen and remove the drain plug. Be prepared for a gush of hot oil! Let the oil drain completely.
- Remove the Old Oil Filter: Locate the oil filter. Use the oil filter wrench to loosen and remove it. Have a rag ready to catch any spilled oil. Note the position of the old filter's gasket.
- Prepare the New Oil Filter: Lightly lubricate the new oil filter's gasket with clean engine oil. This helps ensure a good seal. Some mechanics also pre-fill the filter with oil to reduce the time it takes for the oil pressure to build after the oil change. This is especially helpful on vehicles with vertically mounted filters.
- Install the New Oil Filter: Screw the new oil filter onto the engine by hand until the gasket makes contact, then tighten it an additional ¾ to one full turn, as indicated on the filter itself. Do not overtighten!
- Reinstall the Drain Plug: Install a new crush washer on the drain plug. Tighten the drain plug to the manufacturer's specified torque. Overtightening can damage the oil pan. If you don't have a torque wrench, tighten it snugly but not excessively.
- Lower the Vehicle: Carefully lower the vehicle.
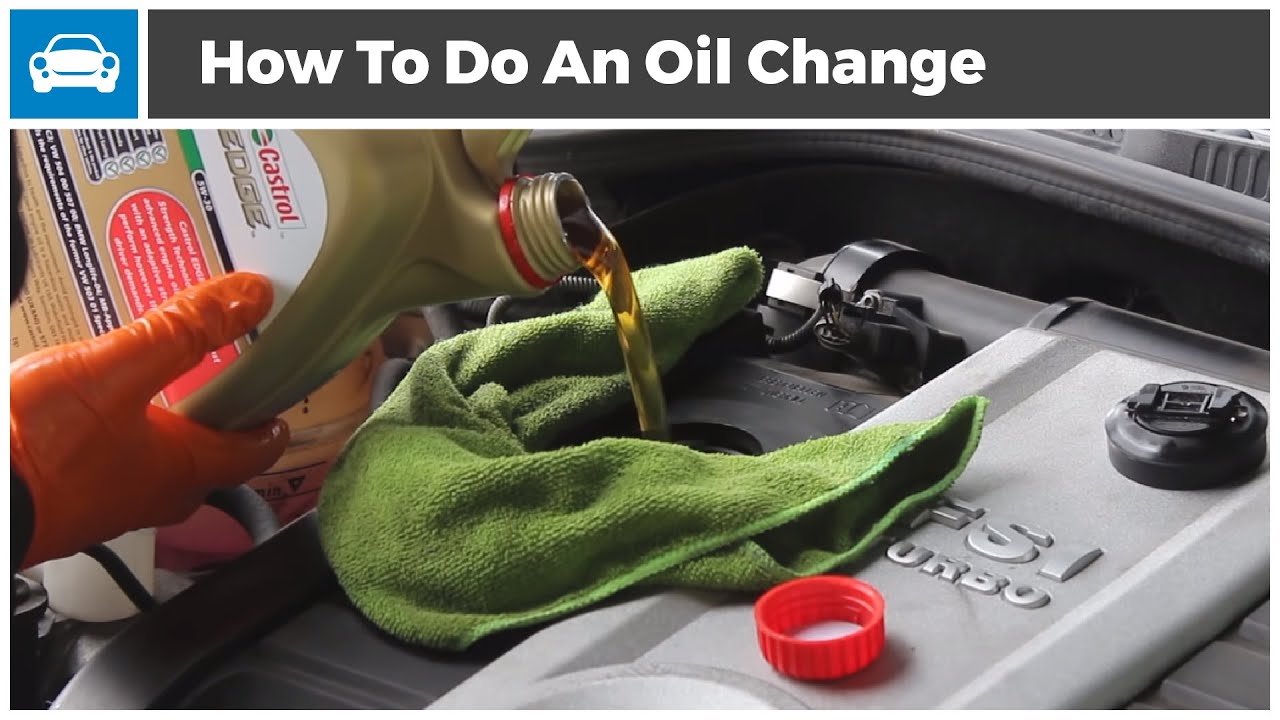
- Add New Oil: Remove the oil filler cap. Using a funnel, pour the correct amount of new oil into the engine, as specified in your vehicle's owner's manual.
- Check the Oil Level: Wait a few minutes for the oil to settle. Then, remove the dipstick, wipe it clean, reinsert it fully, and remove it again to check the oil level. Add more oil if necessary to reach the "full" mark. Do not overfill!
- Start the Engine: Start the engine and let it run for a few minutes. Check for any leaks around the drain plug and oil filter.
- Final Check: Turn off the engine and let it sit for a few minutes. Recheck the oil level one last time.
- Dispose of Used Oil Properly: Take the used oil and filter to a recycling center or auto parts store for proper disposal.
Real-World Use – Basic Troubleshooting Tips
- Drain Plug Stripped: If the drain plug is stripped, you may need to use a thread repair kit or replace the oil pan.
- Oil Filter Stuck: Use a longer oil filter wrench or a screwdriver to puncture the filter (as a last resort) for extra leverage.
- Oil Leak After Change: Check the drain plug and oil filter for tightness. Ensure the crush washer was replaced.
- Low Oil Pressure Light: If the low oil pressure light comes on after the oil change, immediately shut off the engine. Check the oil level. If the level is correct, there may be a more serious problem.
- Difficulty Removing Oil Filter: Make sure you are turning the filter in the correct direction to loosen it. Sometimes they are installed very tightly.
Safety – Highlight Risky Components
Oil changes involve several potential hazards:
- Hot Oil: Used engine oil can be very hot and can cause severe burns. Allow the engine to cool down slightly before draining the oil. Wear gloves and eye protection.
- Crushing Hazard: Never work under a vehicle supported only by a jack. Always use jack stands.
- Chemical Exposure: Engine oil contains harmful chemicals. Avoid prolonged skin contact and wear gloves.
- Fire Hazard: Used oil is flammable. Store it in a sealed container away from heat sources. Clean up any spills immediately.
- Environmental Hazard: Improper disposal of used oil can contaminate the environment. Always dispose of used oil properly.
By understanding the components involved, following safe procedures, and taking your time, you can confidently perform your own oil changes and keep your engine running smoothly for years to come. Good luck!