How Do You Remove A Radiator Cap
Alright, let's talk about something seemingly simple, yet crucial to understand for any DIY mechanic: removing a radiator cap. It might seem like a no-brainer, but a rushed or improper removal can lead to serious injury. So, we'll cover the why, the how, and the (very important) safety aspects of this procedure.
Purpose of Understanding Radiator Cap Removal
Why bother with a detailed explanation of removing a radiator cap? Well, there are several reasons. For starters, you might need to check your coolant level. Maybe you're adding coolant, diagnosing a leak, or even preparing for a more involved cooling system repair, like replacing a thermostat or water pump. Understanding the process also helps in understanding the principles of a pressurized cooling system. Plus, knowing the correct procedure prevents burns from hot coolant, a painful and avoidable experience. This knowledge also becomes critical when working on vintage vehicles that have different types of radiator caps and pressure release systems.
Key Specs and Main Parts
Before we dive into the removal process, let's review the key components and their specifications. The radiator cap isn't just a lid; it's a critical part of your cooling system. It's designed to:
- Maintain pressure: Modern cooling systems are pressurized, typically between 13-16 psi (pounds per square inch). This raised pressure increases the boiling point of the coolant, preventing it from boiling over easily.
- Relieve excess pressure: The cap has a spring-loaded valve that releases pressure when it exceeds the specified limit. This prevents damage to the radiator and other cooling system components.
- Allow coolant recovery: As the engine cools, a vacuum is created in the cooling system. The cap also allows coolant to be drawn back from the overflow reservoir.
Key Parts to Consider:
- Pressure Valve: The primary component for regulating pressure. A weak spring here can lead to overheating.
- Vacuum Valve: Allows coolant to be drawn back from the overflow reservoir during engine cool-down.
- Seals: Rubber seals ensure a tight fit and prevent leaks. Check these for cracking or deterioration.
- Lever (if applicable): Some older caps have a lever that must be moved to release pressure.
The cap itself is usually stamped with its pressure rating (e.g., "16 PSI"). It's crucial to use a replacement cap with the correct pressure rating. Using the wrong cap can lead to either insufficient cooling or excessive pressure, damaging the cooling system.
How It Works: The Pressurized Cooling System
The radiator cap is an integral part of a pressurized cooling system. Here's a quick overview of how it all works:
- Engine Heat: The engine generates heat as it runs.
- Coolant Circulation: Coolant (a mixture of water and antifreeze) circulates through the engine, absorbing heat.
- Radiator Cooling: The hot coolant flows to the radiator, where the heat is dissipated into the air.
- Pressure Build-up: As the coolant heats up, it expands, increasing the pressure within the system.
- Pressure Regulation: The radiator cap maintains the desired pressure. If the pressure exceeds the cap's rating, the pressure valve opens, releasing coolant into the overflow reservoir.
- Coolant Recovery: As the engine cools, the coolant contracts, creating a vacuum. The vacuum valve opens, drawing coolant back from the overflow reservoir into the radiator.
This cycle ensures efficient cooling and prevents coolant loss.
Real-World Use: Basic Troubleshooting Tips
Here are some common problems you might encounter and how they relate to the radiator cap:
- Overheating: A faulty radiator cap (e.g., a weak pressure valve) can cause the coolant to boil over, leading to overheating.
- Coolant Loss: Leaks around the radiator cap or excessive overflow into the reservoir can indicate a bad seal or a malfunctioning pressure valve.
- Low Coolant Level: If the vacuum valve is not working correctly, the coolant may not be drawn back from the overflow reservoir, resulting in a low coolant level in the radiator.
Troubleshooting Steps:
- Visual Inspection: Check the cap for any signs of damage, such as cracks, corrosion, or a loose seal.
- Pressure Test: A cooling system pressure tester can be used to verify the cap's pressure rating and check for leaks. This tool connects to the radiator filler neck and allows you to manually pressurize the system.
- Coolant Level: Regularly check the coolant level in both the radiator and the overflow reservoir.
How to Safely Remove a Radiator Cap
This is where safety is paramount. Never, ever remove a radiator cap when the engine is hot. Doing so can result in a scalding eruption of hot coolant. Here's the proper procedure:
- Wait for the Engine to Cool: Allow the engine to cool completely before attempting to remove the radiator cap. This can take several hours. A good rule of thumb is if you can comfortably touch the radiator hose, it's likely safe to proceed.
- Use a Rag or Glove: Even when the engine is cool, it's a good idea to protect your hand with a rag or glove.
- Slowly Release Pressure: Most modern radiator caps have a two-step removal process. Press down on the cap and rotate it slightly (usually counterclockwise) to the first stop. This will release any residual pressure. You might hear a hissing sound as the pressure is released. Do not remove the cap completely at this stage if you still hear a strong hiss. Wait until the hissing stops.
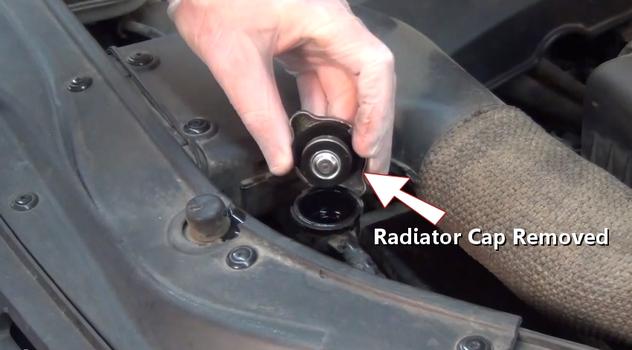
- Remove the Cap: Once the pressure is fully released, press down again and rotate the cap to the final stop and lift it off.
If you're unsure whether the system is still pressurized, err on the side of caution and wait longer. Better safe than sorry!
Safety: Risky Components and Procedures
Let's reiterate the safety concerns:
- Hot Coolant: The primary risk is burns from hot coolant. The cooling system operates under pressure, and hot coolant can erupt violently when the cap is removed prematurely.
- Pressure: Even after the engine has cooled somewhat, residual pressure may still be present in the system. Always release the pressure slowly and cautiously.
- Faulty Caps: A faulty radiator cap can release pressure unexpectedly. Handle with care.
Do not bypass or disable the pressure relief mechanism of the radiator cap. It's there to protect the cooling system and prevent serious damage.
Important Safety Note: When working on any part of your vehicle, always wear appropriate personal protective equipment (PPE), including safety glasses and gloves. Dispose of used coolant properly; it is toxic and harmful to the environment.
We've covered the key aspects of radiator cap removal, from understanding its function to safely performing the procedure. Remember to prioritize safety and take your time. With a little knowledge and caution, you can confidently tackle this task and keep your cooling system running smoothly.
To further assist you in understanding the components discussed in this article, we have prepared a detailed diagram of the radiator cap and cooling system. This file provides a visual representation of the parts, symbols, and functions that we’ve explained. You can download the diagram to complement your understanding and have it as a reference for future repairs and learning.