How Does A Rad Cap Work
Hey folks! Today, we’re diving deep into the unsung hero of your cooling system: the radiator cap, or rad cap as most of us call it. It's a small component, often overlooked, but absolutely vital for keeping your engine running cool and preventing catastrophic overheating. Understanding how it works is crucial for diagnosing cooling system issues, performing preventative maintenance, and even making informed decisions about aftermarket upgrades. We’re going to explore its purpose, key components, and troubleshooting.
Purpose and Importance
Let's be clear: the rad cap is more than just a lid. It’s a pressure-regulating valve. Its primary job is to maintain a specific pressure within the cooling system. Why is pressure important? Well, increasing the pressure raises the boiling point of the coolant. This allows your engine to operate at higher temperatures without the coolant boiling over, which would lead to overheating and potential engine damage. A properly functioning rad cap keeps the system sealed under normal operating conditions, preventing coolant loss. It also allows for coolant expansion and contraction as the engine heats up and cools down, crucial for system longevity. Think of it as a controlled escape valve. Failing to understand or replace a faulty rad cap can lead to serious engine issues, including warped heads, blown gaskets, and even complete engine failure.
Key Specs and Main Parts
Let's break down the anatomy of a typical rad cap and its key specifications. You'll generally see the rated pressure stamped right on the cap itself, usually in pounds per square inch (PSI) or kilopascals (kPa). Typical values range from 13 to 16 PSI, but it's crucial to use the correct PSI rating for your specific vehicle, as specified by the manufacturer.
Main Components:
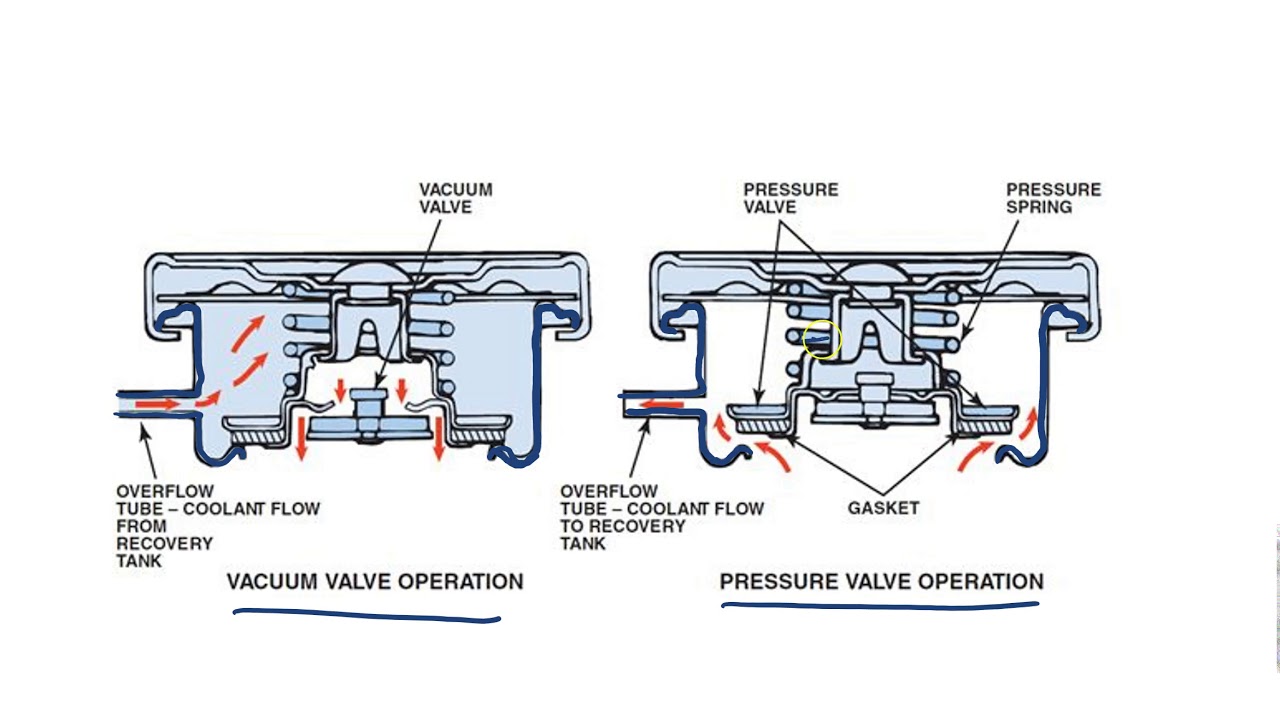
- Pressure Valve: This is the heart of the operation. It's a spring-loaded valve that opens when the cooling system pressure exceeds the cap's rated pressure.
- Vacuum Valve: This smaller valve opens when the cooling system cools down and creates a vacuum. It allows coolant to be drawn back from the overflow tank into the radiator, preventing air pockets.
- Sealing Surfaces (Gaskets): These rubber gaskets ensure a tight seal between the cap and the radiator neck, as well as between the cap and the overflow hose. Proper sealing is critical for maintaining pressure and preventing leaks.
- Lever or Tabs (for Removal): These make it easy to grip and turn the cap for removal and installation.
- Neck Adaptor/Bayonet: The part that locks the cap into the radiator filler neck.
How It Works
Here’s the breakdown of the rad cap's operation:
- Pressure Regulation: As the engine heats up, the coolant expands. This increases the pressure within the cooling system. When the pressure reaches the cap's rated pressure, the pressure valve opens, releasing excess pressure and coolant into the overflow tank.
- Vacuum Relief: When the engine cools down, the coolant contracts. This creates a vacuum within the system. The vacuum valve then opens, allowing coolant to be drawn back from the overflow tank into the radiator. This prevents air pockets from forming, which can lead to localized overheating.
- Sealing: Under normal operating conditions (pressure below the rated PSI), both valves remain closed, maintaining a sealed system.
Important Note: Never remove a rad cap while the engine is hot! The cooling system is pressurized, and removing the cap can cause a sudden release of hot coolant and steam, leading to serious burns.
Real-World Use and Basic Troubleshooting
Here are a few real-world scenarios and troubleshooting tips:
- Overheating: If your engine is overheating, even with sufficient coolant, a faulty rad cap could be the culprit. If the pressure valve is stuck open, the system won't pressurize, lowering the coolant's boiling point and leading to boil-over.
- Coolant Loss: Persistent coolant loss, especially after driving, can indicate a leaky cap or a faulty pressure valve. Check for coolant stains around the cap and overflow hose.
- Overflow Tank Issues: If the overflow tank is constantly overflowing or emptying, the rad cap might not be regulating pressure correctly.
- Visual Inspection: Always start with a visual inspection. Look for cracks, damage, or corrosion on the cap, as well as worn or damaged gaskets.
- Pressure Testing: A cooling system pressure tester can be used to verify the rad cap's functionality. These testers connect to the radiator neck and allow you to pressurize the system. You can then observe if the cap holds pressure at its rated PSI.
Troubleshooting Steps:
- Visual Inspection: Check for obvious damage, leaks, or corrosion.
- Pressure Test: Use a cooling system pressure tester to verify the cap's pressure rating and sealing ability.
- Gasket Inspection: Carefully inspect the gaskets for cracks, tears, or deterioration.
- Replacement: When in doubt, replace the rad cap. They are relatively inexpensive and can save you from much bigger problems. Always use a cap with the correct PSI rating for your vehicle.
Safety Precautions
Working with the cooling system involves some risks. Remember these safety precautions:
- Never remove the rad cap when the engine is hot. Allow the engine to cool completely before attempting to remove the cap.
- Wear safety glasses and gloves to protect yourself from hot coolant and steam.
- Dispose of used coolant properly. Coolant is toxic and should not be poured down drains or onto the ground.
- If coolant splashes on your skin, wash it off immediately with soap and water.
In Conclusion
The rad cap is a simple but crucial component of your cooling system. Understanding how it works, its function, and its failure symptoms is vital for maintaining your vehicle and preventing expensive repairs. By taking the time to inspect and troubleshoot your rad cap, you can keep your engine running cool and avoid the headaches of overheating.