How Does A Radiator Cap Work
Hey gearheads! Ever wonder about that little cap sitting on top of your radiator? It's way more than just a lid – it's a critical component of your cooling system, managing pressure and ensuring your engine doesn't overheat. This article breaks down the radiator cap's inner workings, equipping you with the knowledge to understand its function, troubleshoot common issues, and even choose the right replacement. Understanding this system is important for diagnosing cooling system problems, performing routine maintenance, and even optimizing your cooling system for performance, especially if you're into modifying your vehicle.
Key Specs and Main Parts
Let's start with the core components. A radiator cap isn't just a solid piece of metal; it's a carefully engineered valve system. Here are the main players:
- Pressure Cap: This is the main body of the cap, usually made of stamped steel or a composite material. It's what you grip to install and remove the cap.
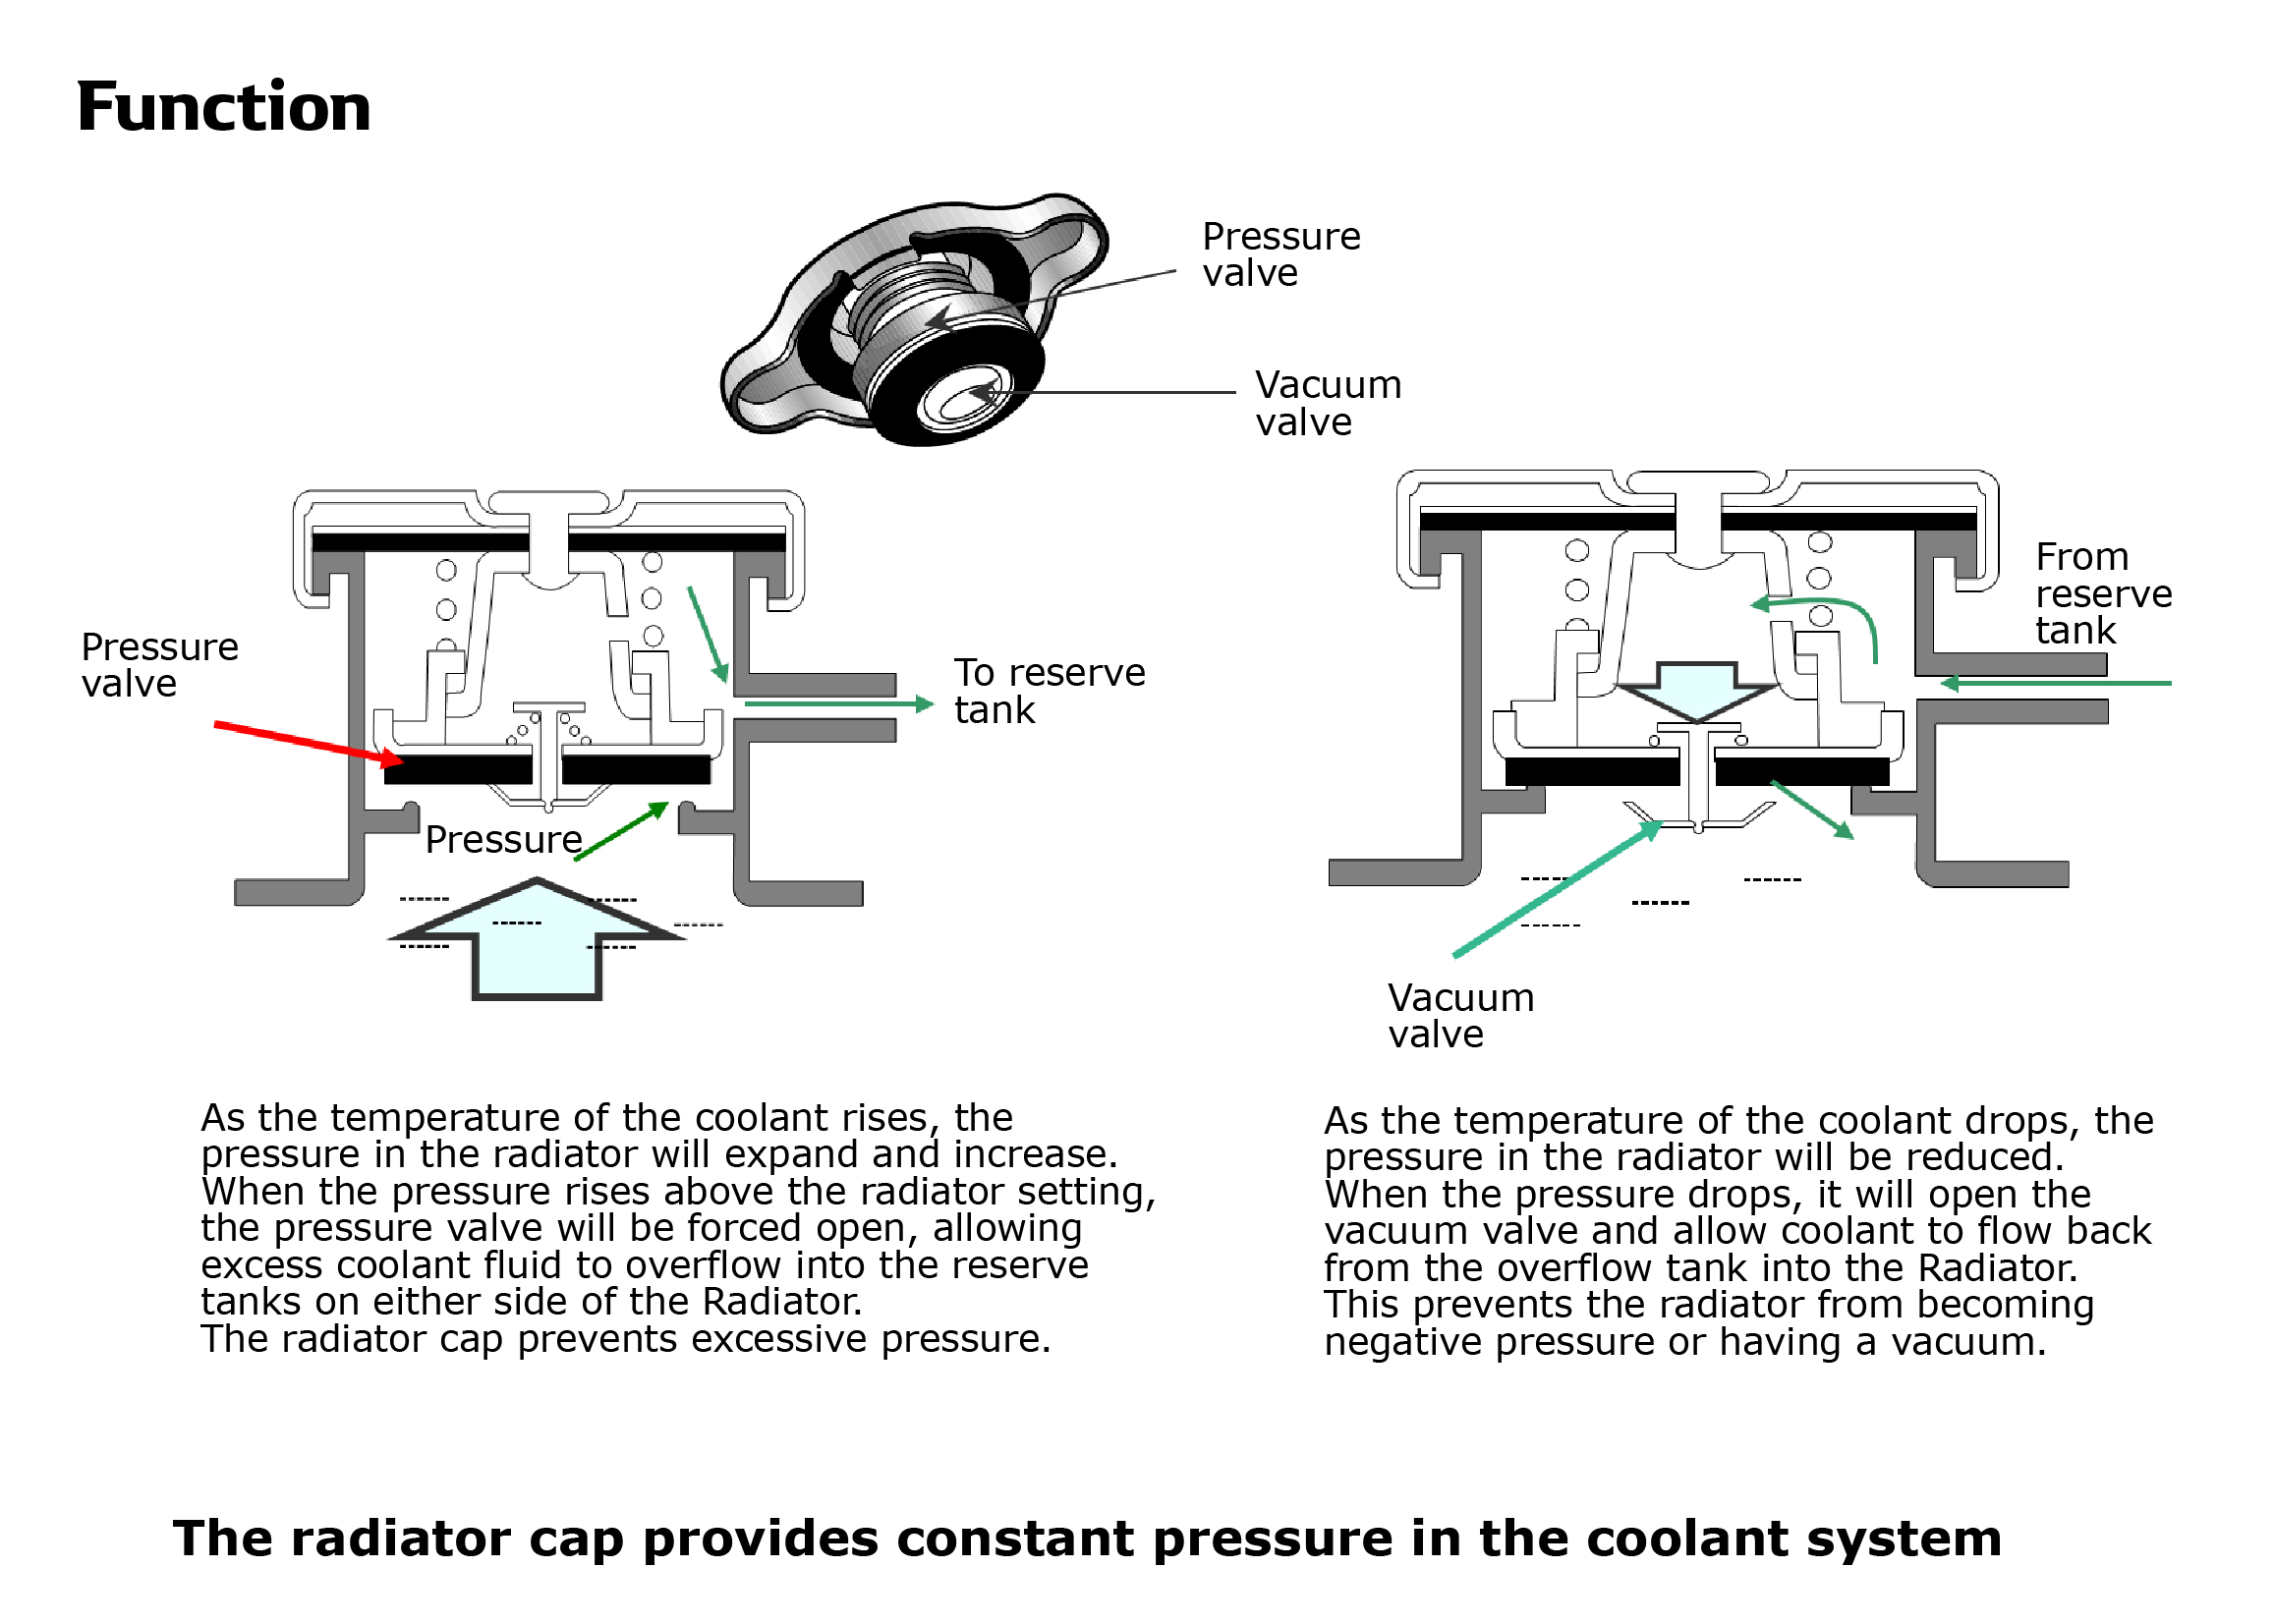
- Pressure Relief Valve: This is a spring-loaded valve that controls the pressure inside the cooling system. It's calibrated to open at a specific pressure (e.g., 16 PSI), releasing excess pressure if it exceeds the set point. This valve is crucial to prevent damage to the radiator and hoses.
- Vacuum Valve: Also known as the "anti-drain back valve," this smaller valve allows coolant to flow back into the radiator from the coolant reservoir as the engine cools down and the system pressure decreases.
- Seals (Gaskets): Rubber seals (usually made of nitrile rubber or EPDM) create a tight seal between the cap and the radiator neck. These are critical to maintaining the pressure and preventing coolant leaks.
- Springs: The pressure relief valve relies on a calibrated spring to maintain the desired pressure. The spring's strength determines the cap's PSI rating.
- Lever or Tabs: Some caps have a lever or tabs that allow you to relieve pressure slowly before fully removing the cap. This is a crucial safety feature.
Key Specs:
- Pressure Rating (PSI): This is the most important spec. It indicates the maximum pressure the cooling system can withstand before the pressure relief valve opens. Using the wrong pressure rating can lead to serious engine damage. Most cars operate between 13-18 PSI, but always check your vehicle's specifications.
- Cap Diameter and Thread Type: These must match your radiator neck for a proper seal.
- Material: The cap's material affects its durability and resistance to corrosion.
How It Works
The radiator cap's job is to maintain a pressurized cooling system. Here's a breakdown of the process:
- Pressure Build-Up: As the engine runs, it generates heat, which is transferred to the coolant. This causes the coolant to expand and increase the pressure inside the cooling system.
- Pressure Regulation: The pressure relief valve remains closed as long as the pressure is below the cap's rating. The spring keeps the valve seated against the radiator neck.
- Pressure Relief: When the pressure exceeds the cap's rating, the pressure relief valve opens, allowing excess pressure to escape into the coolant reservoir (also known as the overflow tank). This prevents hoses from bursting and the radiator from being damaged.
- Vacuum Relief: When the engine cools down, the coolant contracts, creating a vacuum in the cooling system. This vacuum would cause the hoses to collapse if there were no way to equalize the pressure. The vacuum valve opens, allowing coolant to be drawn back from the coolant reservoir into the radiator, maintaining a full cooling system.
The beauty of this system is its simplicity and effectiveness. By pressurizing the cooling system, the radiator cap raises the boiling point of the coolant. This allows the engine to run at a higher temperature without the coolant boiling over, improving cooling efficiency.
Real-World Use – Basic Troubleshooting Tips
A faulty radiator cap can cause a variety of problems. Here are some common symptoms and troubleshooting steps:
- Overheating: A cap that doesn't hold pressure will lower the coolant's boiling point, leading to overheating, especially under heavy load or in hot weather.
- Coolant Loss: A leaking cap or a cap that's not sealing properly will cause coolant to leak out of the system. Look for coolant stains around the cap and on the radiator.
- Collapsing Radiator Hoses: If the vacuum valve is stuck closed, the radiator hoses can collapse as the engine cools down.
- Coolant Reservoir Overflow: If the pressure relief valve is stuck open, coolant may be constantly forced into the reservoir, causing it to overflow.
- Check Engine Light: In some cases, a faulty radiator cap can trigger a check engine light due to coolant temperature sensor readings being out of range.
Troubleshooting Steps:
- Visual Inspection: Check the cap for cracks, damage, and a worn-out rubber seal. Inspect the radiator neck for corrosion or damage that could prevent a proper seal.
- Pressure Test: Use a radiator pressure tester to check the cap's ability to hold pressure. This tool attaches to the radiator neck and allows you to pump up the system to the cap's rated pressure. Observe the gauge for any pressure drop.
- Coolant System Pressure Test: Perform a pressure test on the whole coolant system. Attach the tool, pump it up (check for the correct pressure), and look for drops in pressure. Note the drops, and then look for leaks.
- Replacement: If the cap fails the pressure test or shows signs of damage, replace it with a new cap that matches the original specifications.
Safety – Highlight Risky Components
Working with a cooling system can be dangerous due to the high temperatures and pressures involved. Here are some safety precautions:
- Never remove the radiator cap while the engine is hot. The cooling system is under pressure, and hot coolant can spray out, causing severe burns. Wait for the engine to cool down completely before attempting to remove the cap.
- Wrap the cap with a thick cloth when removing it. This will help protect you from any escaping steam or coolant.
- If the cap has a pressure release lever, use it to slowly relieve pressure before fully removing the cap.
- Wear safety glasses to protect your eyes from splashes.
- Dispose of used coolant properly. Coolant is toxic and should not be dumped down drains or onto the ground.
Always remember: Cooling systems operate under significant pressure and contain extremely hot fluids. Caution is paramount!
A failed radiator cap can have a wide range of negative consequences, from a minor inconvenience to catastrophic engine damage. Regular inspection and timely replacement are key to maintaining a healthy and efficient cooling system.
With a little knowledge and the right tools, you can confidently diagnose and address radiator cap issues, saving you time and money in the long run. Happy wrenching!