How Fast Does Level 2 Charge
Alright, let's talk Level 2 charging for your electric vehicle (EV). This isn’t just about plugging in; it’s about understanding the flow of electrons and maximizing your charging speed. This deep dive is for you, the DIY enthusiast who wants to know what's happening behind the plug. We'll cover everything from the core components to troubleshooting, ensuring you're equipped to diagnose issues and perhaps even upgrade your charging setup safely.
Purpose
Why bother understanding Level 2 charging in detail? Several reasons. First, if you're considering installing your own Level 2 charger (EVSE - Electric Vehicle Supply Equipment) at home, knowing the inner workings is crucial for safety and proper installation. Second, troubleshooting charging problems becomes much easier when you understand the system. Finally, it empowers you to make informed decisions about charging hardware and electricity usage, potentially saving you money and improving your EV experience. Having access to a detailed charging system diagram, which we have available for download, is invaluable for repairs, learning, and planning upgrades.
Key Specs and Main Parts
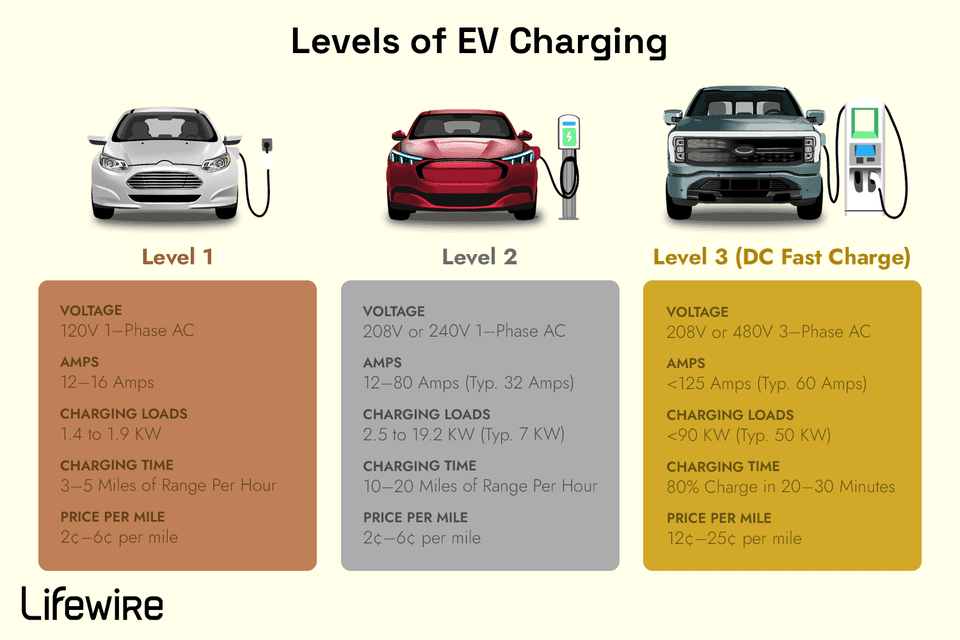
Level 2 charging operates at 208-240 volts AC (alternating current), a significant step up from Level 1's standard 120V outlet. This higher voltage allows for significantly faster charging speeds. The key components of a Level 2 charging system are:
- EVSE (Electric Vehicle Supply Equipment): This is the "charger" you typically see mounted on a wall. It's actually more of a sophisticated switch and safety device than a charger. Its main job is to communicate with the EV and supply the appropriate voltage and current.
- J1772 Connector: This is the standard connector used for Level 1 and Level 2 charging in North America. It’s the physical interface between the EVSE and your vehicle.
- Onboard Charger (in the EV): This is the actual charger. It converts the AC power from the EVSE into DC (direct current) power, which is then used to charge the EV's battery. The onboard charger has a maximum AC input current that it can accept. For example, a Tesla Model 3 has a 32 or 48 Amp AC charger depending on the option that was purchased.
- Power Source (Circuit Breaker Panel): This provides the electrical power to the EVSE. It requires a dedicated circuit breaker of the appropriate amperage (typically 30A, 40A, 50A, or 60A).
- Wiring: The electrical wiring connecting the circuit breaker panel to the EVSE needs to be properly sized to handle the current. This is determined by the amperage of the circuit breaker and the distance of the run. Using the wrong gauge wire can be a fire hazard!
Key Specs to consider:
- Voltage (V): The electrical potential difference. Level 2 uses 208-240V.
- Current (A - Amperes): The flow of electrical charge. Higher amperage means faster charging, but requires a higher capacity circuit.
- Power (kW - Kilowatts): A measure of electrical power (Volts x Amps / 1000). A higher kW rating means faster charging.
Symbols and the EVSE Diagram
A typical EVSE diagram will use standard electrical symbols. Let's decode some of the common ones:
- Solid Lines: Represent electrical conductors (wires).
- Dotted Lines: Often indicate a control or signal connection, not a power-carrying wire.
- Circles with a letter inside: Represent electrical components. For example, "R" might indicate a resistor, "C" a capacitor, and "T" a transformer.
- Squiggly Lines: Represent resistors or, in some cases, AC voltage sources.
- Ground Symbol (three horizontal lines decreasing in length): Indicates a connection to ground, which is a crucial safety feature.
- Circuit Breaker Symbol: A small rectangle with a curved line breaking through it.
- Relay Symbol: A coil with a switch that opens or closes based on the coil's energization. Relays are used to control high-power circuits with low-power signals.
- Color Coding: While not always consistent, black and red wires usually indicate hot (live) wires, white is usually neutral, and green or bare copper is ground. Never assume a wire's function based solely on its color! Always verify with a multimeter.
The diagram will show how these components are interconnected. It will also illustrate the control logic, showing how the EVSE communicates with the EV to initiate and regulate charging. Expect to see the Pilot signal, represented by a line and usually a pulse wave, and Proximity wire.
Note: Different EVSE manufacturers use different diagrams. Understanding the basic symbols will allow you to interpret the diagrams of different EVSEs.
How It Works
Here’s a simplified breakdown of how Level 2 charging works:
- Plug-in: You connect the J1772 connector from the EVSE to your EV's charging port.
- Proximity Detection: When plugged in, the Proximity wire (PP) tells the EVSE that a cable has been connected. This allows the EVSE to enable charging.
- Pilot Signal: The EVSE sends a pilot signal (CP) to the EV. This signal communicates two crucial pieces of information: the maximum available current that the EVSE can provide, and that the connector is properly plugged in.
- EV Communication: The EV "reads" the pilot signal and communicates back to the EVSE, indicating its charging requirements (voltage and maximum current draw).
- Safety Checks: The EVSE performs safety checks, such as ground fault detection, to ensure that the circuit is properly grounded and that there are no electrical faults.
- Power Delivery: If all safety checks pass, the EVSE closes a relay, allowing AC power to flow to the EV's onboard charger.
- AC to DC Conversion: The EV's onboard charger converts the AC power into DC power.
- Battery Charging: The DC power is then used to charge the EV's battery.
- Monitoring and Regulation: Throughout the charging process, the EV and the EVSE continue to communicate, adjusting the charging rate based on the battery's state of charge and temperature.
- Charging Termination: Once the battery is fully charged, the EV signals the EVSE to stop the power flow. The EVSE opens the relay, cutting off the AC power supply.
This process is controlled by a microcontroller within the EVSE. The microcontroller constantly monitors the pilot signal, communicates with the EV, and performs safety checks.
Real-World Use: Basic Troubleshooting Tips
Let's say you're having trouble charging. Here are some basic troubleshooting steps:
- Check the Circuit Breaker: Is the circuit breaker for the EVSE tripped? Reset it if necessary.
- Inspect the Cables and Connectors: Look for any signs of damage to the charging cable or the J1772 connector. Damage can prevent proper communication or power delivery.
- Check the EVSE Status Lights: Most EVSEs have status lights that indicate their current state. Refer to the EVSE's manual to understand what the different light patterns mean.
- Test with Another EV: If possible, try charging another EV with your EVSE. If the other EV charges fine, the problem is likely with your vehicle.
- Test with Another EVSE: If possible, try charging your EV with another EVSE. If your EV charges fine with the other EVSE, the problem is likely with your EVSE.
- Voltage Check: Use a multimeter to verify that the EVSE is receiving the proper voltage (208-240V AC). Be extremely careful when working with electricity!
If the above steps don't resolve the issue, you might need to delve deeper, consulting the EVSE's service manual and using a multimeter to check individual components. This is where having the EVSE diagram becomes extremely helpful.
Remember: Always disconnect the EVSE from the power source before attempting any internal repairs or inspections.
Safety
Electricity is dangerous! Level 2 charging involves high voltages and amperages, which can be lethal. Always follow these safety precautions:
- Turn off the Circuit Breaker: Before working on any electrical components, always turn off the circuit breaker that supplies power to the EVSE.
- Use a Multimeter: Verify that the circuit is de-energized before touching any wires or components.
- Wear Insulated Gloves: Use insulated gloves designed for electrical work.
- Don't Work Alone: Have someone nearby in case of an emergency.
- Grounding: Proper grounding is essential for safety. Ensure that the EVSE is properly grounded according to local electrical codes.
- High-Risk Components: The main components to be aware of are the main wires carrying high current from the breaker panel, the relay that controls the AC power flow to the EV, and the onboard charger, which is usually internal to the EV.
Improper wiring, damaged components, or inadequate grounding can create serious fire hazards and electrocution risks.
Understanding Level 2 charging empowers you to diagnose issues and maintain your EV charging setup effectively. With the knowledge gained here, combined with access to our detailed charging system diagram which you can download, you’re well-equipped to tackle charging challenges with confidence and – most importantly – safely.