How Much For An Oil Change
So, you're thinking about doing your own oil change, or maybe you're just curious about what goes into the cost. Either way, you've come to the right place. Let's break down the factors that influence the price of an oil change, giving you the knowledge to make informed decisions whether you're wrenching on your own ride or taking it to a shop.
Purpose: Understanding the True Cost
Understanding the cost breakdown of an oil change serves several crucial purposes. For the DIY enthusiast, it's about accurate budgeting. Knowing the price of each component – the oil itself, the filter, and even disposal fees – allows you to compare prices from different vendors and optimize your spending. Beyond cost, understanding the process is a matter of vehicle health and maintenance
For those who prefer professional service, a clear understanding of the cost components empowers you to evaluate the fairness of the quote you receive. You can assess whether the shop is using quality components and charging reasonable labor rates. This knowledge prevents you from being overcharged and ensures you are getting what you paid for. Finally, understanding the process helps you identify symptoms of vehicle neglect or incorrect procedures and the effects they have on vehicle health, and in turn your wallet.
Key Specs and Main Parts
The cost of an oil change primarily revolves around the following components:
1. Engine Oil
This is the single biggest factor. Oil is classified by viscosity (its resistance to flow) and type. Viscosity is typically described by a multi-grade such as 5W-30 or 10W-40. The "W" stands for "Winter" and indicates the oil's cold-weather performance. The higher the number, the thicker the oil is at that temperature. The numbers following the "W" indicates the oil's performance at standard operating temperatures. Lower viscosity is better for fuel economy, while higher viscosity provides better protection under extreme loads.
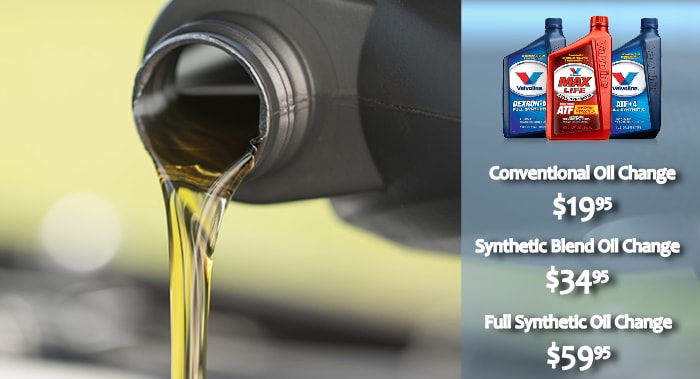
The type of oil also dramatically impacts the price. You have three main categories:
- Conventional Oil: The most basic and cheapest option. Generally suitable for older vehicles with simpler engine designs.
- Synthetic Blend: A mix of conventional and synthetic oils, offering some of the benefits of synthetic oil at a lower price point.
- Full Synthetic Oil: The highest quality oil, offering superior protection against wear and tear, better performance in extreme temperatures, and longer intervals between oil changes. This is the most expensive option but can save money in the long run due to extended change intervals and improved engine longevity.
2. Oil Filter
The oil filter removes contaminants from the oil, preventing them from circulating through the engine and causing damage. Filters are available in various grades, with more expensive filters offering finer filtration and longer lifespans. Look for filters with a micron rating that meets or exceeds your vehicle manufacturer's specifications.
3. Drain Plug Washer
Often overlooked, the drain plug washer (usually made of copper or aluminum) creates a seal between the drain plug and the oil pan. It's crucial to replace this washer with each oil change to prevent leaks. They're very inexpensive, and reusing an old, crushed washer is a false economy.
4. Labor Costs (If Applicable)
If you're not doing the oil change yourself, labor costs will be a significant portion of the overall price. Labor rates vary widely depending on the shop, location, and the complexity of the job. Some vehicles have more difficult to reach oil filters or require specialized tools. Dealerships typically have higher labor rates than independent shops.
5. Disposal Fees
Used motor oil is a hazardous waste and must be disposed of properly. Many shops charge a small disposal fee to cover the cost of recycling the oil and filter. You can often recycle your old oil at auto parts stores as well.
How It Works: The Oil Change Process
While seemingly simple, the oil change process includes several steps and components. Here's a simplified breakdown:
- Preparation: Gather your tools (wrench, oil filter wrench, drain pan, funnel, gloves, etc.) and materials (oil, filter, washer). Ensure the engine is warm, but not hot, before starting.
- Draining the Old Oil: Locate the drain plug on the oil pan (usually at the bottom of the engine). Position the drain pan underneath, loosen the drain plug with a wrench, and carefully remove it, allowing the old oil to drain completely.
- Replacing the Filter: Locate the oil filter (its location varies depending on the vehicle). Use an oil filter wrench to loosen and remove the old filter. Lightly lubricate the rubber gasket on the new filter with fresh oil and screw it on hand-tight, following the manufacturer's instructions (usually a specific number of turns after the gasket contacts the engine).
- Reinstalling the Drain Plug: Replace the drain plug washer with a new one. Clean the drain plug, reinstall it, and tighten it to the manufacturer's specified torque (usually around 20-30 lb-ft). Over-tightening can damage the oil pan.
- Adding New Oil: Locate the oil fill cap (usually on top of the engine). Remove the cap and use a funnel to pour in the correct amount of new oil, as specified in your vehicle's owner's manual.
- Checking the Oil Level: After adding the oil, wait a few minutes for it to settle. Then, check the oil level using the dipstick. Add more oil as needed to reach the "full" mark.
- Running the Engine: Start the engine and let it run for a few minutes, checking for leaks around the drain plug and oil filter.
- Final Check: Turn off the engine and check the oil level again. Dispose of the used oil and filter responsibly.
Real-World Use: Basic Troubleshooting Tips
Here are some common issues you might encounter and how to address them:
- Oil Leak After Change: Most likely caused by a loose drain plug, a damaged drain plug washer, or a loose oil filter. Tighten the drain plug or filter, or replace the washer if necessary. If the leak persists, inspect the oil pan and filter mount for damage.
- Difficulty Removing the Oil Filter: Oil filters can be stubborn. Make sure you're using the correct size oil filter wrench. If it's still stuck, try piercing the filter with a screwdriver and using it as a lever (be careful!). Special oil filter removal tools are also available.
- Stripped Drain Plug Threads: Overtightening the drain plug can damage the threads in the oil pan. If this happens, you might need to re-tap the threads or replace the oil pan. Consider using a self-tapping drain plug as a temporary fix.
- Incorrect Oil Level: Always double-check the oil level after an oil change. Running the engine with too little oil can cause severe damage. Overfilling the oil can also be problematic, potentially causing foaming or damage to the crankshaft.
Safety: Risky Components and Procedures
Safety is paramount when working on your car. Be aware of these potential hazards:
- Hot Engine Components: Allow the engine to cool down slightly before working on it. Exhaust manifolds and other components can be extremely hot and cause burns.
- Used Motor Oil: Used motor oil contains harmful contaminants. Wear gloves to protect your skin and avoid contact with your eyes. Dispose of used oil properly.
- Jack Stands: Never work under a vehicle supported only by a jack. Always use sturdy jack stands to support the vehicle's weight.
- Flammable Liquids: Motor oil is flammable. Keep it away from open flames and sparks.
By understanding the components, process, and potential hazards of an oil change, you can make informed decisions about whether to tackle the job yourself or entrust it to a professional. You will get accurate quotes, and be able to discuss your vehicle needs with your mechanic!