How Much To Fix Evap System
Let's talk about your EVAP system – specifically, how much fixing it might set you back. The Evaporative Emission Control (EVAP) system is designed to prevent fuel vapors from escaping into the atmosphere. A malfunctioning EVAP system can lead to a check engine light, failed emissions tests, and even impact your fuel economy. While dealerships and shops often quote high prices for repairs, understanding the system and tackling some troubleshooting yourself can save you a significant amount of money.
Purpose of Understanding the EVAP System
Why bother diving into the EVAP system? Several reasons: First, diagnosing EVAP problems can be tricky. Mechanics sometimes resort to the "parts cannon" approach, replacing components until the problem disappears – a costly and inefficient strategy. With a solid understanding, you can pinpoint the issue more accurately. Second, many EVAP repairs are straightforward and within the capabilities of a competent DIYer. Replacing a cracked hose or a faulty gas cap is far cheaper than paying a shop labor rate. Third, understanding your car's systems empowers you to make informed decisions about repairs and maintenance, preventing you from being taken advantage of.
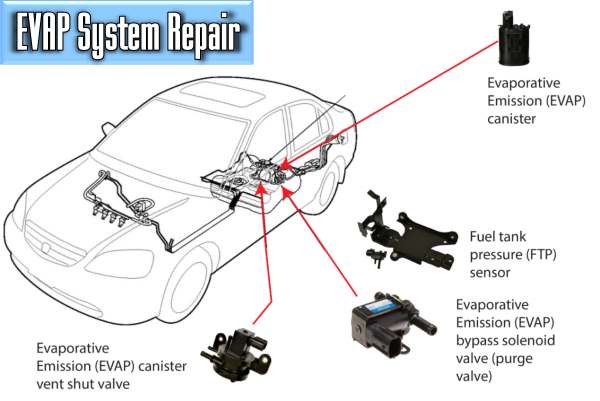
Key Specs and Main Parts
The EVAP system, at its core, is a closed-loop system designed to trap and recycle fuel vapors. Here’s a breakdown of the key components:
- Fuel Tank: Contains the fuel and is vented to the EVAP system.
- Fuel Cap: A seemingly simple component, but a faulty or loose gas cap is one of the most common causes of EVAP system failures. It must maintain a sealed environment.
- Charcoal Canister: This contains activated charcoal, which absorbs and stores fuel vapors from the tank. Think of it as a sponge for fuel fumes.
- Canister Purge Valve: This valve controls when the engine vacuum draws the stored fuel vapors from the charcoal canister into the intake manifold to be burned. It's electronically controlled by the engine control unit (ECU).
- Vent Valve (Canister Vent Solenoid): Allows fresh air to enter the charcoal canister, enabling the purge process. It is typically open when the engine is off and closed during purge operations.
- Fuel Tank Pressure Sensor (FTPS): Monitors the pressure within the fuel tank. This sensor is crucial for leak detection.
- Hoses and Lines: Connect all the components, carrying fuel vapors and air. These are often made of rubber or plastic and can become brittle and cracked over time.
- Leak Detection Pump (LDP): (Some vehicles) Actively tests the system for leaks by creating a vacuum and monitoring its decay.
These parts are connected by a network of lines. Understanding the flow of fuel vapor is key.
Symbols and Diagram Interpretation
Let's briefly explain common symbols found in EVAP system diagrams.
- Solid Lines: Typically represent hoses or tubing carrying fuel vapor or air.
- Dotted Lines: Often indicate vacuum lines or electrical connections.
- Arrows: Show the direction of flow for fuel vapor or air.
- Squares or Rectangles: Generally represent electronic components like sensors or solenoids.
- Circles: May indicate a valve or a filter.
- Colors: While not standardized, colors are often used to differentiate between different types of lines (e.g., fuel vapor lines vs. vacuum lines).
Understanding these symbols helps you trace the system and identify potential problem areas.
How the EVAP System Works
The EVAP system's operation can be broken down into these stages:
- Vapor Generation: Fuel in the tank naturally evaporates, creating fuel vapors.
- Vapor Storage: These vapors are routed to the charcoal canister, where they are absorbed and stored.
- Purge Cycle: When the engine is running and conditions are right (engine temperature, load, etc.), the ECU opens the canister purge valve. Engine vacuum then draws fresh air through the vent valve and the charcoal canister, pulling the stored fuel vapors into the intake manifold, where they are burned along with the regular air/fuel mixture.
- Leak Detection: The ECU monitors the fuel tank pressure using the FTPS. If it detects a pressure drop (indicating a leak), it will trigger a Diagnostic Trouble Code (DTC) and illuminate the check engine light. In systems with an LDP, the pump actively creates a vacuum and monitors its decay rate.
The system's efficiency relies on maintaining a sealed environment, allowing the ECU to effectively manage and monitor vapor pressure.
Real-World Use: Basic Troubleshooting Tips
So, your check engine light is on, and you suspect an EVAP issue. Here's where to start:
- Check the Gas Cap: This is the low-hanging fruit. Ensure the gas cap is properly tightened and the seal isn't cracked or damaged. Many EVAP codes are triggered by a loose gas cap.
- Scan for Codes: Use an OBD-II scanner to retrieve the specific DTCs. Common EVAP codes include P0440 (EVAP System Malfunction), P0442 (EVAP System Small Leak), P0455 (EVAP System Large Leak), and P0456 (Very Small Leak).
- Visual Inspection: Carefully inspect all hoses and lines for cracks, leaks, or damage. Pay close attention to areas near heat sources or where hoses might rub against other components.
- Smoke Test: A smoke test is a highly effective way to locate leaks. Special equipment is used to inject smoke into the EVAP system. Leaks will be visible as smoke escaping from the system. While professional smoke machines are available, DIY versions can be built or purchased.
- Component Testing: Use a multimeter to test the resistance and voltage of the purge valve, vent valve, and FTPS. Consult your vehicle's service manual for the correct specifications.
For example, if you have a P0442 code (Small Leak), systematically check the gas cap, hoses, and connections. A visual inspection might reveal a small crack in a hose, which can be easily replaced. If you suspect a faulty purge valve, use a multimeter to check its resistance. The value should fall within the manufacturer's specified range. If not, the valve likely needs to be replaced.
Safety Precautions
Working on the EVAP system involves dealing with fuel vapors, which are flammable. Here are some safety precautions:
- Work in a well-ventilated area: This helps to dissipate any fuel vapors that may be released.
- Avoid open flames or sparks: Fuel vapors can ignite easily.
- Disconnect the negative battery cable: This prevents accidental electrical shorts.
- Relieve Fuel Tank Pressure: Carefully loosen the gas cap to relieve pressure before disconnecting any fuel lines. Be prepared for a slight hiss as pressure is released.
- Wear safety glasses: Protect your eyes from fuel splashes or debris.
Remember that the fuel tank itself is a high-risk component. Avoid any actions that could puncture or damage the tank.
Cost Considerations
The cost to fix an EVAP system can vary significantly depending on the cause of the problem. A new gas cap might cost $10-$30, while a purge valve can range from $30-$100. A charcoal canister can be more expensive, costing upwards of $100-$300. Labor costs will vary depending on the shop and the complexity of the repair. Performing the repairs yourself can save you a substantial amount on labor costs. For example, replacing a hose is a relatively inexpensive fix, but if you took it to a shop they may charge a few hours of labor. However, if the leak is particularly difficult to find, or requires specialized tools to reach, going to a professional is a good idea.
By diagnosing and addressing the problem yourself, you can potentially save hundreds of dollars and gain a better understanding of your vehicle's operation.
We have a detailed EVAP system diagram file available. You can download it to further assist in your diagnostic and repair efforts. This diagram will provide a visual representation of the system's components and their relationships, making it easier to trace lines and identify potential problem areas.