How Much To Replace 4 Tires
Okay, let's talk about something every car owner eventually faces: replacing tires. It's not just about slapping on some new rubber; understanding the factors involved can save you money, improve performance, and even enhance safety. This article breaks down the costs associated with replacing four tires, giving you the technical knowledge to make informed decisions.
Purpose of Understanding Tire Replacement Costs
Why dive into the nitty-gritty of tire replacement costs? Primarily, it empowers you to:
- Negotiate effectively: Knowing the breakdown of costs – tires, labor, fees – allows you to challenge inflated prices and get a fair deal.
- Budget accurately: Unexpected car repairs are a pain. Understanding the potential expense of tire replacement lets you plan ahead and avoid financial surprises.
- Optimize for performance: You can choose tires that match your driving style and vehicle needs, potentially improving fuel efficiency, handling, and ride comfort.
- Identify potential scams: Unscrupulous shops might try to upsell you on unnecessary services. Knowledge is your best defense.
- Decide on DIY vs. Professional Installation: Understand the work involved to determine if doing it yourself is feasible, considering your skills and available tools.
Key Specs and Main Parts Involved in the Cost
The total cost of replacing four tires isn't just the price of the tires themselves. Here's a breakdown of the main components:
- Tire Price: This is the most obvious factor. Tire prices vary wildly based on brand, size, type (all-season, performance, winter), load rating, and speed rating. Expect to pay anywhere from $50 to $500+ per tire.
- Installation Labor: This covers the process of removing the old tires, mounting and balancing the new ones, and installing them on your vehicle. Labor costs typically range from $15 to $45 per tire. This can depend heavily on your region and the complexity of the vehicle (e.g., some vehicles with TPMS sensors require more specialized handling).
- Balancing: Balancing ensures that the weight of the wheel and tire assembly is evenly distributed. An unbalanced tire can cause vibrations, uneven wear, and steering problems. Balancing is a crucial part of tire installation.
- Valve Stems: These are the small valves that allow you to inflate your tires. They can degrade over time and should often be replaced during tire replacement. Standard rubber valve stems are inexpensive (a few dollars each), but some vehicles use more complex Tire Pressure Monitoring System (TPMS) valve stems, which can be significantly more expensive ($30-$100+ each).
- Tire Disposal Fee: Most tire shops charge a small fee to dispose of your old tires responsibly. This fee usually ranges from $3 to $10 per tire.
- Wheel Alignment (Optional but Recommended): A wheel alignment adjusts the angles of your wheels to ensure they are parallel and perpendicular to the road. Misalignment can cause uneven tire wear, poor handling, and reduced fuel economy. It's highly recommended to get an alignment after installing new tires. Alignment typically costs between $75 and $200.
- Sales Tax: Don't forget to factor in sales tax, which will vary depending on your location.
Deciphering Tire Sidewall Markings: Key "Symbols"
The sidewall of a tire is packed with information. Understanding these markings is crucial for selecting the correct tires for your vehicle. Here's a breakdown:
- Tire Size Designation (e.g., P225/50R17):
- P: Indicates a passenger tire (LT for light truck tires).
- 225: Tire width in millimeters.
- 50: Aspect ratio (the ratio of the tire's sidewall height to its width).
- R: Radial tire construction.
- 17: Wheel diameter in inches.
- Load Index: A numerical code indicating the maximum load the tire can carry at its maximum speed. Consult a load index chart to determine the actual weight capacity.
- Speed Rating: A letter code indicating the maximum speed at which the tire can operate safely. Again, consult a speed rating chart for specific speed values (e.g., H = 130 mph, V = 149 mph).
- DOT Code: Indicates that the tire meets the U.S. Department of Transportation (DOT) safety standards. It also contains a date code indicating when the tire was manufactured. Knowing the tire's age is important, as tires degrade over time even if they haven't been used much.
- M+S (Mud and Snow): Indicates the tire is designed for use in mud and snow conditions.
How Tire Replacement Works: The Process
Here's a simplified overview of the tire replacement process:
- Vehicle Preparation: The vehicle is lifted using a hydraulic lift.
- Wheel Removal: The lug nuts are loosened, and the wheels are removed from the vehicle.
- Tire Removal: The old tires are removed from the wheels using a tire changing machine. This machine uses leverage and pressure to separate the tire bead (the edge of the tire that seals against the wheel) from the wheel rim.
- New Tire Mounting: The new tires are mounted onto the wheels using the same tire changing machine. Lubricant is used to help the tire slide onto the rim.
- Inflation: The tires are inflated to the recommended pressure specified on the tire placard (usually located on the driver's side doorjamb).
- Balancing: The wheels and tires are placed on a wheel balancing machine, which identifies any imbalances. Small weights are then attached to the wheel rim to counteract the imbalances.
- Wheel Installation: The wheels are reinstalled on the vehicle, and the lug nuts are tightened to the correct torque specification using a torque wrench.
- Lowering and Final Check: The vehicle is lowered, and a final inspection is performed to ensure everything is properly installed.
- (Optional) Wheel Alignment: The vehicle is placed on an alignment rack, and the wheel alignment angles are adjusted to the manufacturer's specifications.
Real-World Use: Basic Troubleshooting Tips
- Vibrations After Tire Replacement: This is often caused by unbalanced tires. Return to the shop and have them re-balanced. It could also be related to wheel alignment, so if the re-balancing doesn't fix it, consider an alignment.
- TPMS Light On After Tire Replacement: This could indicate a problem with the TPMS sensor. The sensor may need to be reset, or the battery may be dead (especially if the sensor is old). A shop can diagnose and replace the sensor if necessary.
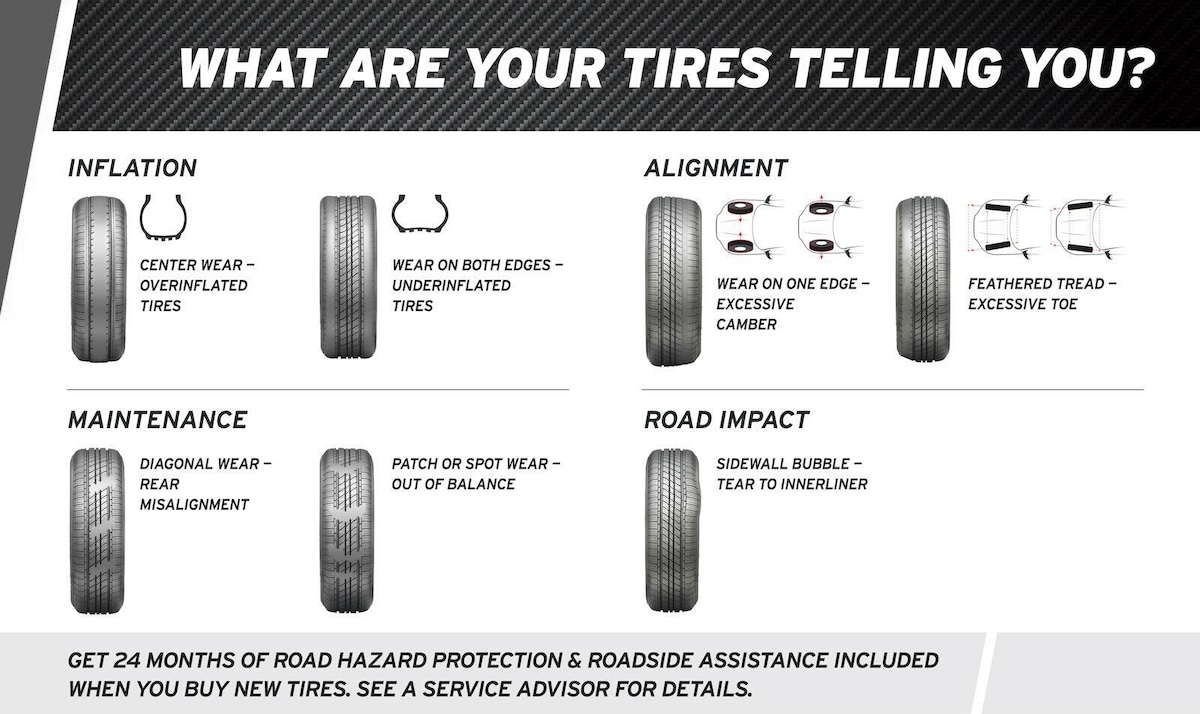
- Uneven Tire Wear After Tire Replacement: This is a strong indicator of a wheel alignment problem. Have your alignment checked and adjusted.
- Loss of Air Pressure: Check the valve stem for leaks. A faulty valve stem can cause slow leaks. Also, inspect the tire for punctures or damage.
Safety: Risky Components and Procedures
Tire replacement involves working with potentially dangerous equipment and components:
- Tire Changing Machine: These machines exert significant force and can cause serious injury if not used properly. Improper use can lead to pinched fingers, crushed limbs, or even explosions.
- Compressed Air: Over-inflating a tire can cause it to explode, which can be extremely dangerous. Always follow the recommended inflation pressure.
- Torque Wrench: Using a torque wrench is crucial for tightening lug nuts to the correct specification. Over-tightening can damage the wheel studs or warp the brake rotors, while under-tightening can cause the wheel to come loose.
- Lifting the Vehicle: Always use proper jack stands to support the vehicle when working underneath it. Never rely solely on the jack.
- TPMS Sensors: These sensors contain small batteries that can be hazardous if ingested. Dispose of them properly.
Disclaimer: Working on vehicles can be dangerous. If you are not comfortable performing any of these tasks, it is best to consult a qualified mechanic.
I have the detailed diagram showcasing tire sidewall marking and other key elements discussed. It can be very helpful in understanding tire specifications better. The diagram is available for download. Use it as a reference guide to make informed decisions about your tire replacement.