How Tall Is A Cargo Van
Alright, let's talk cargo vans and, more specifically, how tall they actually are. Understanding the height of your cargo van isn't just about fitting it in the garage; it's crucial for everything from planning roof-mounted equipment installations and navigating low clearances to ensuring your custom suspension mods don't turn your reliable workhorse into an oversized, under-performing headache. This article will break down the key dimensions, using diagrams and real-world examples, so you can confidently tackle your next van-related project.
Purpose – Why This Matters
Knowing the precise height of your cargo van isn't just a fun fact; it's a critical piece of information for a variety of reasons:
- Repairs and Modifications: Before installing roof racks, solar panels, or even a simple antenna, you need to know your van's current height to ensure clearance. Ignoring this can lead to damage, fines, or even accidents.
- Route Planning: Commercial drivers, in particular, need to be aware of overpasses, tunnels, and parking garages with height restrictions. Knowing your van's exact dimensions allows for accurate route planning and avoids costly detours.
- Learning and Diagnosis: Understanding how vehicle dimensions relate to overall performance can aid in diagnosing suspension issues or identifying the cause of unusual handling characteristics. A sagging suspension, for example, will obviously affect the overall height.
- Insurance and Legal Compliance: In some instances, modifications that significantly alter a vehicle's height may need to be reported to insurance companies or relevant authorities.
- Resale Value: Potential buyers will want to know about any modifications that affect the vehicle's dimensions, especially height. Transparency builds trust and can impact resale value.
Key Specs and Main Parts
The height of a cargo van isn't a single, static number. It depends on several factors, including the specific model, year, trim level, and any modifications you've made. Here's a breakdown of the key specifications to consider:
1. Overall Height
This is the measurement from the ground to the highest point of the van, typically the roof. This is the most critical dimension for clearance purposes. Note that factory specifications often quote a "curb height," which refers to the height with the vehicle empty and at its standard weight. Adding cargo, passengers, or aftermarket components will increase the weight and slightly decrease the overall height due to suspension compression.
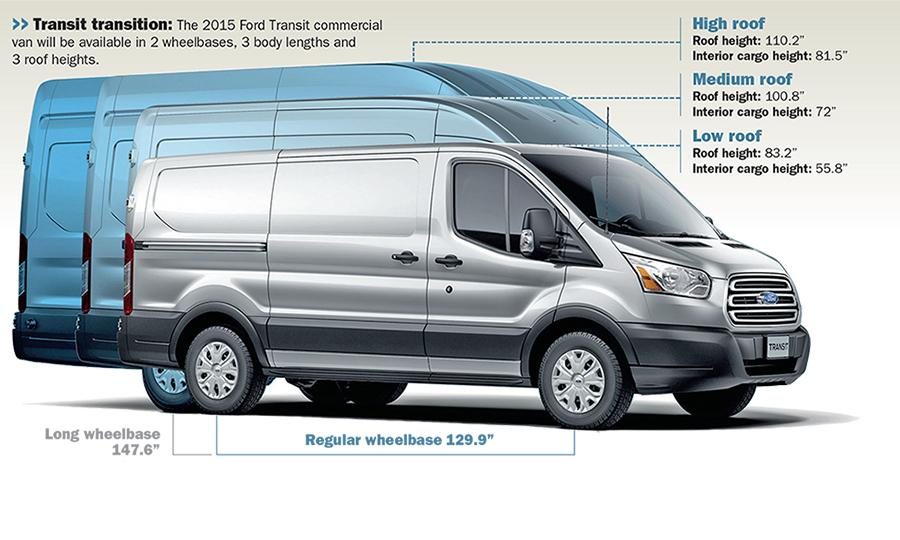
2. Roof Height
Cargo vans often come in different roof heights (low, medium, high). This specification refers to the height of the cargo area itself. It doesn’t include things like antennas or roof rails.
3. Ground Clearance
While not directly related to the overall height, ground clearance is a related dimension. Ground clearance is the distance between the lowest point of the vehicle's chassis (usually the differential) and the ground. This is crucial for off-road use or navigating uneven terrain.
4. Suspension
The suspension system (leaf springs, coil springs, shocks, struts, etc.) directly impacts the ride height of the van. Modifications to the suspension, such as lift kits or lowering kits, will significantly alter the overall height.
5. Tires
Tire size also affects the overall height, albeit to a smaller degree than suspension modifications. Using larger diameter tires will increase the overall height, while smaller tires will decrease it.
Main Parts Affecting Height:
- Roof: The design of the roof itself (flat, raised, extended) significantly affects the height.
- Suspension Components: Springs, shocks, and struts all play a role in determining ride height.
- Tires and Wheels: Diameter and size impact total height.
- Axles: Affect the ground clearance, which is also related to overall height.
- Add-ons: Roof racks, air conditioning units, and other after-market installations.
Symbols – Explaining Lines, Colors, and Icons (Hypothetical Diagram)
Let's imagine we have a detailed technical diagram of a cargo van. Here's how we would interpret the symbols:
- Solid Lines: Represent visible external surfaces of the van.
- Dashed Lines: Indicate hidden surfaces or internal components. For example, a dashed line might show the position of the axle behind the wheel.
- Dimension Lines: Lines with arrows at both ends, accompanied by a numerical value, indicate a specific dimension (e.g., overall height, wheelbase).
- Hatching (Cross-hatching): Used to represent a cut-away section, showing the internal structure of a component (e.g., suspension strut).
- Color Coding: (Example) Blue might represent fluid lines (brake lines, fuel lines), red might represent electrical wiring, and gray might represent structural components.
- Icons: Small symbols might be used to indicate the location of specific components, such as a steering wheel icon for the steering system or a battery icon for the electrical system.
- Datum Lines: Often labeled with letters, datum lines are reference points from which other dimensions are measured. Understanding the datum is crucial for accurate measurements.
Example: A dimension line pointing from the ground to the highest point on the roof, labeled "Overall Height: 96 inches," tells you the maximum height of the van.
How It Works
The overall height of a cargo van is a combination of several interconnected factors. The frame provides the structural foundation. Suspension components attach to the frame and support the body of the van. The tires provide the contact point with the road, and their size contributes to the overall height. Any modifications to these components will affect the final height.
For instance, replacing the factory suspension with a lift kit will raise the entire van, increasing ground clearance and overall height. Similarly, installing larger tires will have the same effect, though to a lesser extent. On the other hand, worn-out suspension components can cause the van to sag, reducing the overall height.
It's important to note that these factors are not independent. Changing one component can affect others. For example, lifting the suspension may require longer brake lines and modified steering components to maintain proper functionality and safety.
Real-World Use – Basic Troubleshooting Tips
Here are some common scenarios and troubleshooting tips related to cargo van height:
- Problem: Van scrapes the roof when entering a parking garage.
- Possible Causes: Incorrectly measured height, underestimated clearance, overloaded cargo (causing suspension sag), larger than stock tires.
- Troubleshooting: Double-check the van's height with a tape measure, verify the garage's clearance, reduce cargo weight, inspect suspension for wear, check tire size against factory specifications.
- Problem: Difficulty installing a roof rack.
- Possible Causes: Incorrect measurements, incompatible roof rack design, modifications to the roof (e.g., adding an AC unit).
- Troubleshooting: Remeasure the roof dimensions, ensure the roof rack is compatible with the specific van model and roof height, account for any roof-mounted accessories.
- Problem: Uneven ride height (one side lower than the other).
- Possible Causes: Worn-out suspension components (springs, shocks), damaged frame, uneven tire pressure.
- Troubleshooting: Inspect suspension components for damage or wear, check frame for signs of damage, ensure tire pressure is even on all tires.
Safety – Highlight Risky Components
Working with suspension components can be extremely dangerous. Springs store a tremendous amount of energy, and improper handling can result in serious injury or death.
- Suspension Springs: Use proper spring compressors when removing or installing springs. Never attempt to compress springs without the correct tools.
- Jacking Points: Always use designated jacking points and secure the van with jack stands before working underneath. Never work under a vehicle supported only by a jack.
- Brake Lines: Be careful when working near brake lines. Damaging a brake line can lead to brake failure.
- Electrical System: Disconnect the battery before working on the electrical system to prevent electrical shock.
Always consult a qualified mechanic if you are unsure about any aspect of vehicle repair or modification. Your safety is paramount.
While we don't have a downloadable diagram directly embedded here, remember to consult your van's service manual or a reputable online resource for detailed schematics specific to your model and year. These resources will provide accurate dimensions and component locations, crucial for any repair or modification project.