How To Add 134a To A Car
Maintaining a comfortable cabin temperature is crucial, especially during the scorching summer months. A well-functioning air conditioning (A/C) system is essential for this, and often, the culprit behind a failing A/C is simply low refrigerant. This article will guide you through the process of adding R-134a refrigerant to your car's A/C system, enabling you to restore cooling performance. We will delve into the technical aspects and best practices to ensure a safe and effective recharge.
Background of Automotive A/C Systems
Before diving into the recharge process, it's beneficial to understand the fundamentals of a car's A/C system. The system operates on the principle of heat transfer through the phase change of a refrigerant. The refrigerant, in this case R-134a, circulates through a closed loop, absorbing heat from the cabin and releasing it outside. Understanding the key components is crucial for effective troubleshooting and maintenance.
Key Components:
- Compressor: The heart of the system, the compressor compresses the low-pressure, low-temperature refrigerant gas, raising its pressure and temperature. It's typically driven by the engine via a belt.
- Condenser: Located in front of the radiator, the condenser dissipates heat from the high-pressure, high-temperature refrigerant gas, causing it to condense into a high-pressure liquid.
- Receiver/Drier (or Accumulator): This component acts as a filter, removing moisture and contaminants from the refrigerant. It also provides a reservoir of liquid refrigerant. Receiver/Driers are typically found in systems with a thermal expansion valve (TXV), while accumulators are found in systems with an orifice tube.
- Expansion Valve (or Orifice Tube): This metering device reduces the pressure of the high-pressure liquid refrigerant, causing it to expand and cool rapidly. The expansion valve regulates refrigerant flow based on cooling demand, while the orifice tube has a fixed flow rate.
- Evaporator: Located inside the cabin, the evaporator absorbs heat from the air blowing across it, cooling the air that enters the cabin. The low-pressure, low-temperature refrigerant liquid evaporates into a gas.
Technical Breakdown: How the A/C System Works
The A/C cycle starts with the compressor drawing in low-pressure, low-temperature R-134a gas. The compressor increases the pressure and temperature of the gas, which then flows to the condenser. As air flows across the condenser, the high-pressure, high-temperature gas releases heat and condenses into a high-pressure liquid. This liquid then passes through the receiver/drier (or accumulator) for filtration and moisture removal. Next, the high-pressure liquid refrigerant enters the expansion valve (or orifice tube), where its pressure is drastically reduced, causing it to cool significantly. This cold, low-pressure liquid enters the evaporator. As warm air from the cabin blows across the evaporator coils, the refrigerant absorbs the heat, causing it to evaporate into a low-pressure gas. The cooled air is then blown into the cabin. Finally, the low-pressure, low-temperature refrigerant gas returns to the compressor, completing the cycle. The pressure switch is a crucial safety component that prevents the compressor from running if the refrigerant pressure is too low or too high, protecting the system from damage.
Adding R-134a Refrigerant: Step-by-Step Guide
Safety First: Always wear safety glasses and gloves when working with refrigerants. R-134a can cause frostbite if it comes into contact with your skin. Work in a well-ventilated area.
Tools and Materials:
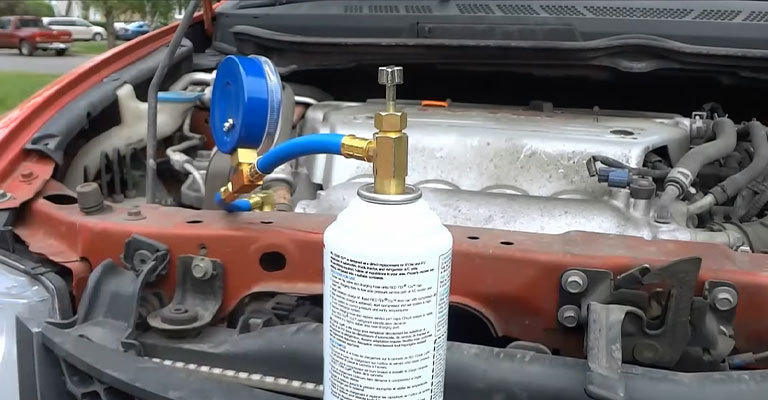
- R-134a refrigerant can with a charging hose and gauge. Ensure the gauge reads in PSI (pounds per square inch).
- A/C manifold gauge set (optional, but highly recommended for accurate readings).
- Safety glasses.
- Gloves.
- Service port caps (replacement caps if needed).
- Rag or shop towel.
Procedure:
- Locate the Low-Pressure Service Port: This port is typically located on the larger diameter line of the A/C system, usually near the evaporator core (firewall) or compressor. It will have a cap labeled "L" or have a blue colored cap. Do not attempt to connect to the high-pressure port (labeled "H" or with a red cap); the fittings are different sizes to prevent accidental connection. For assistance finding the port, consult your vehicle's service manual.
- Prepare the Charging Hose: Connect the charging hose to the R-134a can. Some cans require piercing; follow the instructions on the can carefully.
- Purge the Charging Hose: With the can connected, slightly loosen the charging hose at the connection point to the low-pressure service port. This will release a small amount of refrigerant, purging any air from the hose. Tighten the connection. This is a crucial step to prevent introducing air into the A/C system, which can reduce efficiency and damage components.
- Connect to the Low-Pressure Service Port: Remove the cap from the low-pressure service port. Connect the charging hose to the port. You should hear a slight hiss as the hose engages.
- Start the Engine and Turn on the A/C: Start your car's engine and turn the A/C to the maximum setting (highest fan speed and coldest temperature). Ensure the A/C compressor is engaged. You should be able to hear and see the compressor clutch engage and disengage.
- Monitor the Pressure: Observe the pressure gauge on the charging hose (or the manifold gauge set if you are using one). The ideal low-side pressure typically ranges from 25-45 PSI, but this can vary depending on the ambient temperature. Consult your vehicle's service manual for the specific pressure range for your vehicle.
- Add Refrigerant Slowly: With the engine running and the A/C on, slowly add refrigerant by gently shaking the can and holding it upright. Monitor the pressure gauge closely. Add refrigerant in short bursts, allowing the system to stabilize between additions. Do not overcharge the system. Overcharging can damage the compressor and other components.
- Check for Cooling Performance: Periodically check the temperature of the air coming from the A/C vents inside the car. As you add refrigerant, the air should become progressively colder.
- Disconnect the Charging Hose: Once the pressure is within the specified range and the cooling performance has improved, disconnect the charging hose from the low-pressure service port.
- Replace the Service Port Cap: Replace the cap on the low-pressure service port to prevent leaks.
- Monitor and Test: Continue to monitor the A/C performance over the next few days. If the cooling performance diminishes again, it may indicate a leak in the system.
Common Issues and Maintenance Concerns
- Leaks: A common cause of low refrigerant is leaks in the A/C system. These leaks can occur at various points, including hoses, fittings, the compressor, condenser, evaporator, or even the O-rings sealing the connections. Leak detection dye can be added to the system to help identify the source of leaks.
- Compressor Failure: A failing compressor can also lead to poor cooling performance. Symptoms of a failing compressor include unusual noises, lack of engagement, or insufficient pressure.
- Clogged Orifice Tube or Expansion Valve: A clogged orifice tube or expansion valve can restrict refrigerant flow, reducing cooling efficiency.
- Condenser or Evaporator Blockage: Debris or corrosion can block the condenser or evaporator, hindering heat transfer.
- Moisture in the System: Moisture can react with the refrigerant, forming acids that can corrode the system components. It's crucial to evacuate the system properly before recharging to remove moisture.
Do's and Don'ts / Best Practices
Do's:
- Wear safety glasses and gloves.
- Work in a well-ventilated area.
- Use a gauge to monitor the pressure.
- Add refrigerant slowly and in short bursts.
- Consult your vehicle's service manual for the correct pressure range.
- Purge the charging hose before connecting it to the service port.
- Replace the service port cap after disconnecting the charging hose.
Don'ts:
- Overcharge the system.
- Connect the charging hose to the high-pressure service port.
- Introduce air into the system.
- Ignore leaks.
- Attempt to repair the system without proper training and equipment.
Conclusion
Adding R-134a refrigerant to your car's A/C system can be a straightforward process, but it's crucial to approach it with caution and attention to detail. By following these guidelines and using the correct tools, you can effectively restore cooling performance and enjoy a comfortable ride. However, remember that if you suspect a significant leak or other underlying issues, it's best to consult a qualified A/C technician for professional diagnosis and repair. Overcharging the system or failing to address leaks can lead to costly repairs down the line. While a DIY recharge can offer a quick fix, it’s crucial to have a comprehensive understanding of the system and prioritize safety. A manifold gauge set provides significantly more accurate readings than the simple gauge on a refrigerant can and is a worthwhile investment if you plan to maintain your A/C system yourself.