How To Add Freon To Your Car
Let's talk about keeping your car's AC blowing cold. Adding refrigerant, commonly called "Freon" (though technically, that term refers to R-12, which is largely phased out, we'll primarily be dealing with R-134a or HFO-1234yf here), is a task many experienced DIYers can tackle. However, it's crucial to understand the system and potential dangers involved. This guide will walk you through the process, assuming you have some existing mechanical knowledge and are comfortable working on your car.
Understanding Your Car's AC System
Before we dive into the specifics, let's establish the fundamental components and their roles. A car's air conditioning system is a closed-loop system utilizing the principles of thermodynamics to transfer heat. The refrigerant cycles through these components, undergoing phase changes (liquid to gas and back) to absorb heat from the cabin air and release it outside.
Key Specs and Main Parts
The major components include:
- Compressor: This is the heart of the system. It's driven by the engine and compresses the refrigerant gas, increasing its pressure and temperature. Key spec: Displacement (cc or cubic inches), indicating its capacity to pump refrigerant.
- Condenser: Located at the front of the car, often near the radiator, the condenser dissipates heat from the high-pressure, high-temperature refrigerant gas, causing it to condense into a high-pressure liquid.
- Receiver/Drier (or Accumulator): This component filters out moisture and debris from the refrigerant. It also acts as a reservoir for liquid refrigerant. The receiver/drier is typically used with systems that use a thermal expansion valve (TXV), while the accumulator is used with systems that use an orifice tube.
- Expansion Valve (TXV) or Orifice Tube: This metering device controls the flow of refrigerant into the evaporator. The TXV automatically adjusts the refrigerant flow based on the evaporator's temperature and pressure, providing more efficient cooling. The orifice tube is a fixed restriction that causes a pressure drop, flash-evaporating the refrigerant.
- Evaporator: Located inside the dashboard, the evaporator absorbs heat from the cabin air, causing the liquid refrigerant to evaporate into a low-pressure gas. This cools the air blown into the car.
- Refrigerant Lines: These hoses and pipes connect all the components, allowing the refrigerant to circulate. High-pressure lines carry refrigerant from the compressor to the condenser, and from the condenser to the metering device. Low-pressure lines carry refrigerant from the evaporator back to the compressor.
- Pressure Switches: These switches monitor the refrigerant pressure. A high-pressure switch shuts off the compressor if the pressure gets too high, preventing damage. A low-pressure switch shuts off the compressor if the pressure gets too low, preventing damage from running the compressor without sufficient refrigerant.
Refrigerant Type: As mentioned earlier, most vehicles manufactured after the mid-1990s use R-134a refrigerant. Newer vehicles are increasingly using HFO-1234yf. It's crucial to use the correct refrigerant for your vehicle, as mixing them can damage the system. Consult your vehicle's service manual or a reliable parts supplier to confirm the correct type.
How It Works
The A/C system operates on a thermodynamic cycle. The compressor increases the refrigerant's pressure and temperature. The hot, high-pressure gas then enters the condenser where it releases heat to the environment, changing state to a high-pressure liquid. This liquid passes through the receiver/drier (or accumulator) for filtration and storage. Next, the refrigerant flows through the expansion valve or orifice tube, which reduces the pressure dramatically, causing the refrigerant to cool significantly. This cold, low-pressure refrigerant enters the evaporator core, where it absorbs heat from the air blown across it by the blower motor, cooling the cabin. Finally, the now warm, low-pressure refrigerant gas returns to the compressor, and the cycle repeats.
Adding Refrigerant: A Step-by-Step Guide
Disclaimer: This procedure should only be performed by individuals with a good understanding of automotive systems and safety precautions. Improper handling of refrigerant can be dangerous and illegal. If you are not comfortable with any of these steps, consult a qualified technician.
- Gather Your Supplies: You'll need:
- Refrigerant (R-134a or HFO-1234yf) - Ensure you have the correct type and quantity for your vehicle.
- A manifold gauge set - This measures the high and low-side pressures.
- Refrigerant charging hose with quick couplers (specifically designed for R-134a or HFO-1234yf).
- Safety glasses and gloves.
- A leak detector (optional, but highly recommended).
- Vehicle's service manual (for pressure specifications).
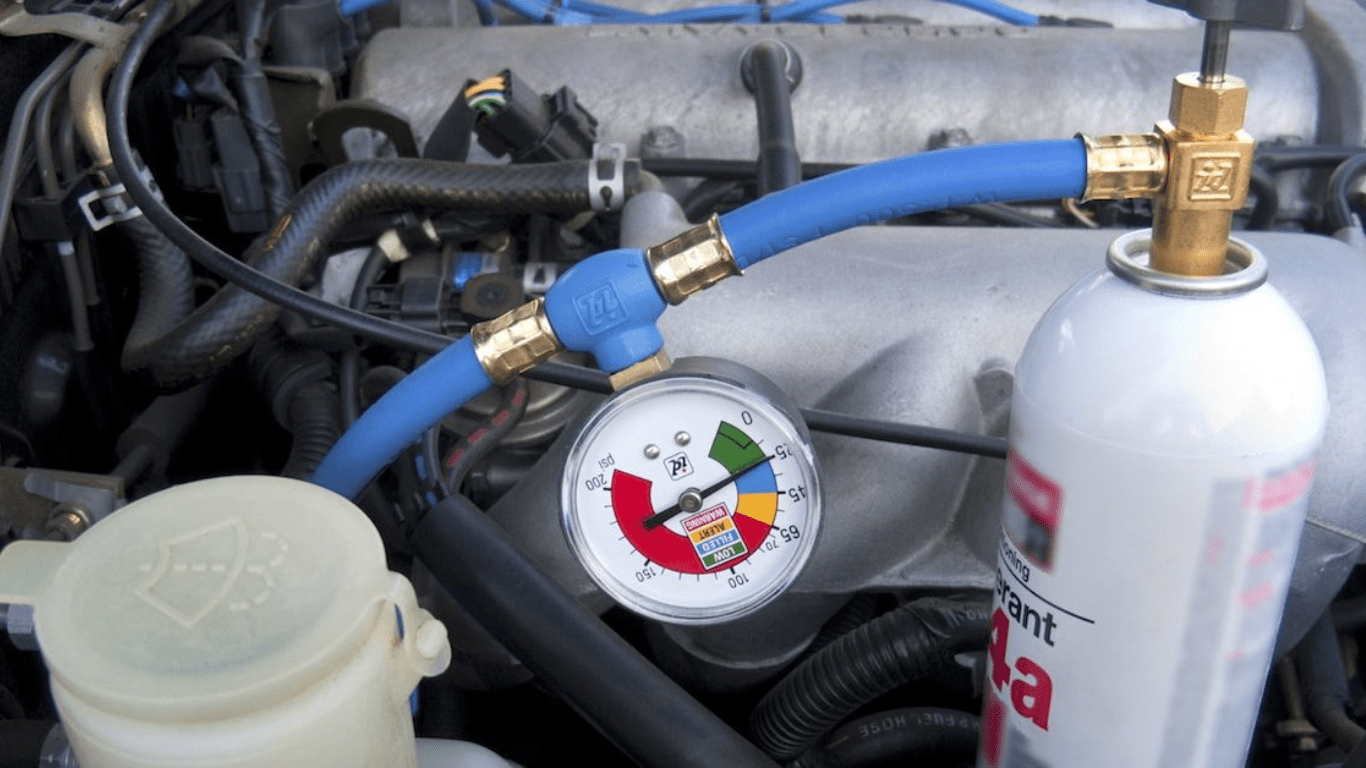
- Identify the Low-Pressure Port: Locate the low-pressure service port on your vehicle's AC system. It's usually on the larger diameter line coming from the evaporator. It will have a fitting compatible with the quick coupler on your charging hose. Do not attempt to connect to the high-pressure port, as this could cause serious injury or damage.
- Connect the Manifold Gauge Set:
- Connect the blue (low-pressure) hose to the low-pressure service port.
- Connect the red (high-pressure) hose to the high-pressure service port (for diagnostic purposes only; do not use this side for charging).
- Connect the yellow (center) hose to the refrigerant can or charging station.
- Check Initial Pressures: With the engine off, read the pressure on the low and high-side gauges. This will give you a baseline reading.
- Start the Engine and Turn on the AC: Set the AC to maximum cool and the blower fan to the highest speed.
- Charge the System:
- Purge the charging hose by briefly opening the valve on the refrigerant can, allowing a small amount of refrigerant to escape (this removes air from the hose).
- Slowly open the low-side valve on the manifold gauge set.
- Allow refrigerant to flow into the system. Monitor the low and high-side pressures. Refer to your vehicle's service manual for the correct pressure range. It is better to undercharge than overcharge.
- Periodically check the air temperature coming from the vents.
- Monitor Pressures and Air Temperature: Continue adding refrigerant until the pressures are within the specified range and the air coming from the vents is as cold as possible.
- Close Valves and Disconnect: Once the system is properly charged, close all valves on the manifold gauge set. Disconnect the charging hose from the low-pressure service port.
- Check for Leaks: Use a leak detector to check for leaks around the service ports and other AC components.
Real-World Use - Basic Troubleshooting Tips
- No Cold Air: This could be due to a low refrigerant charge, a faulty compressor, a blocked expansion valve, or other issues. Check the low-side pressure first. If it's very low, you likely have a leak.
- AC Works Intermittently: This could be caused by a failing compressor clutch, a faulty pressure switch, or a wiring issue.
- Warm Air on One Side: This could indicate a blend door actuator problem. Blend doors control the mixing of hot and cold air.
- Hissing Sound: A hissing sound from the evaporator could indicate a low refrigerant charge or a leak.
Safety - Highlight Risky Components
Refrigerant Under Pressure: The AC system operates under high pressure. Improper handling of refrigerant can cause serious injury, including frostbite and chemical burns. Always wear safety glasses and gloves when working on the system.
High-Pressure Side: Never attempt to add refrigerant to the high-pressure side of the system. This could cause the refrigerant can to explode, resulting in serious injury.
Electrical Components: Be aware of electrical components in the AC system, such as the compressor clutch and pressure switches. Disconnect the battery before working on these components.
Proper Ventilation: Work in a well-ventilated area to avoid inhaling refrigerant fumes.
Remember, automotive AC systems can be complex. If you are unsure about any aspect of this procedure, consult a qualified technician.
A detailed schematic of a typical automotive AC system can be extremely helpful in understanding the components and their relationships. This article provides a general overview, but seeing the physical layout and connections can significantly enhance your understanding. We have a sample diagram available for download. It includes key components like the compressor, condenser, evaporator, and expansion valve, along with the refrigerant lines and pressure switches. This diagram is a great resource for visualizing the system and troubleshooting potential problems.