How To Adjust Mirrors On A Car
Alright, let's talk about something every driver interacts with daily but often overlooks: adjusting your car's mirrors. While it seems trivial, proper mirror adjustment is crucial for safe driving and minimizing blind spots. This article will go beyond the basic "up, down, left, right" and delve into the principles behind effective mirror placement, offering techniques and tips for maximizing your field of view. We'll approach this from the perspective of someone familiar with basic car maintenance, aiming to provide insights useful for both daily driving and more advanced vehicle customization projects.
Purpose: Optimizing Your View of the Road
The primary purpose of correctly adjusting your mirrors is to eliminate or minimize blind spots and provide a comprehensive view of your surroundings. This isn't just about seeing what's directly behind you; it's about understanding the position and speed of vehicles approaching from your flanks. Proper mirror adjustment reduces the need for constant head-checking, allowing you to focus more on the road ahead. Think of it as extending your peripheral vision. A well-adjusted mirror setup is especially crucial for merging onto highways, navigating multi-lane roads, and parking in tight spaces. Furthermore, understanding the geometry of mirror angles is essential when installing aftermarket mirrors, such as those used for towing or enhancing visibility in performance vehicles.
Key Specs and Main Parts
Before diving into the "how-to," let's define some key terms and identify the main components involved.
- Field of View (FOV): This refers to the extent of the observable world that is seen at any given moment. Our goal is to maximize the FOV using the mirrors.
- Blind Spot (or Blind Zone): The area around the vehicle that cannot be seen in the mirrors. Proper adjustment aims to minimize these.
- Lateral Field of View: The width of the area visible to the sides of the vehicle, crucial for seeing vehicles approaching from the adjacent lanes.
- Rearview Mirror: The mirror mounted in the center of the windshield, providing a direct view of what's behind the vehicle.
- Side Mirrors (Left and Right): These mirrors are mounted on the doors and provide a view of the areas to the sides and slightly behind the vehicle. These often have aspherical sections to widen the field of view.
- Mirror Adjustment Controls: These can be manual (levers or knobs) or electric (buttons or switches), allowing you to adjust the mirror's angle.
- Mirror Housing: The protective casing around the mirror glass.
How It Works: The Principles of Mirror Adjustment
The traditional method of adjusting side mirrors often results in significant overlap with the rearview mirror's field of view, creating larger blind spots. The goal of modern methods, and what we'll focus on here, is to minimize that overlap, effectively pushing your "vision" further out to the sides.
Here's the preferred method, often called the "Society of Automotive Engineers (SAE)" or "Blind Spot and Glare Reduction" method:
- Rearview Mirror: Adjust this mirror first to center the view directly behind your vehicle. You should see as much of the rear window as possible.
- Driver's Side Mirror: Lean your head to the left until it almost touches the driver's side window. From this position, adjust the driver's side mirror outward until you can just barely see the side of your car.
- Passenger's Side Mirror: Lean your head to the right, aligning it with the center of the vehicle. From this position, adjust the passenger's side mirror outward until you can just barely see the side of your car.
The rationale behind this method is to position the side mirrors so that they pick up the image of a vehicle leaving your rearview mirror's field of view and entering your blind spot. When a vehicle disappears from your rearview mirror, it should immediately appear in your side mirror. This drastically reduces the size of the blind spot. This method works best when you understand angles of incidence and reflection. Mirrors reflect light at an angle equal to the angle at which the light hits the mirror. By angling the side mirrors outward, you're maximizing the lateral field of view.
Accounting for Different Vehicle Types
The above method is a general guideline. You may need to fine-tune the adjustment based on your vehicle type. For example, if you drive a larger vehicle like an SUV or truck, you might need to angle the mirrors slightly more outward to compensate for the vehicle's width. Additionally, if you're towing a trailer, you'll likely need specialized towing mirrors that extend further outward.
Real-World Use: Troubleshooting and Tips
Here are some common issues and tips for adjusting your mirrors:
- Glare: Adjust the rearview mirror to its "night" setting (if equipped). This setting reduces glare from headlights behind you. Consider aftermarket anti-glare side mirrors.
- Visibility Issues in Poor Weather: Ensure your mirrors are clean. Consider applying a hydrophobic coating to repel water. Heated mirrors are also helpful in cold climates.
- Difficulty Seeing Vehicles in Adjacent Lanes: Double-check your mirror adjustment. Ensure the mirrors are angled far enough outward. If using the SAE method, revisit steps 2 and 3.
- Parking Assistance: Some vehicles have "tilt-down" mirrors that automatically angle downward when reverse is engaged. This can be helpful for seeing the curb. If yours don't, you may be able to code them to with appropriate tools and software if the car has the hardware already installed.
Basic Troubleshooting Tips:
- Electric Mirror Issues: Check the fuse. If the fuse is blown, replace it. If the fuse keeps blowing, there may be a short circuit in the wiring.
- Manual Mirror Issues: Inspect the linkage for damage or obstructions. Lubricate the mechanism with silicone spray.
- Loose Mirror Housing: Tighten the screws or clips that hold the housing in place. If the housing is broken, replace it.
Safety: Be Aware of the Surroundings and Components
Adjusting your mirrors should always be done before you start driving. Never attempt to adjust your mirrors while the vehicle is in motion. If you have electric mirrors, avoid prolonged use of the adjustment controls, as this can overheat the motor. When working on the mirrors, be aware of any sharp edges or protruding components that could cause injury. If you're working on the wiring, disconnect the battery to prevent electrical shock. Finally, remember that mirrors are not a substitute for checking your blind spots. Always physically check your blind spots before changing lanes or making turns.
While the mirrors themselves aren't inherently dangerous, be mindful of the electrical components involved, especially when dealing with heated mirrors or electric adjustment motors. These components are typically low-voltage, but mishandling can still result in minor shocks or damage to the vehicle's electrical system.
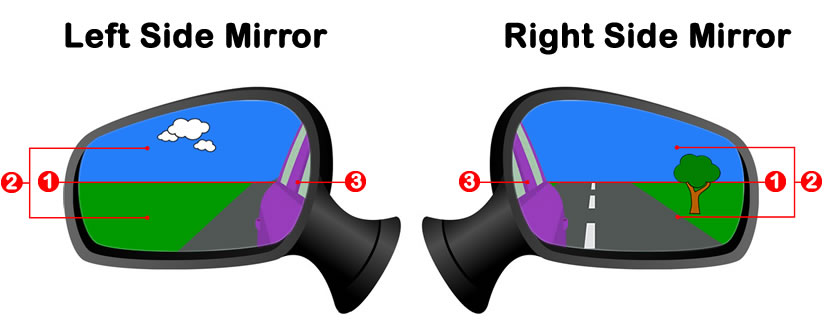
Downloadable Diagram (For Visual Reference)
To further aid your understanding, we've created a detailed diagram illustrating the proper mirror adjustment technique. This diagram visually represents the recommended angles and field of view. This file has been prepared and available for download. The diagram contains visual aids to assist in understanding the concepts explained in the article.