How To Adjust Side Mirrors Of Car
Hey there, fellow gearheads! We're going to dive deep into something that seems simple but is absolutely crucial for safe driving: adjusting your car's side mirrors. You might think it's a trivial task, but properly aligned side mirrors dramatically reduce blind spots and enhance your overall awareness on the road. Whether you're fine-tuning your ride after a repair, learning about vehicle ergonomics, or just aiming for optimal visibility, understanding the mechanics behind mirror adjustment is a worthwhile skill.
Purpose of Understanding Side Mirror Adjustment
Why bother learning the ins and outs of adjusting side mirrors? The answer is simple: safety. Improperly adjusted mirrors create significant blind spots, areas around your vehicle you can't see in either your rearview mirror or side mirrors. These blind spots are a major cause of accidents, especially during lane changes. Understanding the principles behind proper adjustment helps you minimize these hazards and drive with greater confidence. Furthermore, if you're working on collision repairs, replacing a damaged mirror assembly, or modifying your car, knowing how to adjust the mirrors correctly afterward is essential.
Key Specs and Main Parts
Let's break down the anatomy of a typical side mirror assembly. While designs vary, the core components are fairly consistent:
- Mirror Housing: The outer shell that protects the mirror and its internal mechanisms.
- Mirror Glass: The reflective surface itself. This can be flat (for a true representation of distance) or convex (for a wider field of view, but with some distortion). Most passenger vehicles use convex mirrors on at least one side to improve visibility.
- Adjustment Mechanism: This is the heart of the system, allowing you to move the mirror glass horizontally and vertically. Older vehicles use manual cable systems, while newer vehicles employ electric motors.
- Actuator (Electric Mirrors): The small electric motor that moves the mirror glass in response to signals from the adjustment controls.
- Control Switch (Electric Mirrors): Located inside the cabin, this switch allows you to select which mirror to adjust (left or right) and the direction of movement (up, down, left, right).
- Wiring Harness (Electric Mirrors): Connects the control switch to the actuators and the vehicle's power supply.
Key Specs to consider aren't really numerical, more about field of view. The goal is to minimize overlap with your rearview mirror and maximize side visibility. Consider the type of driving you do (city vs. highway) when optimizing your settings.
How It Works: The Adjustment Mechanism
The magic behind mirror adjustment lies in the mechanism that allows you to precisely position the mirror glass. Let's compare manual and electric systems:
Manual Adjustment
In older vehicles, a series of cables connects a small joystick or lever inside the cabin to the mirror glass. Moving the joystick pulls or pushes on these cables, causing the mirror to pivot on a ball-and-socket joint. The simplicity of this system makes it reliable, but it can be less precise and require more effort to adjust.
Electric Adjustment
Electric mirrors offer much greater convenience and precision. When you move the control switch, it sends electrical signals to the appropriate actuator. Each actuator is responsible for moving the mirror in one direction (either horizontal or vertical). The actuator consists of a small electric motor connected to a series of gears. These gears convert the motor's rotational motion into linear motion, which pushes or pulls on the mirror glass, causing it to pivot.
Modern systems often use a potentiometer to provide feedback on the mirror's position. The control unit then uses this information to precisely control the actuator and achieve the desired adjustment.
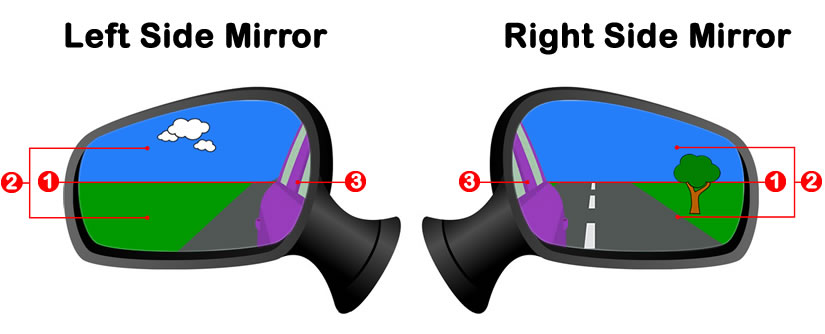
Real-World Use: The Proper Adjustment Technique
The most effective technique to adjust side mirrors is often called the SAE (Society of Automotive Engineers) or the B-pillar method. It minimizes blind spots by extending your field of view further to the sides. Here's how to do it:
- Left Mirror: Lean your head towards the left side window until your head almost touches the glass. Adjust the left side mirror outwards until you can just barely see the side of your car in the inner edge of the mirror.
- Right Mirror: Lean your head towards the center of the car, over the console. Adjust the right side mirror outwards until you can just barely see the side of your car in the inner edge of the mirror.
The goal is to have minimal overlap between what you see in your rearview mirror and your side mirrors. This maximizes your total field of vision. This method initially feels odd as you will no longer see your own car body in the mirrors under normal driving. Trust the process.
Basic Troubleshooting Tips
- Electric Mirrors Not Working: Check the fuse first! A blown fuse is the most common cause. If the fuse is good, inspect the wiring harness for damage or loose connections. A multimeter can be used to test for voltage at the actuator. If voltage is present but the actuator doesn't move, the actuator itself may be faulty.
- Mirror Glass Loose: The mirror glass is typically held in place by clips or adhesive. If it's loose, gently try to re-seat it. If it's severely damaged or detatched, it needs to be replaced.
- Manual Mirror Difficult to Adjust: Cables may be stretched or binding. Try lubricating the cables with a silicone-based lubricant. If that doesn't work, the cables may need to be replaced.
Safety Considerations
Working with electric mirrors involves dealing with electrical components. Always disconnect the negative terminal of your car's battery before working on any electrical wiring. This prevents accidental short circuits and potential damage to the vehicle's electrical system. If you're not comfortable working with electrical wiring, it's best to consult a qualified mechanic.
The actuators themselves are generally low-voltage devices, but they can still generate heat during operation. Avoid touching them immediately after prolonged use. And, be mindful of the glass mirror itself - sharp edges can cause cuts.
Diagrams & Further Learning
While this article provides a detailed overview, visual aids can be incredibly helpful. We have a detailed diagram illustrating the components and operation of both manual and electric side mirror adjustment systems. This diagram includes:
- Exploded views of the mirror assembly
- Wiring diagrams for electric mirrors
- Schematics of the adjustment mechanisms
Understanding these diagrams can greatly assist in troubleshooting and repair tasks. The diagram clearly shows the relationship between the internal components, wiring and control switch. It's a great reference when disassembling and reassembling a mirror assembly. You can download the diagram here: [Link to Diagram - placeholder].
Properly adjusted side mirrors are an investment in your safety and the safety of others on the road. Take the time to understand how they work and how to adjust them correctly. Your visibility will improve, and you'll be a safer, more confident driver.