How To Bypass A Factory Amp
Upgrading your car's audio system can dramatically improve your driving experience. However, many modern vehicles come equipped with a factory-installed amplifier, which can sometimes complicate the process of installing aftermarket components. Bypassing the factory amp is often necessary to achieve the desired sound quality and compatibility with new head units, speakers, or subwoofers. This article will guide you through the process, providing the technical knowledge and practical advice you need to confidently bypass your factory amplifier.
Why Bypass the Factory Amp?
There are several reasons why you might want to bypass the factory amp. Here's a look at the most common:
- Sound Quality Limitations: Factory amplifiers are often designed to prioritize cost-effectiveness over high-fidelity audio. They may use lower-quality components and have limited power output, resulting in a less-than-ideal listening experience.
- Aftermarket Compatibility: When installing a new head unit (the main receiver in your dashboard), the factory amp may not be compatible with the new unit's output signals. This can lead to distortion, weak sound, or even damage to your new equipment. The impedance (resistance to electrical flow) of the factory amplifier's inputs might be different from what your new head unit is designed to output, causing mismatch issues.
- Integration Challenges: Integrating aftermarket amplifiers and speakers with a factory amp can be tricky. Factory amplifiers often incorporate complex equalization (EQ) curves tailored to the specific vehicle and speaker setup. These curves may not be desirable when using aftermarket components designed to provide a flat or user-adjustable response.
- Power Restrictions: Factory amps are often underpowered. If you're upgrading to higher-power speakers or adding a subwoofer, the factory amp simply won't be able to provide enough juice to drive them effectively. Bypassing and installing a dedicated aftermarket amplifier gives you the necessary power and control.
Understanding the Factory Amplifier System
Before you start snipping wires, it's crucial to understand how your factory amplifier system works. Most factory systems follow a general layout:
Signal Flow
The head unit generates a low-level audio signal. This signal is then sent to the factory amplifier. The amplifier boosts the signal's voltage to a level sufficient to drive the speakers. Many systems also include a crossover network, either built into the amplifier or located separately, which divides the audio signal into different frequency ranges (highs, mids, lows) before sending them to the appropriate speakers (tweeters, midrange drivers, woofers).
Amplifier Location
The location of the factory amplifier varies depending on the vehicle manufacturer and model. Common locations include:
- Under the driver or passenger seat
- In the trunk or cargo area
- Behind the dashboard
Consult your vehicle's service manual or online forums specific to your make and model to pinpoint the exact location of your amp. You might also use a wire tracer to follow the speaker wires from the head unit to the amplifier location.
Wiring Diagrams
Obtaining a wiring diagram for your vehicle's audio system is absolutely essential. This diagram will show you the pinout of the amplifier connectors, identifying which wires are for power, ground, input signals, and output signals to the speakers. Without a wiring diagram, you're essentially working blind and risk causing damage to your vehicle's electrical system. You can typically find wiring diagrams in your vehicle's service manual, online databases (paid or free), or through reputable car audio installation shops.
Technical Breakdown: Bypassing the Amplifier
There are a few methods for bypassing a factory amplifier, each with its own advantages and disadvantages. The best method depends on your specific goals and the complexity of your factory system.
Method 1: Direct Speaker Wiring (Simplest Approach)
This method is the most straightforward and is suitable for situations where you're replacing the factory amplifier with an aftermarket amplifier. The basic principle is to connect the speaker wires directly from your new head unit (or aftermarket amplifier) to the speakers, bypassing the factory amplifier entirely.
- Disconnect the Battery: Always disconnect the negative terminal of your car battery before working on any electrical components. This prevents accidental short circuits and protects your equipment.
- Locate the Factory Amplifier: Find the amplifier based on your research and wiring diagrams.
- Identify Speaker Wires: Using your wiring diagram, identify the speaker output wires coming from the factory amplifier. These will be the wires that run to your speakers.
- Cut the Speaker Wires: Carefully cut the speaker output wires on the output side of the amplifier connector (the side that leads to the speakers). Leave enough wire on both sides of the cut so you can reconnect them later if needed.
- Connect to New Head Unit/Amplifier: Connect the speaker output wires from your new head unit or aftermarket amplifier to the cut speaker wires leading to the speakers. Ensure you connect the correct wires to the correct speakers (front left, front right, rear left, rear right). Pay close attention to polarity (+ and -). Mismatched polarity can cause sound cancellation and poor bass response. Use butt connectors, solder and heat shrink tubing, or a wiring harness adapter for secure and reliable connections.
- Bypass Signal Wires (If Necessary): Some factory amplifiers receive input signals digitally or via balanced differential signals rather than standard RCA or speaker-level inputs. In these cases, you may need to run new RCA cables from your aftermarket head unit to your new amplifier.
- Test and Verify: Reconnect the battery and test your audio system to ensure all speakers are working correctly. Verify that the sound is clean and free of distortion.
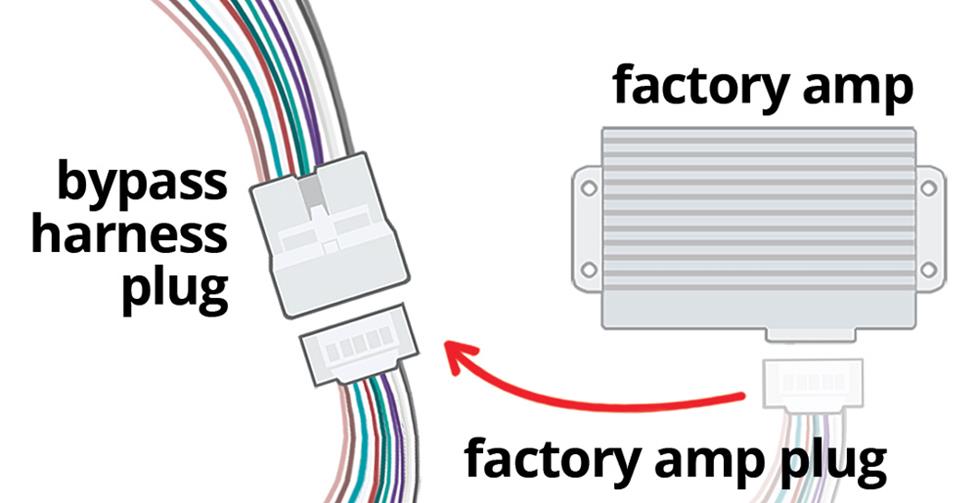
Method 2: Using a Wiring Harness Adapter (Plug-and-Play)
This method involves using a wiring harness adapter specifically designed for your vehicle. These adapters provide a plug-and-play solution, allowing you to bypass the factory amplifier without cutting any wires. This is a cleaner and more reversible approach.
- Disconnect the Battery: As always, disconnect the battery.
- Locate the Factory Amplifier: Find the amplifier as before.
- Purchase the Correct Harness: Obtain a wiring harness adapter designed for your specific vehicle make, model, and year. Metra, Scosche, and PAC are common brands that offer these harnesses. Make sure the harness is specifically designed for bypassing the amplifier, not just for replacing the head unit.
- Connect the Harness: Disconnect the factory amplifier's wiring harness. Plug the wiring harness adapter into the factory wiring harness connectors. The adapter will typically have wires that you can then connect to your new head unit or aftermarket amplifier's speaker outputs.
- Connect to New Head Unit/Amplifier: Connect the wires from the wiring harness adapter to the corresponding speaker outputs on your new head unit or aftermarket amplifier. As with the direct wiring method, pay close attention to polarity.
- Test and Verify: Reconnect the battery and test your audio system.
Method 3: Line Output Converter (LOC)
A Line Output Converter (LOC) is a device that converts speaker-level outputs from your factory amplifier into low-level RCA signals that can be used by an aftermarket amplifier. This method is useful when you want to retain the factory head unit but add an aftermarket amplifier and speakers.
- Disconnect the Battery: Disconnect the battery.
- Locate the Factory Amplifier: Find the amplifier.
- Tap into Speaker Wires: Identify the speaker output wires on the factory amplifier. Tap into these wires using wire taps or by carefully stripping a small section of insulation and soldering on new wires.
- Connect to LOC: Connect the tapped speaker wires to the inputs of the LOC. Follow the LOC's instructions for proper wiring.
- Connect LOC to Aftermarket Amplifier: Connect RCA cables from the outputs of the LOC to the inputs of your aftermarket amplifier.
- Connect Aftermarket Amplifier to Speakers: Connect the speaker outputs of your aftermarket amplifier to your speakers.
- Adjust the LOC: Most LOCs have adjustable gain controls. Adjust these controls to optimize the signal level going to your aftermarket amplifier.
- Test and Verify: Reconnect the battery and test your audio system.
Common Issues and Maintenance Concerns
- Wiring Errors: Incorrect wiring is the most common cause of problems. Double-check your wiring connections and polarity using your wiring diagram.
- Ground Loops: Ground loops can cause unwanted noise (humming or buzzing) in your audio system. Ensure all components (head unit, amplifier, LOC) are properly grounded to a common ground point on the vehicle's chassis.
- Impedance Mismatch: Ensure that the impedance of your speakers matches the impedance requirements of your amplifier. Using speakers with the wrong impedance can damage your amplifier.
- Signal Clipping: Signal clipping occurs when the amplifier is overdriven, resulting in distorted sound. Adjust the gain settings on your amplifier and head unit to avoid clipping.
- Factory System Integration Issues: Some vehicles have complex integrated systems where the factory amplifier controls other functions, such as chimes or warning signals. Bypassing the amplifier may disable these functions. Research your specific vehicle to determine if this is a concern. In these cases, a specialized integration module might be required.
Do's and Don'ts / Best Practices
Do's:
- Research Thoroughly: Gather as much information as possible about your vehicle's audio system before starting. Obtain a wiring diagram and consult online forums specific to your make and model.
- Disconnect the Battery: Always disconnect the battery before working on electrical components.
- Use Quality Connectors: Use high-quality butt connectors, solder and heat shrink tubing, or wiring harness adapters for secure and reliable connections.
- Label Everything: Label all wires before disconnecting them to avoid confusion.
- Test Before Reassembling: Test your audio system thoroughly before reassembling the dashboard or interior panels.
- Document Your Work: Take pictures and notes as you go, so you can easily troubleshoot problems or reverse the process if needed.
Don'ts:
- Cut Wires Without a Plan: Never cut any wires without knowing their function. Consult your wiring diagram.
- Guess at Wiring Connections: Guessing can lead to damage and frustration. Use your wiring diagram.
- Overlook Grounding: Proper grounding is essential for preventing noise and ensuring proper operation.
- Ignore Polarity: Correct polarity is crucial for optimal sound quality. Double-check your connections.
Conclusion
Bypassing a factory amplifier can be a rewarding project that significantly improves your car's audio system. By understanding the basics of your factory system, carefully planning your approach, and following the steps outlined in this article, you can confidently bypass your amplifier and enjoy a superior listening experience. If you are unsure about any aspect of the process, it's always best to consult a professional car audio installer. They have the experience and expertise to ensure a safe and successful installation. However, with patience, research, and attention to detail, this is a task within reach for the experienced DIYer.