How To Change A Knock Sensor
The dreaded check engine light illuminates on your dashboard, accompanied by a feeling of unease. A quick scan reveals a code indicating a faulty knock sensor. What now? Is your engine about to self-destruct? While a malfunctioning knock sensor shouldn't be ignored, understanding its function and replacement procedure can empower you to tackle this common automotive issue, saving both time and money.
The Case of the Phantom Knock
Imagine you're a conductor leading an orchestra. You have meticulously scored the music, expecting each instrument to play its part perfectly, creating a harmonious symphony. Now imagine one violinist, out of tune, playing sharp, dissonant notes. That's essentially what knock, or detonation, is in your engine. It's an abnormal combustion event that can severely damage internal components. The knock sensor is like your ears as the conductor, listening for those rogue sounds and alerting the engine's control system to correct the issue.
What is Knock and Why is it Bad?
Normally, the combustion process in an engine involves a controlled burn of the air-fuel mixture ignited by the spark plug. This burn propagates smoothly across the combustion chamber, pushing the piston down. However, under certain conditions, the unburned portion of the air-fuel mixture can spontaneously ignite due to excessive pressure and temperature before the spark plug fires. This uncontrolled explosion creates pressure waves that collide with the cylinder walls, producing a characteristic "knocking" or "pinging" sound. Prolonged detonation can lead to piston damage, cylinder head erosion, connecting rod failure, and even catastrophic engine failure. Factors contributing to knock include low-octane fuel, excessive engine load, high ambient temperatures, and improper ignition timing.
How the Knock Sensor System Works
The knock sensor itself is a relatively simple device, typically utilizing a piezoelectric crystal. This crystal generates a small electrical voltage when subjected to mechanical stress, like the vibrations caused by engine knock. The sensor is mounted directly to the engine block, often near the cylinders. When detonation occurs, the vibrations transmit through the engine block to the knock sensor, generating a voltage signal. This signal is then sent to the Engine Control Unit (ECU), the brains of the engine management system.
ECU Response and Retarded Timing
Upon receiving a signal from the knock sensor, the ECU interprets the severity of the knock and takes corrective action. The primary strategy is to retard the ignition timing. By firing the spark plug later in the combustion cycle, the peak cylinder pressure is reduced, mitigating the conditions that cause detonation. The ECU can also adjust other parameters, such as fuel mixture, to further control the combustion process. This retardation of timing, while preventing engine damage, comes at the cost of reduced engine performance and fuel economy. The ECU will attempt to gradually advance the timing back to the optimal setting as the knock subsides. If the knock persists, the ECU will keep the timing retarded and may illuminate the check engine light, indicating a problem that needs attention.
Replacing the Knock Sensor: A Step-by-Step Guide
Tools Required:
- Socket set with extensions
- Torque wrench
- Jack and jack stands (if needed)
- Penetrating oil
- New knock sensor
- Possibly: Multi-meter
Procedure:
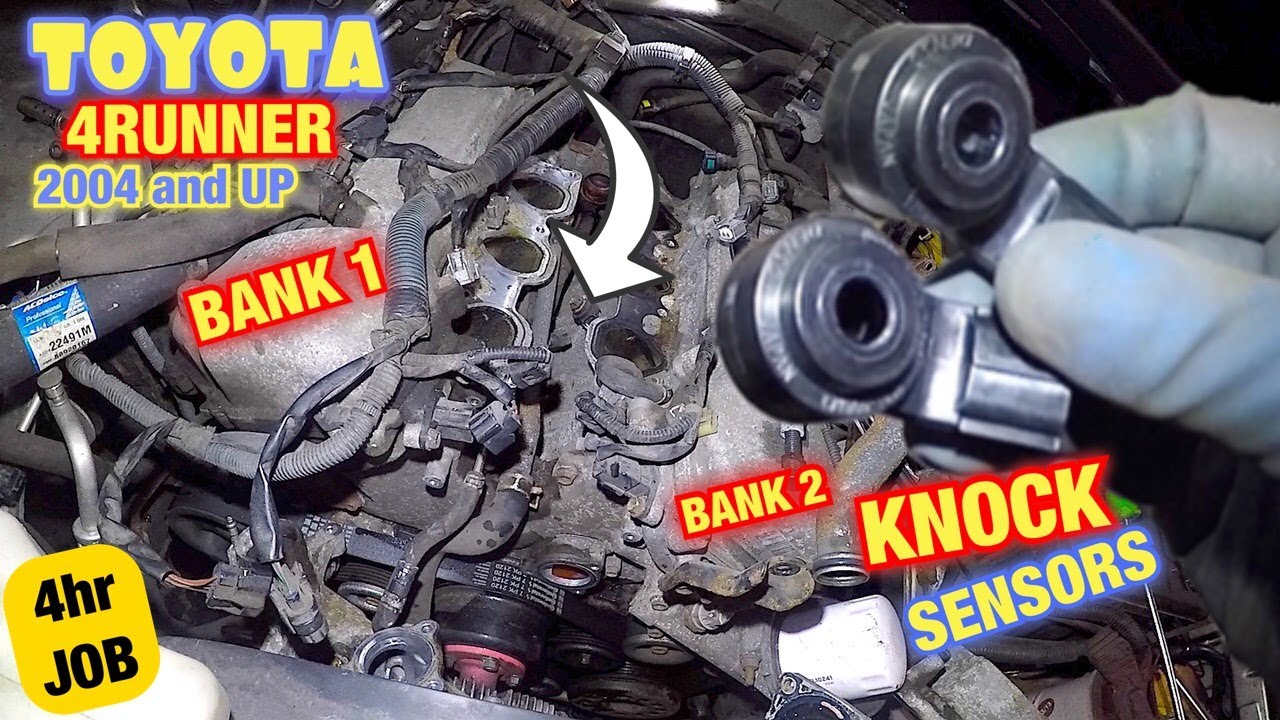
- Locate the Knock Sensor: This is often the trickiest part. Consult your vehicle's service manual or online resources to identify the sensor's exact location. It's typically mounted on the engine block, often near the intake manifold or cylinder head. Some vehicles have multiple knock sensors.
- Disconnect the Battery: This is a crucial safety precaution to prevent electrical shorts.
- Gain Access: Depending on the vehicle, you may need to remove other components, such as the intake manifold, air intake, or wiring harnesses, to gain access to the knock sensor. Take photos as you disassemble to aid in reassembly.
- Disconnect the Connector: Carefully disconnect the electrical connector from the knock sensor. Check the connector for corrosion and clean if necessary. A dab of dielectric grease can help prevent future corrosion.
- Remove the Old Sensor: Use the appropriate socket to loosen and remove the knock sensor. Be careful not to damage the threads in the engine block. Applying penetrating oil can help loosen a stubborn sensor.
- Install the New Sensor: Apply a small amount of anti-seize compound to the threads of the new knock sensor to prevent it from seizing in the future. Torque the sensor to the manufacturer's specified torque using a torque wrench. Overtightening can damage the sensor.
- Reconnect the Connector: Reconnect the electrical connector to the new knock sensor. Ensure it is securely fastened.
- Reassemble: Reinstall any components that were removed to gain access to the knock sensor. Refer to the photos you took during disassembly to ensure everything is put back correctly.
- Reconnect the Battery: Reconnect the battery.
- Clear the Codes: Use an OBD-II scanner to clear the check engine light codes.
- Test Drive: Take the vehicle for a test drive to ensure the knock sensor is functioning properly and the check engine light does not return.
Pros and Cons of DIY Replacement
Pros:
- Cost savings compared to a mechanic.
- Opportunity to learn about your vehicle.
- Satisfaction of completing the repair yourself.
Cons:
- Requires mechanical aptitude and tools.
- Potential for mistakes if not done carefully.
- Access to the knock sensor can be difficult on some vehicles.
Real-World Examples and Common Problems
Toyota: Toyota knock sensors are known to fail over time, often due to heat and vibration. Symptoms include reduced power and poor fuel economy. Replacement is usually straightforward, but proper torque is critical to prevent damage.
GM: GM vehicles, especially those with the 3.8L V6 engine, can suffer from knock sensor issues. A common problem is coolant leaking onto the sensor, causing corrosion and failure. Thoroughly inspect the area around the sensor for leaks before replacement.
Ford: Ford knock sensors can be sensitive to aftermarket modifications, such as performance chips or exhaust systems. These modifications can sometimes create false knock signals, leading to reduced performance. It's important to diagnose the root cause of the knock before replacing the sensor.
Important Note: Sometimes, a knock sensor code doesn't necessarily mean the sensor itself is bad. Other potential causes include: wiring harness issues, faulty connectors, carbon buildup in the engine, low fuel octane, or even internal engine damage. Before replacing the sensor, it's wise to check the wiring harness for damage or corrosion, and to ensure that the fuel being used is of the correct octane rating. A multi-meter can also be used to test the resistance of the knock sensor, but it's best to compare the reading to the manufacturer's specifications.
Insights and Recommendations
Replacing a knock sensor is a manageable task for a DIYer with some mechanical experience. The key is to take your time, follow the manufacturer's instructions carefully, and use the correct tools. However, if you're unsure about any aspect of the repair, it's always best to consult a qualified mechanic. Remember to diagnose the problem thoroughly before replacing the sensor, as other issues can mimic a faulty knock sensor. Investing in a good quality OBD-II scanner can be invaluable for diagnosing and clearing codes. Using a dab of dielectric grease on the connector and applying anti-seize to the sensor threads are simple steps that can prevent future problems. Finally, always torque the new sensor to the manufacturer's specification to ensure proper function and prevent damage.