How To Change A Tail Light Bulb
A malfunctioning tail light is more than just a minor inconvenience; it’s a significant safety hazard. A burned-out tail light reduces your vehicle's visibility to other drivers, especially at night or in adverse weather conditions, increasing the risk of a rear-end collision. Fortunately, replacing a tail light bulb is often a straightforward repair you can tackle yourself, saving time and money. This guide will walk you through the process, helping you identify the problem, understand the cause, and implement the correct solution.
Identifying the Problem: Symptoms of a Faulty Tail Light Bulb
Recognizing the symptoms of a failing tail light bulb is the first step toward addressing the issue. Here are some common indicators:
- Complete Darkness: The most obvious sign is when the tail light is completely out. This means it doesn't illuminate at all when the headlights are on or when the brake pedal is pressed.
- Dim or Weak Light: The tail light may still illuminate, but it's significantly dimmer than the other tail light. This can be difficult to notice during the day but is very apparent at night.
- Flickering Light: The tail light may flicker intermittently. This indicates a loose connection or a bulb that's nearing the end of its life.
- Brake Light Failure: In some vehicles, the tail light and brake light use the same bulb with dual filaments. If the brake light function fails while the tail light still works (or vice versa), it usually means one of the filaments has burned out.
- Dashboard Warning Light: Many modern vehicles are equipped with a dashboard warning light that indicates a problem with the exterior lighting. This light will illuminate if a tail light bulb has burned out. Consult your owner's manual to identify the specific warning light.
- Other Lights Affected: In rare cases, a faulty tail light bulb can affect other lights in the vehicle, such as license plate lights or side marker lights. This is usually due to a shared circuit or a short circuit.
Understanding the Root Cause: Why Tail Light Bulbs Fail
Tail light bulbs, like all light bulbs, have a finite lifespan. Several factors can contribute to their failure:
- Normal Wear and Tear: Over time, the filament inside the bulb weakens and eventually breaks, causing the bulb to burn out. This is the most common reason for tail light bulb failure.
- Vibration: The constant vibration of the vehicle can weaken the filament, especially in older vehicles with stiffer suspensions.
- Voltage Fluctuations: Over time, voltage spikes or fluctuations in the vehicle's electrical system can shorten the life of the bulb.
- Moisture: Moisture inside the tail light housing can corrode the bulb's contacts and cause it to fail. This is more common in vehicles that have been in accidents or have damaged tail light housings.
- Poor Quality Bulbs: Using low-quality or non-OEM (Original Equipment Manufacturer) bulbs can also lead to premature failure. Cheaper bulbs often have weaker filaments and are more susceptible to damage.
- Incorrect Bulb Type: Using the wrong type of bulb can cause it to overheat and burn out quickly. Always refer to your owner's manual or the bulb chart at your local auto parts store to ensure you're using the correct bulb.
The Consequences of Ignoring a Burned-Out Tail Light
Ignoring a burned-out tail light can have serious consequences:
- Increased Risk of Accidents: A burned-out tail light reduces your vehicle's visibility, making it more difficult for other drivers to see you, especially at night or in bad weather. This significantly increases the risk of a rear-end collision.
- Legal Penalties: Driving with a burned-out tail light is illegal in most jurisdictions and can result in a traffic ticket and a fine.
- Vehicle Inspection Failure: Many states require vehicles to pass a safety inspection, and a burned-out tail light will cause your vehicle to fail.
- Liability in Accidents: If you're involved in a rear-end collision with a burned-out tail light, you may be held liable for the accident, even if it wasn't entirely your fault.
Recommended Fixes: Replacing the Tail Light Bulb
The recommended fix for a burned-out tail light bulb is to replace it with a new bulb of the correct type. Here's a step-by-step guide:
- Gather Your Supplies: You'll need the correct replacement bulb (check your owner's manual or an online bulb guide), a screwdriver (usually Phillips or flathead, depending on your vehicle), and possibly a pair of gloves.
- Safety First: Park your vehicle on a level surface, turn off the ignition, and engage the parking brake.
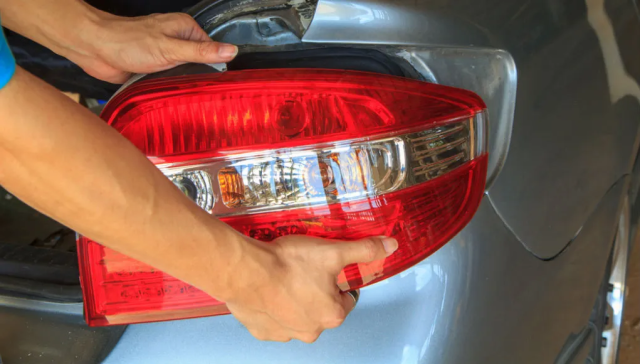
- Access the Tail Light Housing: The method for accessing the tail light bulb varies depending on the vehicle model.
- Inside the Trunk: In many cars, you can access the tail light housing from inside the trunk. Look for an access panel or a plastic cover that can be removed.
- From the Exterior: Some tail light housings are accessible from the exterior of the vehicle. You may need to remove screws or clips to detach the housing.
- Consult Your Owner's Manual: If you're unsure how to access the tail light housing, consult your owner's manual for specific instructions.
- Remove the Old Bulb: Once you've accessed the tail light housing, locate the bulb socket. Depending on the design, you may need to twist the socket counterclockwise to release it, or it may simply pull straight out. Once the socket is out, gently pull the old bulb straight out of the socket. Some bulbs may require a slight twist to release.
- Install the New Bulb: Insert the new bulb into the socket, ensuring it's fully seated and properly aligned. If the bulb has a specific orientation, make sure it's inserted correctly.
- Reinstall the Socket: Reinstall the socket into the tail light housing, twisting it clockwise to lock it in place (if applicable) or pushing it straight in until it clicks.
- Test the Light: Before reassembling everything, turn on the headlights and/or press the brake pedal to ensure the new bulb is working correctly.
- Reassemble the Tail Light Housing: Reattach the access panel, screw the housing back into place, or reassemble any other components you removed to access the bulb.
Cost Estimates and Shop Advice
Replacing a tail light bulb is generally an inexpensive repair. A replacement bulb typically costs between $5 and $20, depending on the type of bulb and where you purchase it. If you choose to have a mechanic replace the bulb for you, labor costs can range from $20 to $50, depending on the complexity of the job and the shop's hourly rate.
When to seek professional help:
- Difficulty accessing the bulb: If you're unable to access the tail light housing or remove the old bulb, it's best to seek professional help. You don't want to risk damaging the housing or other components.
- Electrical issues: If the new bulb doesn't work, or if you suspect there's an underlying electrical problem, such as a short circuit or a blown fuse, take your vehicle to a qualified mechanic for diagnosis and repair.
- Damaged tail light housing: If the tail light housing is cracked or damaged, it may need to be replaced. This is a more complex repair that typically requires professional assistance.
Credibility and Additional Information
While a burned-out tail light seems simple, there are occasionally underlying issues. For example, some vehicles, particularly those with LED tail lights, may require replacement of the entire tail light assembly if a single LED fails. These repairs are more complex and costly.
You can also check for Technical Service Bulletins (TSBs) related to your vehicle's tail lights. TSBs are issued by manufacturers to address common problems and provide repair instructions. You can usually find TSB information online or through your local dealership.
Many online forums and communities dedicated to specific vehicle makes and models often discuss common tail light issues and provide valuable troubleshooting tips. These communities can be a great resource for learning about specific problems and solutions related to your vehicle.
In conclusion, replacing a tail light bulb is a crucial maintenance task that ensures your safety and prevents potential legal issues. By understanding the symptoms, causes, and proper replacement procedures, you can often handle this repair yourself. However, don't hesitate to seek professional help if you encounter any difficulties or suspect a more complex problem.