How To Change A Transmission Seal
Let's talk about transmission seals – specifically, how to replace them. If you're noticing fluid leaks under your car, especially if the fluid is reddish-brown (for automatic transmissions) or golden-brown (for manual transmissions), a leaking transmission seal is a likely culprit. Ignoring it will lead to low fluid levels, which can cause serious and expensive damage to your transmission. This guide will walk you through the process, assuming you've got some wrenching experience under your belt and aren’t afraid to get your hands dirty.
Understanding Your Transmission
Before we dive into the how-to, a little background. Your transmission, whether it's an automatic or a manual, is essentially a gearbox. It uses a series of gears to multiply the engine's torque and deliver the right amount of power to the wheels at different speeds. This is critical because an engine produces peak power within a specific RPM range. Without a transmission, you’d only have one "gear," severely limiting acceleration and top speed.
Automatic transmissions (ATs) use a torque converter instead of a clutch to manage the engine’s power at rest and initial acceleration. Inside, a complex system of planetary gears is engaged and disengaged by a valve body, controlled by hydraulic pressure (and increasingly, electronic solenoids in modern transmissions). Manual transmissions (MTs), on the other hand, rely on a clutch, which you manually engage and disengage with the clutch pedal. Gears are selected by shifting the gear lever, physically moving forks that engage the desired gear.
Both types of transmissions require lubrication. Transmission fluid (ATF in automatics, gear oil in manuals) lubricates the gears, bearings, and other moving parts, dissipating heat and preventing wear. This fluid is sealed within the transmission housing by various seals. The most common culprits for leaks are the output shaft seal (where the driveshaft connects), the input shaft seal (where the transmission connects to the engine), and the selector shaft seal (where the shift linkage connects).
Technical Breakdown: Replacing a Transmission Seal
This process outlines a general procedure. Always consult your vehicle's service manual for specific instructions and torque specifications.
Tools and Materials You'll Need:
- New Transmission Seal (Use the correct seal for your vehicle's make, model, and year!)
- Socket Set and Wrenches
- Torque Wrench
- Screwdrivers (Flathead and Phillips)
- Pry Bar (small)
- Seal Puller (essential for removing the old seal without damaging the housing)
- Hammer or Rubber Mallet
- Transmission Fluid (Correct type for your transmission)
- Drain Pan
- Jack and Jack Stands
- Wheel Chocks
- Gloves
- Safety Glasses
- Parts Cleaner
- Shop Rags
Steps:
- Safety First! Chock the rear wheels, loosen the lug nuts on the wheels you'll be working near (if you need to remove them for access), jack up the vehicle, and securely support it on jack stands. Never work under a vehicle supported only by a jack!
- Drain the Transmission Fluid: Locate the drain plug on the transmission pan (for automatics) or the drain plug on the transmission case (for manuals). Place a drain pan underneath and remove the plug. Allow the fluid to drain completely. Replace the drain plug with a new crush washer, if applicable, and torque it to the manufacturer's specification.
- Access the Seal: This is where things get vehicle-specific.
- Output Shaft Seal: You'll likely need to remove the driveshaft. Mark the driveshaft and the transmission flange before removal to ensure proper reinstallation and prevent driveline vibration. Disconnect the driveshaft from the transmission. Some driveshafts are held in by bolts, others by U-bolts, and some slip out after disconnecting the center support bearing. Once disconnected, carefully remove the driveshaft from the transmission. Be prepared for some fluid to spill, even after draining.
- Input Shaft Seal: This is more involved. You’ll likely need to remove the entire transmission from the vehicle. This often involves disconnecting exhaust components, shift linkages, electrical connectors, and supporting the engine. This is a complex job and should only be attempted if you have significant experience.
- Selector Shaft Seal: Disconnect the shift linkage from the transmission. This usually involves removing cotter pins or clips.
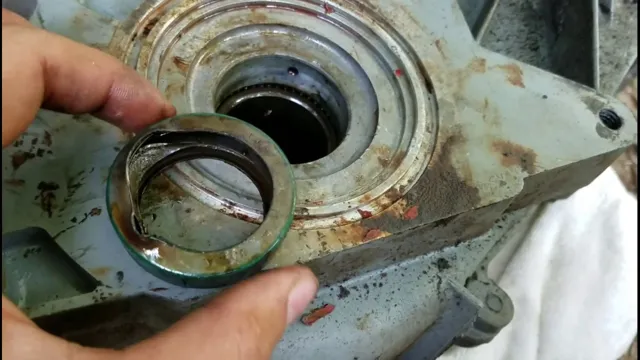
- Remove the Old Seal: This is where the seal puller is crucial. Carefully insert the seal puller behind the seal's lip and use it to pry the seal out. Be extremely careful not to scratch or damage the transmission housing! Damaging the housing will prevent the new seal from seating properly, leading to leaks. If you don’t have a seal puller, you can *carefully* try using a small screwdriver and a hammer, tapping gently around the perimeter of the seal. Again, extreme caution is required.
- Clean the Sealing Surface: Use parts cleaner and a shop rag to thoroughly clean the area where the new seal will sit. Remove any old sealant, grime, or corrosion. A clean surface is essential for a good seal.
- Install the New Seal: Lightly lubricate the inner lip of the new seal with transmission fluid. This will help it slide over the shaft without damage. Position the new seal squarely in the housing. Use a seal installer tool (a socket or piece of pipe that matches the seal's outer diameter) and a hammer or rubber mallet to gently tap the seal into place until it is fully seated and flush with the housing. If you don’t have a seal installer, carefully use a socket that matches the seal diameter. Avoid hammering directly on the seal!
- Reassemble:
- Output Shaft: Reinstall the driveshaft, aligning the marks you made earlier. Torque the bolts to the manufacturer's specification.
- Input Shaft: Reinstall the transmission, carefully aligning the input shaft with the clutch disc (for manuals) or torque converter (for automatics). Reconnect all components in the reverse order of removal. Torque all bolts to the manufacturer's specification.
- Selector Shaft: Reconnect the shift linkage, ensuring all cotter pins or clips are securely in place.
- Refill the Transmission Fluid: Locate the fill plug on the transmission (usually on the side of the case). Add the correct type and amount of transmission fluid, as specified in your vehicle's service manual. Check the fluid level with the dipstick (for automatics) or by removing the fill plug and observing the fluid level (for manuals).
- Lower the Vehicle: Carefully lower the vehicle and remove the jack stands.
- Test Drive: Take the vehicle for a short test drive and check for leaks around the seal. Also, check the transmission fluid level again after the test drive and add more if necessary.
Common Issues and Maintenance Concerns
- Damaged Seal Housing: If the seal housing is damaged (scratched, corroded, or warped), the new seal may not seat properly and will leak. In some cases, you can use a sealant like Permatex to help fill minor imperfections. However, severe damage may require replacing the transmission housing.
- Incorrect Seal Installation: Improper installation is the most common cause of leaks after replacing a seal. Ensure the seal is seated squarely and fully in the housing.
- Using the Wrong Seal: Always use the correct seal for your vehicle. Different transmissions and even different years of the same transmission may use different seals.
- Worn Shaft: If the shaft that the seal rides on is worn or grooved, it can damage the new seal and cause it to leak prematurely. In some cases, you can install a “speedi-sleeve” on the shaft to provide a smooth sealing surface.
Do's and Don'ts / Best Practices
Do's:
- Do consult your vehicle’s service manual for specific instructions and torque specifications.
- Do use the correct seal for your vehicle.
- Do use a seal puller to remove the old seal without damaging the housing.
- Do clean the sealing surface thoroughly before installing the new seal.
- Do lubricate the new seal before installation.
- Do use a seal installer tool to install the new seal evenly.
- Do torque all bolts to the manufacturer’s specification.
- Do check the transmission fluid level after the repair and add more if necessary.
Don'ts:
- Don't work under a vehicle supported only by a jack.
- Don't scratch or damage the transmission housing when removing the old seal.
- Don't hammer directly on the new seal during installation.
- Don't overtighten bolts.
- Don't use the wrong type of transmission fluid.
- Don't ignore leaks!
Conclusion
Replacing a transmission seal is a manageable task for the experienced DIYer. By following these steps carefully and paying attention to detail, you can save money and gain a better understanding of your vehicle. However, if you're uncomfortable with any part of the process, or if you encounter any unexpected problems, don't hesitate to seek professional help. A leaking transmission can quickly lead to catastrophic damage, so it's always better to be safe than sorry. Always refer to your vehicle’s service manual and use the correct tools and parts. Good luck, and happy wrenching!