How To Change A Transmission Speed Sensor
Changing a transmission speed sensor (TSS), also sometimes referred to as a vehicle speed sensor or VSS depending on its location and function, is a repair that many experienced DIY mechanics can tackle. It's a common issue, often manifesting as erratic shifting, speedometer malfunctions, or even triggering the dreaded check engine light. This article will guide you through the process, providing a clear understanding of the TSS, its function, and the steps involved in replacing it.
Background: The Transmission Speed Sensor and Your Car
To understand the TSS, you need a basic grasp of how your car’s powertrain control module (PCM) works. The PCM is essentially the brain of your car, controlling various engine and transmission functions based on data received from numerous sensors. One of the critical pieces of information it relies on is vehicle speed. This information is crucial for optimal engine performance, transmission shift points, cruise control operation, and even anti-lock braking systems (ABS).
The TSS is a type of sensor that specifically measures the speed of the transmission's output shaft or other rotating components within the transmission. This information is then transmitted to the PCM as an electrical signal. Modern vehicles may have multiple speed sensors, including an input speed sensor (ISS) and an output speed sensor (OSS), particularly in automatic transmissions. The ISS monitors the speed of the transmission's input shaft, allowing the PCM to compare input and output speeds and calculate gear ratios.
Technical Breakdown: How the TSS Works
Most TSS units are based on one of two primary technologies: Hall effect sensors or variable reluctance sensors (VRS). Let's examine each:
Hall Effect Sensors
A Hall effect sensor utilizes the Hall effect, a phenomenon where a voltage difference (the Hall voltage) is produced across an electrical conductor, transverse to an electric current in the conductor and a magnetic field perpendicular to the current. In a TSS, a toothed wheel (reluctor wheel) is mounted on the transmission shaft. As the shaft rotates, the teeth of the wheel pass by a permanent magnet and a Hall effect sensor. Each time a tooth passes, it disrupts the magnetic field, causing a change in the Hall voltage. This change is detected by the sensor's internal circuitry and converted into a digital signal (a series of pulses) that is sent to the PCM. The frequency of these pulses is directly proportional to the shaft speed.
Variable Reluctance Sensors (VRS)
A VRS, also known as a magnetic pickup sensor, also uses a toothed wheel and a magnetic field, but operates differently. The sensor consists of a coil of wire wrapped around a permanent magnet. When a tooth of the reluctor wheel passes by the sensor, it changes the reluctance (resistance to magnetic flux) of the magnetic circuit. This change in reluctance induces a voltage in the coil of wire. The induced voltage is an analog signal that varies in amplitude and frequency depending on the shaft speed. The PCM then interprets this analog signal to determine the speed.
Regardless of the technology used, the PCM receives a signal indicating the speed of the transmission shaft. By analyzing this signal, along with input from other sensors like the engine speed sensor (crankshaft position sensor), the PCM can precisely control the transmission's shifting behavior.
Common Issues and Maintenance Concerns
Several factors can cause a TSS to fail. Some of the most common issues include:
- Contamination: Metallic debris from the transmission or other contaminants can accumulate on the sensor, interfering with its ability to accurately detect the rotating wheel.
- Wiring Issues: Damaged or corroded wiring, connectors, or ground connections can disrupt the signal transmission to the PCM.
- Sensor Failure: The sensor itself can simply fail due to age, wear, or internal component breakdown.
- Reluctor Wheel Damage: If the toothed wheel is damaged, bent, or has missing teeth, it will disrupt the sensor's ability to accurately measure speed.
- Fluid Leaks: Transmission fluid leaks can saturate the sensor, causing it to malfunction.
Symptoms of a failing TSS can include:
- Erratic or harsh shifting
- Speedometer malfunction (inaccurate reading or no reading at all)
- Check engine light (typically codes P0500, P0720, P0721, P0722, P0715, P0716, P0717)
- Cruise control malfunction
- ABS malfunction (in some cases, as the ABS relies on vehicle speed information)
- Stalling or difficulty starting
While there's no specific "maintenance" you can perform on a TSS, regular transmission fluid changes are crucial. Clean fluid helps prevent the buildup of metallic debris that can contaminate the sensor. Also, inspect the sensor and its wiring during routine maintenance to check for any signs of damage or corrosion.
Do’s and Don’ts / Best Practices for TSS Replacement
Here's a step-by-step guide and best practices for replacing a TSS:
- Safety First: Disconnect the negative battery terminal. This prevents accidental shorts and ensures your safety. Use wheel chocks to secure the vehicle.
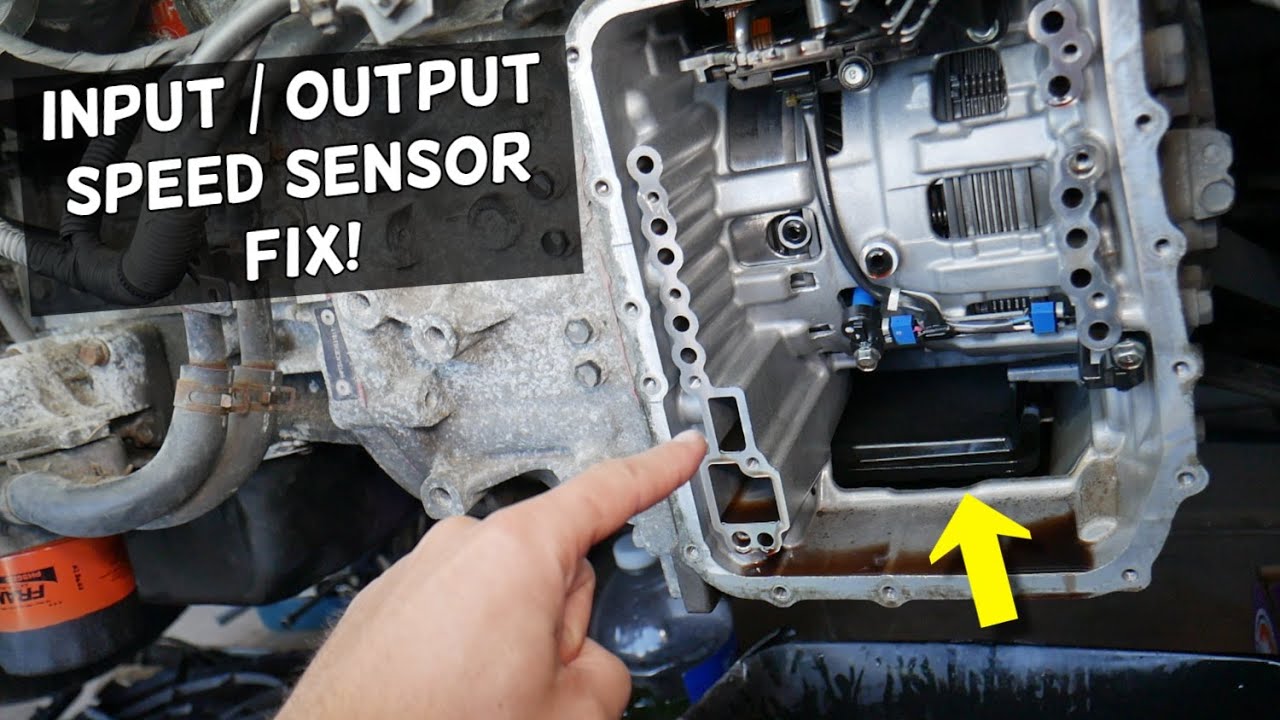
- Locate the TSS: Consult your vehicle's repair manual or online resources to find the exact location of the TSS. It is typically located on the transmission housing, often near the output shaft. Some vehicles may have one sensor near the front and another near the rear of the transmission. Knowing the specific location for your make/model is paramount.
- Prepare the Area: Clean the area around the sensor. This prevents dirt and debris from entering the transmission when you remove the sensor. Use a wire brush and degreaser if necessary.
- Disconnect the Electrical Connector: Carefully disconnect the electrical connector from the sensor. Be gentle, as the plastic connectors can become brittle with age. You may need to use a small screwdriver to release a retaining clip.
- Remove the Sensor: The sensor is usually held in place by a bolt or a retaining clip. Remove the bolt or clip. Then, carefully pull the sensor straight out of the transmission housing. Some fluid leakage is normal, so have a rag handy.
- Inspect the Reluctor Wheel: While the sensor is removed, inspect the reluctor wheel for any damage or missing teeth. If you find damage, the reluctor wheel will also need to be repaired or replaced.
- Install the New Sensor: Lubricate the O-ring on the new sensor with a small amount of clean transmission fluid. This will help it seal properly. Carefully insert the new sensor into the transmission housing.
- Secure the Sensor: Reinstall the bolt or retaining clip that secures the sensor. Tighten the bolt to the manufacturer's specified torque (consult your repair manual). Do not overtighten, as this can damage the sensor or the transmission housing.
- Reconnect the Electrical Connector: Reconnect the electrical connector to the sensor. Make sure it clicks into place securely.
- Reconnect the Battery: Reconnect the negative battery terminal.
- Clear Diagnostic Trouble Codes (DTCs): Use an OBD-II scanner to clear any DTCs that may have been triggered by the failed sensor. If you don't clear the codes, the check engine light may remain on even after the repair.
- Test Drive: Take the vehicle for a test drive to verify that the repair was successful. Pay attention to the shifting behavior and the speedometer reading.
Do’s:
- Do use the correct replacement sensor. Verify the part number against your vehicle's specifications.
- Do use a torque wrench when tightening the sensor retaining bolt.
- Do inspect the wiring harness and connector for damage before replacing the sensor.
- Do use dielectric grease on the electrical connector to prevent corrosion.
Don'ts:
- Don't force the sensor in or out of the transmission housing.
- Don't overtighten the retaining bolt.
- Don't reuse the old O-ring. Always replace it with a new one.
- Don't forget to clear the DTCs after the repair.
Conclusion
Replacing a transmission speed sensor is a manageable task for the experienced DIYer. By understanding the function of the sensor, following the proper steps, and adhering to best practices, you can successfully complete this repair and restore your vehicle's performance. If you're uncomfortable with any aspect of this procedure, it's always best to consult a qualified mechanic. However, with the right tools and knowledge, you can save yourself a significant amount of money by tackling this repair yourself.