How To Change Car Cabin Air Filter
Ever noticed a musty smell lingering in your car, even after a thorough detailing? Or perhaps your air conditioning and heating system just doesn't seem to be performing as well as it used to? The culprit might be a simple component often overlooked: the cabin air filter. Replacing it is a straightforward DIY task that can significantly improve air quality, HVAC efficiency, and even your overall driving experience.
The Breathing Apparatus of Your Car
Think of the cabin air filter as the lungs of your car's ventilation system. Just like your own lungs filter out pollutants from the air you breathe, the cabin air filter prevents dust, pollen, smog, and other airborne particles from entering the passenger compartment. Over time, this filter becomes clogged, reducing airflow and compromising its effectiveness. This is especially crucial for individuals with allergies or respiratory sensitivities.
Imagine a vacuum cleaner bag. When it's new, the vacuum has strong suction. As the bag fills with dust, the suction diminishes, making the vacuum less effective. The same principle applies to your cabin air filter. A clean filter allows for optimal airflow, ensuring that your HVAC system can deliver the desired temperature quickly and efficiently. A clogged filter restricts airflow, forcing the system to work harder, potentially shortening its lifespan and reducing fuel efficiency.
How the Cabin Air Filtration System Works
The cabin air filtration system is relatively simple in design. Outside air enters the car through vents, typically located at the base of the windshield or near the hood. This air is then channeled through a housing where the cabin air filter is located. The filter, usually made of pleated paper or a combination of paper and activated carbon, traps particulate matter as the air passes through. The filtered air is then directed to the HVAC system, where it's either heated or cooled before being distributed to the passenger compartment through vents. The exact location of the filter housing varies depending on the vehicle make and model. It's commonly found behind the glove compartment, under the dashboard, or even under the hood near the firewall.
Benefits, Drawbacks, and Real-World Applications
The Upsides: Fresh Air and a Healthy System
The benefits of regularly replacing your cabin air filter are numerous:
- Improved Air Quality: Removes allergens, dust, pollen, and other pollutants from the air you breathe inside the car.
- Enhanced HVAC Performance: Allows for optimal airflow, leading to quicker heating and cooling and improved overall system efficiency.
- Reduced Odors: Activated carbon filters can neutralize unpleasant odors, providing a fresher smelling cabin.
- Extended HVAC System Lifespan: By reducing the strain on the system, a clean filter can help prolong the life of the blower motor and other components.
- Increased Fuel Efficiency: A less strained system consumes less energy, subtly improving fuel economy.
Potential Downsides: A Minimal List
The downsides are minimal, primarily related to incorrect installation:
- Incorrect Installation: If installed backwards, the filter will not function properly and may even restrict airflow further.
- Compatibility Issues: Using an incompatible filter may not fit properly or provide adequate filtration.
- Cost: While relatively inexpensive, there's still the cost of the filter itself.
When to Replace: Time, Miles, and Scents
The typical replacement interval for a cabin air filter is every 12,000 to 15,000 miles, or about once a year. However, this can vary depending on your driving environment. If you frequently drive in dusty or polluted areas, you may need to replace the filter more often. Some signs that your cabin air filter needs replacing include:
- Reduced Airflow: Noticeably weaker airflow from the vents.
- Musty Odor: A persistent musty or stale smell inside the car.
- Increased Allergies: More frequent allergy symptoms while driving.
- Visible Debris: A visibly dirty or clogged filter upon inspection.
Manufacturer Examples and Filter Types
Most major automotive manufacturers recommend regular cabin air filter replacements as part of their scheduled maintenance. For example, Toyota recommends replacement every 15,000 miles or 18 months, while Honda suggests checking the filter annually and replacing it as needed. BMW and Mercedes-Benz also include cabin air filter replacement as part of their routine maintenance schedules.
Cabin air filters come in various types, each offering different levels of filtration. The most common types include:
- Particulate Filters: These are the most basic type and primarily filter out dust, pollen, and other particulate matter.
- Activated Carbon Filters: These filters contain a layer of activated carbon that helps to absorb odors and gases, providing additional air purification.
- Electrostatic Filters: These filters use an electrostatic charge to attract and trap particles, offering a higher level of filtration.
- HEPA Filters: While less common in automotive applications, HEPA (High-Efficiency Particulate Air) filters provide the highest level of filtration, removing 99.97% of particles that are 0.3 microns or larger.
The DIY Replacement Process: A Step-by-Step Guide
While specific steps may vary slightly depending on your vehicle, the general process for replacing a cabin air filter is as follows:
- Gather Your Tools and Supplies: You'll need a new cabin air filter (make sure it's the correct one for your vehicle), a screwdriver (Phillips or flathead, depending on your vehicle), and possibly a small socket set. A flashlight can also be helpful.
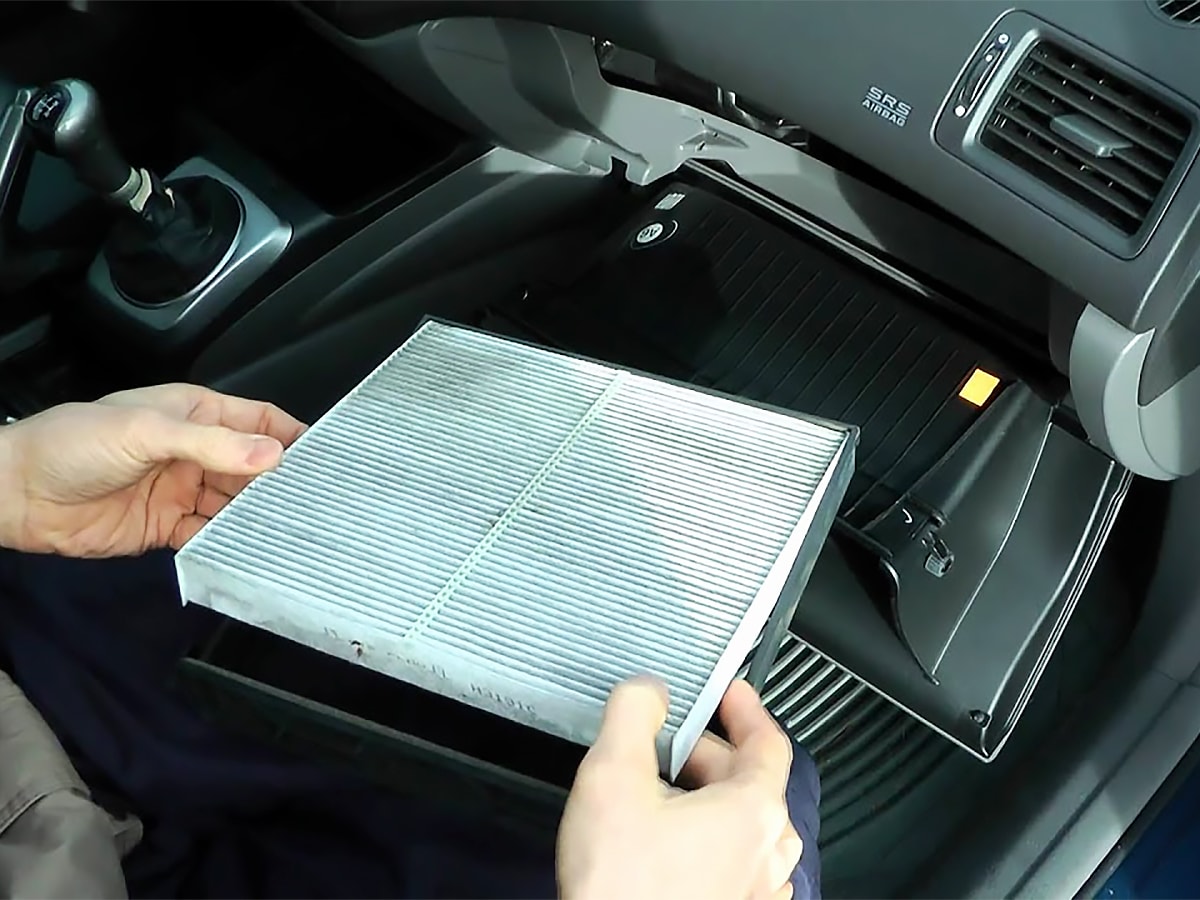
- Locate the Filter Housing: Consult your owner's manual to find the location of the cabin air filter housing. As mentioned earlier, it's often located behind the glove compartment, under the dashboard, or under the hood.
- Access the Filter: Depending on the location, you may need to remove the glove compartment (usually by releasing a few tabs or screws), or remove a panel under the dashboard. Follow the instructions in your owner's manual carefully.
- Remove the Old Filter: Once you've accessed the filter housing, carefully remove the old cabin air filter. Note the direction of airflow (usually indicated by an arrow on the filter) to ensure you install the new filter correctly. Be prepared for dust and debris to fall out when you remove the old filter.
- Clean the Housing: Use a vacuum cleaner or a damp cloth to clean out any debris from the filter housing.
- Install the New Filter: Insert the new cabin air filter into the housing, making sure to align it correctly with the airflow arrow.
- Reassemble the Housing: Replace the cover or panel that you removed to access the filter housing. If you removed the glove compartment, reattach it securely.
- Test the System: Turn on the car and test the HVAC system to ensure that air is flowing properly.
Troubleshooting Tips
If you encounter any problems during the replacement process, here are a few troubleshooting tips:
- Difficulty Removing the Filter: If the old filter is stuck, try gently wiggling it back and forth to loosen it.
- Incorrect Filter Size: If the new filter doesn't fit properly, double-check that you have the correct filter for your vehicle.
- Reduced Airflow After Replacement: Make sure you installed the filter in the correct direction and that the filter housing is properly sealed.
Real-World Insights and Recommendations
Based on real-world experience, replacing your cabin air filter regularly is a worthwhile investment in your vehicle's health and your own well-being. Don't wait for the musty smell or reduced airflow to become unbearable. Consider adding cabin air filter replacement to your routine maintenance schedule, especially if you live in an area with high levels of pollution or allergens.
While basic particulate filters are adequate for most situations, consider upgrading to an activated carbon filter for enhanced odor control. If you or your passengers have severe allergies, an electrostatic or HEPA filter may provide even better protection.
Finally, remember to consult your owner's manual for specific instructions and recommendations for your vehicle. With a little effort and the right tools, you can easily keep your car's air clean and fresh, ensuring a more comfortable and enjoyable driving experience.