How To Change From Drum Brakes To Disc Brakes
Upgrading from drum brakes to disc brakes is a popular modification for many car enthusiasts. Whether you're looking for improved stopping power, better performance in wet conditions, or simply a more modern feel, this conversion can be a worthwhile project. This article will provide a detailed, step-by-step guide to help you successfully complete this upgrade. We'll cover the technical aspects, potential challenges, and best practices to ensure a safe and effective installation.
Why Upgrade to Disc Brakes?
Drum brakes, while reliable in their time, have limitations compared to disc brakes. The primary advantages of disc brakes include:
- Superior stopping power: Disc brakes offer better heat dissipation and a more consistent friction surface, resulting in shorter stopping distances.
- Improved performance in wet conditions: Drum brakes can suffer from brake fade due to water accumulation, while disc brakes are less susceptible to this issue.
- Reduced brake fade: Brake fade occurs when the brake components overheat, reducing their effectiveness. Disc brakes are better at managing heat, minimizing fade.
- Easier maintenance: Disc brakes are generally easier to inspect and service compared to drum brakes.
Understanding the Braking System
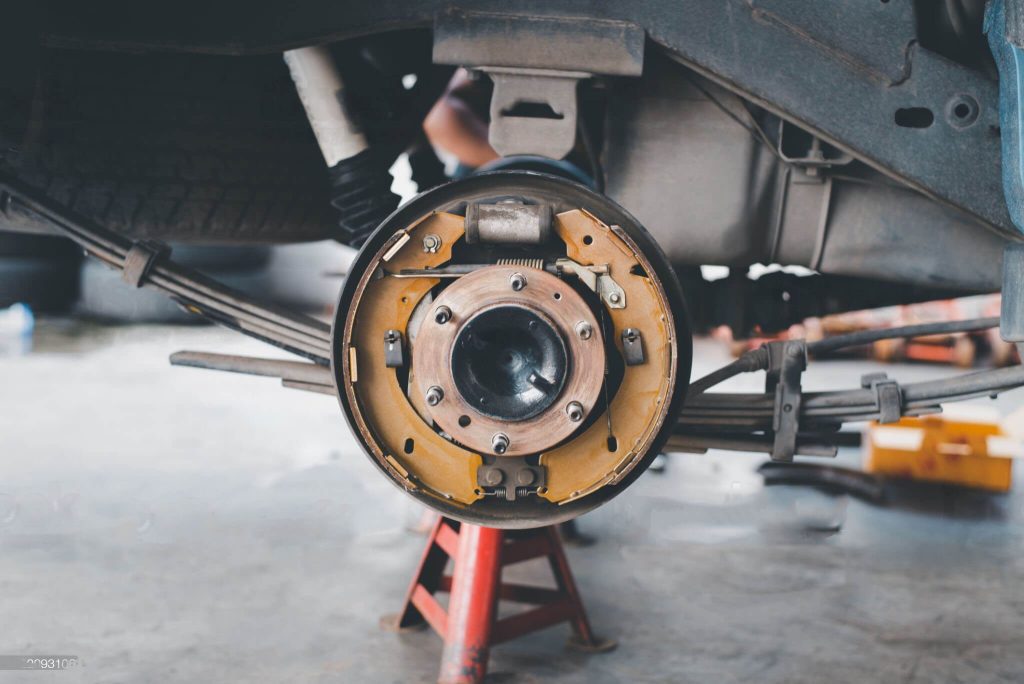
Drum Brakes: A Quick Overview
Drum brakes use a rotating drum attached to the wheel hub. Inside the drum are brake shoes lined with friction material. When you press the brake pedal, a wheel cylinder pushes the brake shoes outward, pressing them against the inner surface of the drum. This friction slows the wheel's rotation.
Disc Brakes: How They Work
Disc brakes utilize a rotor (also called a disc) attached to the wheel hub. A caliper, containing brake pads, straddles the rotor. When you apply the brakes, the caliper's pistons push the brake pads against the rotor, creating friction that slows the wheel. This is usually done with a hydraulic system.
The Hydraulic System: Linking Pedal to Brakes
Whether drum or disc, the brakes rely on a hydraulic system. When you press the brake pedal, you push a piston in the master cylinder. This pressurizes the brake fluid, which travels through brake lines to the calipers (in a disc brake system) or wheel cylinders (in a drum brake system). The pressure forces the pistons in these components to actuate the brakes. The entire system needs to be properly bled to remove air bubbles, ensuring proper function. Air in the lines can cause a spongy feel or a complete failure of the brakes.
The Conversion Process: Step-by-Step
Converting from drum to disc brakes involves several key steps. The exact procedure will vary depending on the specific vehicle and the conversion kit you choose.
1. Research and Planning
This is the most crucial step. Determine if a readily available conversion kit exists for your specific vehicle. Research reputable brands and compare features and prices. Consider factors like rotor size, caliper type (single-piston or multi-piston), and whether the kit includes a new master cylinder or proportioning valve. Read reviews and consult online forums for feedback from other users.
2. Gathering Parts and Tools
Once you've selected a kit, ensure you have all the necessary parts. This typically includes:
- Rotors: These are the discs that the brake pads clamp onto.
- Calipers: These house the brake pads and pistons.
- Brake Pads: The friction material that presses against the rotor.
- Caliper Brackets: These mount the calipers to the vehicle's spindle or axle.
- Brake Lines: New brake lines are often required to adapt to the disc brake setup.
- Master Cylinder (possibly): A larger master cylinder might be needed to provide adequate fluid volume for the disc brakes.
- Proportioning Valve (possibly): This valve adjusts the brake pressure between the front and rear brakes to prevent rear wheel lockup.
- Dust Shields (if applicable): These protect the rotors and calipers from debris.
- Hardware: Bolts, nuts, washers, and other fasteners.
You'll also need a comprehensive set of tools, including:
- Jack and Jack Stands: To safely lift and support the vehicle.
- Wheel Chocks: To prevent the vehicle from rolling.
- Socket Set: Including various sizes and extensions.
- Wrench Set: Including standard and metric sizes.
- Brake Line Wrench (Flare Nut Wrench): Essential for loosening brake line fittings without damaging them.
- Torque Wrench: To tighten bolts to the correct specifications.
- Brake Bleeder Kit: For bleeding the brake lines.
- Pliers: Various types for different tasks.
- Screwdrivers: Phillips and flathead.
- Hammer: For gentle persuasion.
- Brake Cleaner: To clean brake components.
- Brake Fluid: Use the correct type specified for your vehicle.
- Penetrating Oil: To loosen stubborn bolts.
3. Removing the Drum Brakes
Start by safely lifting the vehicle and supporting it with jack stands. Remove the wheels. Disconnect the parking brake cable from the drum brake assembly. Carefully disconnect the brake line from the wheel cylinder, using a brake line wrench to avoid rounding off the fitting. Remove the drum, brake shoes, wheel cylinder, and backing plate. Be sure to note the orientation of any parts you remove, as this will help with reassembly if necessary.
4. Installing the Disc Brakes
Install the caliper bracket onto the spindle or axle, following the manufacturer's instructions. Mount the rotor onto the hub. Attach the caliper to the caliper bracket. Install the brake pads into the caliper. Connect the new brake lines to the caliper and the existing brake system. If required, install a new master cylinder and/or proportioning valve.
5. Bleeding the Brakes
Bleeding the brakes is crucial to remove air from the system. Start with the wheel furthest from the master cylinder and work your way closer. Open the bleeder screw on the caliper, and have an assistant slowly pump the brake pedal. Close the bleeder screw before the pedal reaches the floor. Repeat this process until clear, bubble-free fluid flows from the bleeder screw. Repeat for all four wheels.
6. Testing and Adjustment
After bleeding the brakes, test the brake pedal feel. It should be firm and consistent. Start the engine and check for leaks. Take the vehicle for a slow test drive, gradually increasing speed while testing the brakes. Pay attention to any unusual noises or vibrations. If necessary, adjust the proportioning valve to optimize brake balance.
Common Issues and Maintenance Concerns
- Incorrect Installation: Improperly installed components can lead to brake failure. Always follow the manufacturer's instructions carefully and double-check all connections.
- Air in the Brake Lines: Air can cause a spongy brake pedal and reduced braking performance. Bleed the brakes thoroughly after installation.
- Brake Fluid Leaks: Check for leaks at all connections. Tighten fittings as needed, but be careful not to overtighten them.
- Improper Brake Pad Break-In: New brake pads require a break-in period to properly seat against the rotors. Follow the manufacturer's recommendations for break-in procedures.
- Proportioning Valve Adjustment: An improperly adjusted proportioning valve can cause rear wheel lockup, especially in wet conditions.
Do's and Don'ts / Best Practices
Do's:
- Do thorough research and planning before starting the project.
- Do use a high-quality conversion kit from a reputable manufacturer.
- Do follow the manufacturer's instructions carefully.
- Do use the correct tools for the job.
- Do torque all bolts to the correct specifications.
- Do bleed the brakes thoroughly.
- Do perform a test drive in a safe environment to check for proper operation.
- Do replace brake pads and rotors as needed.
- Do inspect the brake system regularly for leaks and wear.
Don'ts:
- Don't attempt this conversion if you are not comfortable working on brakes.
- Don't reuse old brake lines or fittings.
- Don't overtighten brake line fittings.
- Don't neglect to bleed the brakes properly.
- Don't drive the vehicle if you suspect a brake problem.
Conclusion
Converting from drum brakes to disc brakes can significantly improve your vehicle's braking performance and safety. While this project requires mechanical skill and attention to detail, it can be a rewarding upgrade. By following the steps outlined in this guide and adhering to best practices, you can successfully complete this conversion and enjoy the benefits of disc brakes. However, if you are at all unsure about your abilities, it's always best to consult with a qualified mechanic. Brakes are a critical safety system, and any mistakes could have serious consequences. A professional installation might be a worthwhile investment for your peace of mind and safety.