How To Change Key Remote Battery
So, your key fob is acting up, huh? You press the button, but the car ignores you like a teenager ignores chores. More often than not, it's just a dead or dying battery. Changing the battery in your key remote is a straightforward process you can easily tackle yourself, saving you a trip to the dealership and some serious cash. This article will guide you through the process step-by-step, assuming you have some basic mechanical aptitude and are comfortable using small tools. We'll break down the anatomy of a key fob, the tools you'll need, and how to safely perform the battery replacement.
Key Fob Teardown: What You're Dealing With
Before you start prying things open, it's good to understand what's inside that little gadget. Think of it like a miniaturized circuit board with a power source and buttons. Let's look at the key specs and the main components:
Key Specs and Main Parts
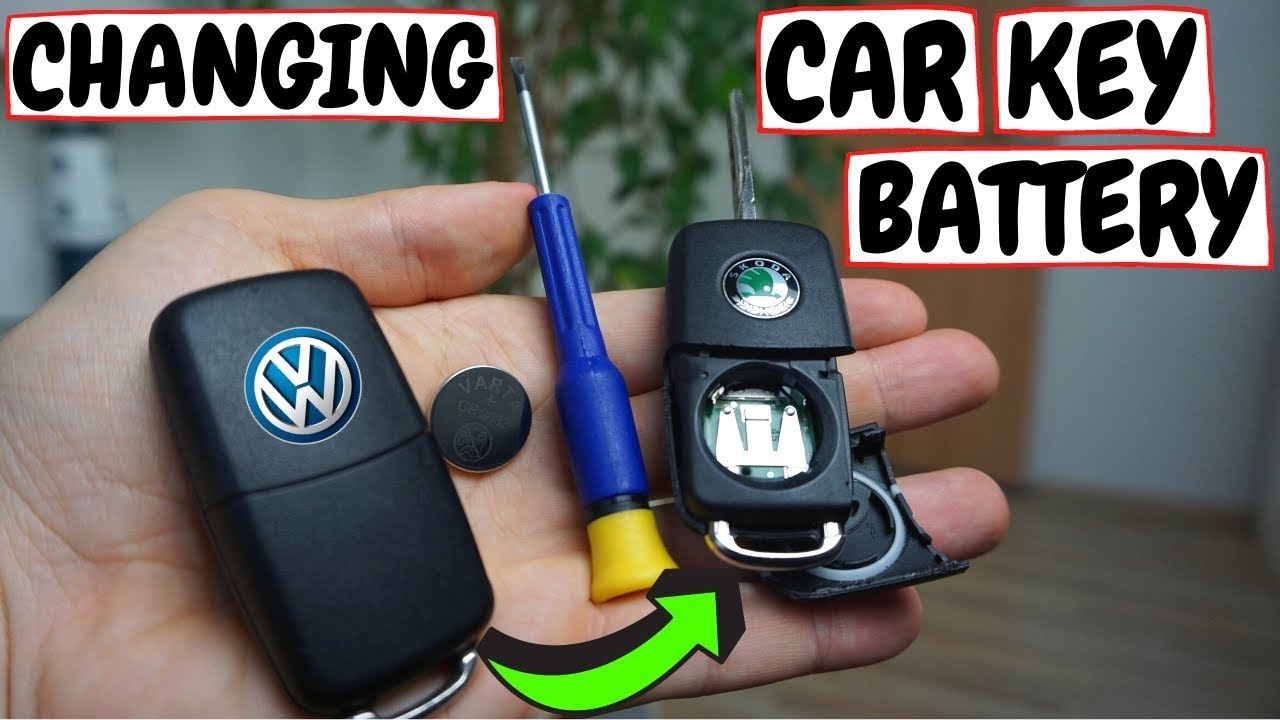
- Battery Type: Most key fobs use coin cell batteries, also known as button cell batteries. The most common types are CR2032, CR2025, and CR1620. The specific type will be printed on the battery itself. Always use the exact same type as the original.
- Operating Voltage: Usually 3V (Volts). This is critical for the fob's circuitry to function correctly. Using a battery with a different voltage can damage the fob.
- Frequency: Key fobs transmit radio signals at specific frequencies (e.g., 315 MHz, 433 MHz). This isn't directly related to the battery but understanding that the fob is essentially a miniature radio transmitter helps to grasp its function.
The main parts you'll encounter are:
- Casing: The outer shell, typically made of plastic, protects the internal components. It's usually snapped or screwed together.
- Circuit Board (PCB): This is the brain of the fob, containing the microprocessor, antenna, and button contacts. Handle it with care to avoid static discharge.
- Battery Holder: A small cradle or clip that secures the battery to the PCB.
- Button Contacts: These are small metal pads on the PCB that make contact with the buttons on the casing, completing the circuit and sending the signal to the car.
- Emergency Key (if applicable): Some fobs contain a physical key that can be used to unlock the door manually if the battery is completely dead.
Decoding the Diagram: Understanding the Visual Representation
While we don't have a live diagram here in text, imagine a schematic diagram of a typical key fob. Here’s how to interpret the common visual cues:
- Solid Lines: Generally represent physical connections or the outline of components. A solid line might indicate the edge of the circuit board or the pathway of a mechanical linkage.
- Dashed Lines: Often indicate hidden features or areas that are obscured from view in a particular perspective. For example, a dashed line might show the location of the battery holder under the circuit board.
- Colors: Typically used to differentiate between components or highlight specific areas of interest. For instance, the battery might be colored bright yellow or silver to draw attention to it.
- Arrows: Indicate the direction of force or movement. An arrow might show where to insert a tool to pry open the casing, or the direction in which to slide the emergency key.
- Icons: Small, stylized representations of components or tools. A screwdriver icon indicates where a screwdriver is needed, a battery icon shows the battery's location, and so on.
- Callouts: Numbered or lettered labels that correspond to a legend explaining the function of each component. These are crucial for identifying specific parts within the diagram.
Purpose of Diagram: This diagram serves multiple purposes. Primarily, it's for repair. By visually mapping out the internal layout, you can understand how the fob is assembled and disassembled, aiding in battery replacement or even more complex repairs like replacing a broken button. Secondly, it's for learning. Understanding the internal structure of the fob can give you a better grasp of how it functions as a whole. Thirdly, it can be helpful for modification. If you are inclined to modify the fob (though generally not advised without considerable electronics experience), understanding the schematic can help avoid damaging the internal components.
How It Works: The Electrical Dance
The operation of a key fob is pretty simple once you understand the basics. When you press a button, it closes a circuit. This allows a small amount of current to flow from the battery, through the integrated circuit (IC), and to the antenna. The IC is programmed to generate a specific radio signal based on the button you pressed. This signal, containing a unique code, is transmitted wirelessly to your car's receiver. If the code matches, the car unlocks the doors, starts the engine, or performs whatever function is associated with that button.
The battery provides the necessary potential difference (voltage) for this electrical current to flow. As the battery ages, its internal resistance increases, reducing the voltage and current it can supply. Eventually, the fob's signals become too weak or inconsistent to be reliably received by the car.
Replacing the Battery: A Step-by-Step Guide
- Gather Your Tools: You'll need a small flathead screwdriver (or a plastic pry tool – preferred to avoid scratches), a new battery of the correct type, and possibly a small Phillips head screwdriver (depending on the fob design). A soft cloth or towel to protect surfaces is also a good idea.
- Open the Casing: This is often the trickiest part. Look for a small slot or seam along the edge of the fob. Gently insert the flathead screwdriver or plastic pry tool into the slot and twist or pry to separate the two halves of the casing. Some fobs have screws holding them together – look for these and remove them first.
- Access the Battery: Once the casing is open, you'll see the circuit board and battery. The battery is usually held in place by a clip or cradle.
- Remove the Old Battery: Carefully pry the battery out of its holder. Use the screwdriver sparingly to avoid damaging the battery holder or circuit board. Note the orientation of the battery (+ and - sides) before removing it.
- Install the New Battery: Insert the new battery into the holder, making sure the positive (+) and negative (-) sides are oriented correctly. Refer to the markings on the battery holder or the old battery for guidance.
- Reassemble the Fob: Carefully align the two halves of the casing and snap them back together. If there were screws, reinstall them.
- Test the Fob: Press the buttons to see if the fob is working. If it's not working, double-check the battery orientation and make sure the battery contacts are clean and making good contact.
Real-World Use: Basic Troubleshooting Tips
Even with a new battery, things can sometimes go wrong:
- Fob Still Doesn't Work:
*Check Battery Orientation:* This is the most common mistake. Double-check that the positive and negative sides of the battery are oriented correctly.
*Clean Battery Contacts:* Use a cotton swab and a small amount of rubbing alcohol to clean the battery contacts on the circuit board.
*Resync the Fob:* Some cars require you to resync the fob after replacing the battery. Consult your owner's manual for the resyncing procedure.
*Check for Damage:* Inspect the circuit board for any signs of damage, such as cracked components or broken solder joints.
- Weak Signal: Even with a new battery, the signal might be weak. This could be due to interference from other electronic devices or a damaged antenna.
- Casing Won't Close Properly: Make sure all the components are properly seated and that the two halves of the casing are aligned correctly. Don't force it – you might break something.
Safety: Handle with Care
While changing a key fob battery is generally safe, there are a few precautions to keep in mind:
- Static Electricity: The circuit board is sensitive to static electricity. Ground yourself before touching the circuit board by touching a metal object. Avoid working in a carpeted area or wearing clothing that generates static electricity.
- Battery Polarity: Inserting the battery with the wrong polarity can damage the circuit board. Always double-check the battery orientation before installing it.
- Swallowing Batteries: Coin cell batteries are small and can be a choking hazard, especially for children. Keep them out of reach of children and pets. If swallowed, seek immediate medical attention.
- Dispose of Old Batteries Properly: Coin cell batteries contain hazardous materials. Dispose of them properly at a designated recycling center.
The most risky component is the circuit board itself. Improper handling can easily lead to damage that renders the entire key fob useless. Static discharge is its nemesis. Also, avoid applying excessive force when opening the casing or removing the battery, as this can damage the delicate components.
And there you have it! Changing your key fob battery is a simple task that can save you time and money. Remember to take your time, be careful, and follow these instructions. With a little patience and attention to detail, you'll have your key fob working like new in no time.