How To Change Tail Light Bulb
The modern automobile, a marvel of engineering, is often taken for granted until something stops working. Among the many components vital for safe operation, the tail light often gets overlooked – until it burns out. A burnt-out tail light isn't just an inconvenience; it's a safety hazard, decreasing visibility and potentially leading to accidents. But fear not, intrepid DIY enthusiast! Replacing a tail light bulb is a relatively simple task, achievable with basic tools and a little know-how. This guide will not only walk you through the process but also delve into the mechanics behind the system, providing a deeper understanding of automotive lighting.
The Problem: Seeing and Being Seen
Imagine driving down a dark, winding road at night. Rain is pelting the windshield, visibility is low, and you're relying heavily on the tail lights of the car in front of you. Now, imagine that car has a burnt-out tail light. Suddenly, the distance estimation becomes more difficult, and the risk of a rear-end collision dramatically increases. This scenario highlights the critical importance of functioning tail lights. They serve two primary functions: to signal your presence to other drivers, especially in low-light conditions, and to indicate braking or turning. A malfunctioning tail light compromises both of these functions, endangering you and those around you.
A Simple Circuit: The Electrical Backbone
The tail light system, at its core, is a basic electrical circuit. Think of it like a garden hose: the battery is the water source (voltage), the wires are the hose (conductors), the bulb is the sprinkler (resistance), and the switch is the nozzle (control). When you turn on the tail lights, you're essentially opening the nozzle, allowing electricity (water) to flow through the circuit, illuminating the bulb. When the bulb burns out, it's like the sprinkler head becoming clogged, interrupting the flow of electricity and preventing it from lighting up.
Mechanical Breakdown: How It All Works
The typical tail light circuit consists of the following components:
- Battery: The source of electrical energy, providing the voltage needed to power the bulb. Most vehicles use a 12-volt battery.
- Wiring: The conductive pathways that carry electricity from the battery to the switch, bulb, and back to the battery (ground). These are usually copper wires insulated with plastic.
- Switch: A device that controls the flow of electricity. In the case of tail lights, this is usually a combination switch located on the steering column.
- Fuse: A safety device designed to protect the circuit from overcurrent. If there's a surge of electricity (e.g., a short circuit), the fuse will blow, interrupting the circuit and preventing damage to other components.
- Bulb: The light-emitting element. Tail lights typically use incandescent, halogen, or LED bulbs.
- Ground: A connection to the vehicle's chassis, which provides a return path for the electricity to complete the circuit.
- Tail Light Assembly: The housing that protects the bulb and reflector, and provides the colored lens to emit the required light.
When you turn on the tail lights, the switch closes, completing the circuit. Electricity flows from the battery, through the wiring, to the bulb. The bulb's filament (in the case of incandescent or halogen bulbs) heats up due to the resistance to electrical flow, causing it to glow and emit light. The light then passes through the colored lens, providing the red light visible to other drivers. The electricity then flows back to the battery through the ground connection, completing the circuit.
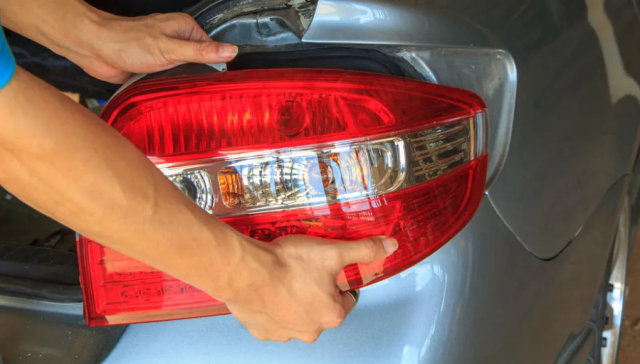
Step-by-Step Bulb Replacement: A Practical Guide
Replacing a tail light bulb is generally straightforward, but always consult your vehicle's owner's manual for specific instructions for your make and model.
- Gather Your Tools: You'll typically need a screwdriver (Phillips or flathead, depending on the vehicle), replacement bulb(s) (check your owner's manual for the correct bulb type), and potentially a pair of pliers. Also, wear gloves to protect your hands.
- Access the Tail Light Assembly: This usually involves opening the trunk or liftgate and removing an access panel or trim piece. Some vehicles may require removing screws to detach the entire tail light assembly.
- Remove the Old Bulb: Depending on the vehicle, the bulb may be held in place by a socket that twists and locks, or it may simply pull straight out. Gently twist or pull the bulb socket out of the tail light assembly. Then, remove the bulb from the socket by either pushing and twisting (bayonet type) or pulling straight out (wedge type).
- Install the New Bulb: Insert the new bulb into the socket, ensuring it's properly aligned. Then, reinsert the socket into the tail light assembly, twisting or pushing until it locks into place.
- Test the Lights: Before reassembling everything, turn on the tail lights and/or have someone press the brake pedal to ensure the new bulb is working correctly.
- Reassemble the Tail Light Assembly: Reinstall the access panel or trim piece, or reattach the entire tail light assembly if you removed it.
Bulb Types: Incandescent, Halogen, and LED
Tail lights commonly utilize three main types of bulbs, each with its own set of pros and cons:
- Incandescent Bulbs: The traditional choice, incandescent bulbs are relatively inexpensive but have a shorter lifespan and lower energy efficiency compared to halogen or LED bulbs. Example: Found in older vehicles.
- Halogen Bulbs: An improvement over incandescent bulbs, halogen bulbs offer brighter light output and a longer lifespan. However, they are still less energy-efficient than LEDs. Example: Many mid-2000's vehicles.
- LED Bulbs: Light Emitting Diodes (LEDs) are the most energy-efficient and longest-lasting option. They also offer a more modern and vibrant light output. However, they are typically more expensive upfront. Example: Becoming standard in new vehicles.
Pros and Cons: LED vs. Halogen
| Feature | LED | Halogen |
|---|---|---|
| Lifespan | Significantly longer (up to 50,000 hours) | Shorter (around 1,000 hours) |
| Energy Efficiency | Highly energy-efficient | Less energy-efficient |
| Brightness | Brighter and more vibrant | Adequate brightness |
| Response Time | Instantaneous | Slight delay |
| Cost | More expensive upfront | Less expensive upfront |
| Heat Generation | Minimal heat | Significant heat |
Use Cases: LED bulbs are ideal for drivers who want long-lasting, energy-efficient, and bright lighting. Halogen bulbs are a more budget-friendly option for those who don't mind replacing bulbs more frequently.
Manufacturer Examples: Lighting Innovations
Automakers are constantly innovating in the field of automotive lighting. For instance, Audi is known for its Matrix LED headlights, which dynamically adjust the beam pattern to avoid blinding oncoming drivers. BMW has developed laser headlights, which offer even greater range and brightness. These advancements highlight the increasing importance of lighting technology in modern vehicles.
Real-World Insights and Recommendations
While replacing a tail light bulb is usually a simple task, there are a few common pitfalls to avoid. First, always disconnect the negative battery terminal before working on any electrical components. This will prevent accidental short circuits and protect you from electric shock. Second, ensure you're using the correct bulb type for your vehicle. Refer to your owner's manual or consult with an auto parts store to determine the appropriate bulb. Third, be gentle when handling the bulb and socket. Excessive force can damage the components or even break the bulb. Finally, if you're unsure about any step in the process, don't hesitate to seek professional assistance. It's always better to be safe than sorry.
In conclusion, understanding the fundamentals of the tail light system empowers you to diagnose and address common issues, such as a burnt-out bulb. By following the steps outlined in this guide, you can confidently replace your tail light bulb, ensuring your safety and the safety of others on the road. Remember, regular maintenance and attention to detail are key to keeping your vehicle running smoothly and safely.