How To Change Valve Cover Gasket
So, you're thinking about tackling your valve cover gasket. Excellent! It's a manageable job for a DIYer with some experience, and can save you a good chunk of change. This guide will walk you through the process, step-by-step, with a focus on understanding *why* you're doing what you're doing, not just *how*. We'll cover everything from identifying the symptoms of a failing gasket to the nitty-gritty of torquing the valve cover bolts correctly.
Purpose of Replacing a Valve Cover Gasket
The valve cover gasket's primary job is to seal the valve cover to the cylinder head. This creates a leak-proof barrier, preventing engine oil from escaping the valve train area. Why is this important? Well, oil leaks can cause a whole host of problems:
- Oil Consumption: You'll find yourself topping off your oil more frequently, which gets expensive and annoying.
- Engine Bay Mess: Leaked oil can drip onto hot engine components, causing a burning smell and potentially even a fire hazard. It also makes everything sticky and grimy.
- Reduced Engine Performance: In some cases, leaking oil can contaminate spark plugs or other critical components, leading to misfires and reduced power.
- Environmental Concerns: Leaking oil is bad for the environment.
Replacing a valve cover gasket is a preventative maintenance measure that keeps your engine running smoothly and reliably. It's also a crucial step when performing other maintenance tasks on the valve train, such as adjusting valves.
Key Specs and Main Parts
Before you dive in, let's familiarize ourselves with the key components and specifications you'll need to know:
- Valve Cover: The protective cover that sits on top of the cylinder head, housing the valve train components (rocker arms, valves, springs, etc.).
- Valve Cover Gasket: The sealing material that sits between the valve cover and the cylinder head. They come in various materials like rubber, cork, silicone, or a combination.
- Valve Cover Bolts/Nuts: Secure the valve cover to the cylinder head. These are typically torqued to a specific value (we'll cover that shortly).
- Torque Specifications: This is *crucial*. The proper torque value for your valve cover bolts. This information is typically found in your vehicle's repair manual (Haynes or Chilton) or online resources. Over-torquing can damage the valve cover or cylinder head; under-torquing can lead to leaks. We're talking in the range of 8-12 ft-lbs for most applications, but always double-check!
- RTV Silicone Sealant: Recommended for use in specific areas (usually corners or seams) to ensure a complete seal. Make sure to use a *sensor-safe* RTV silicone.
- Gasket Scraper: For cleaning the old gasket material off the cylinder head and valve cover.
The Gasket: Material Science in Action
The type of gasket you choose matters. Older cars often used cork gaskets, which are inexpensive but tend to dry out and crack over time. Newer vehicles commonly use rubber or silicone gaskets, which are more durable and resistant to heat and oil. When replacing the gasket, it's always a good idea to use the same type of material as the original, unless you have a specific reason to upgrade (e.g., switching to a high-temperature silicone gasket for a performance engine).
How It Works: The Sealing Principle
The valve cover gasket works by compressing between the valve cover and the cylinder head, creating a seal that prevents oil from escaping. The critical factor is uniform pressure. That's why proper torque is so important. If the bolts are unevenly tightened, the gasket will be compressed unevenly, leading to leaks. Also, the cleanliness of the surfaces is crucial. Any debris or old gasket material left on the sealing surfaces will create gaps, allowing oil to seep through.
Step-by-Step Guide to Replacing a Valve Cover Gasket
- Preparation: Gather your tools and materials. These typically include sockets, wrenches, a torque wrench, a gasket scraper, RTV silicone sealant, a clean rag, and the new valve cover gasket.
- Disconnect the Battery: Disconnect the negative battery terminal for safety. This prevents accidental electrical shorts.
- Remove Components: Remove any components that are in the way of the valve cover, such as air intake hoses, wiring harnesses, or vacuum lines. Label everything carefully so you can reassemble it correctly. Taking pictures with your phone is a great idea.
- Loosen the Valve Cover Bolts: Loosen the valve cover bolts in a crisscross pattern. This helps to distribute the pressure evenly and prevents warping of the valve cover.
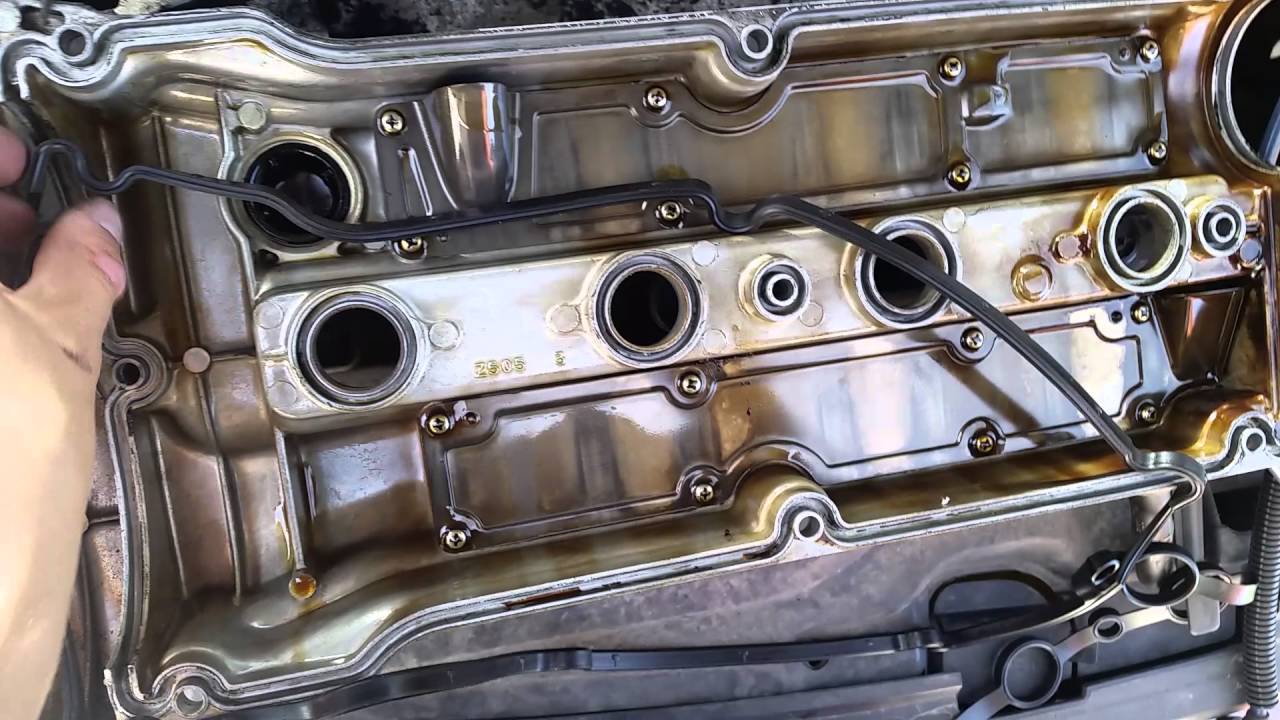
- Remove the Valve Cover: Carefully remove the valve cover. Be careful not to damage the valve train components.
- Clean the Sealing Surfaces: Use a gasket scraper to remove any old gasket material from the cylinder head and valve cover. Be thorough! Use a clean rag and some solvent to wipe down the surfaces. They should be clean and dry.
- Install the New Gasket: Install the new valve cover gasket onto the valve cover. Some gaskets have locating tabs or grooves that help to position them correctly. Apply a small amount of RTV silicone sealant to the corners or seams where the cylinder head meets other surfaces, as recommended by the manufacturer. This is usually around timing chain covers or head mating surfaces.
- Reinstall the Valve Cover: Carefully reinstall the valve cover onto the cylinder head. Make sure the gasket is properly aligned.
- Tighten the Valve Cover Bolts: Tighten the valve cover bolts in a crisscross pattern to the specified torque value. Use a torque wrench! Do not overtighten! Overtightening can damage the valve cover or cylinder head. It's better to err on the side of slightly undertightening and then re-torque after a short drive if necessary.
- Reinstall Components: Reinstall any components that you removed in step 3.
- Reconnect the Battery: Reconnect the negative battery terminal.
- Start the Engine: Start the engine and check for leaks. Let the engine run for a few minutes and then shut it off. Inspect the valve cover for any signs of oil leakage.
Real-World Use: Basic Troubleshooting Tips
- Persistent Leaks: If you still have leaks after replacing the gasket, double-check the torque on the bolts. Make sure the sealing surfaces are clean and free of debris. Also, inspect the valve cover itself for cracks or warping.
- Difficult Bolt Removal: If the valve cover bolts are difficult to remove, use a penetrating oil to loosen them. Be patient and don't force them, as you could break them.
- Damaged Threads: If you strip the threads in the cylinder head, you may need to use a thread repair kit (e.g., Helicoil) to fix them.
Safety Considerations
Working on your car can be dangerous if you're not careful. Here are some safety precautions to keep in mind:
- Hot Engine: Never work on a hot engine. Allow the engine to cool down completely before starting any work.
- Flammable Liquids: Engine oil and gasoline are flammable. Keep them away from open flames or sources of ignition.
- Eye Protection: Wear safety glasses to protect your eyes from debris.
- Gloves: Wear gloves to protect your hands from oil and chemicals.
- Proper Ventilation: Work in a well-ventilated area to avoid inhaling fumes.
- Sharp Objects: Be careful when using a gasket scraper, as it can be sharp.
- Electrical Hazards: Always disconnect the negative battery terminal before working on the electrical system. The ignition coil packs can hold a high-voltage charge even after the engine is off, so avoid touching them directly unless you've taken proper precautions.
Replacing a valve cover gasket is a rewarding DIY project that can save you money and give you a better understanding of your engine. By following these steps and taking the necessary safety precautions, you can successfully complete this task and keep your engine running smoothly.
For a detailed diagram specific to your vehicle's engine, showing the valve cover assembly and torque specifications, we have a file available for download. This diagram will provide visual assistance and ensure you're working with the correct information for your particular engine.