How To Change Your Wiper Blades
Streaking across the windshield. A persistent, annoying smear. The rhythmic *thwack* of rubber against dry glass. These are the telltale signs that your windshield wiper blades have reached the end of their useful life. While seemingly a minor component, functioning wipers are crucial for maintaining visibility and safety in inclement weather. Replacing them is a simple task that can be completed at home with minimal tools, and understanding the process provides a valuable glimpse into the engineering of a vital automotive system.
The Problem: Decreased Visibility
Imagine driving home after a long day, a light drizzle beginning to fall. As you engage the wipers, instead of clearing the water, they leave a hazy film, blurring the headlights of oncoming traffic. This scenario highlights the core problem addressed by replacing wiper blades: reduced visibility. This reduction can stem from several factors, including:
- Dried and Cracked Rubber: The rubber element, responsible for wiping the windshield clean, deteriorates over time due to exposure to UV radiation, temperature extremes, and road grime. This leads to cracking, tearing, and a loss of flexibility, preventing a clean sweep.
- Rounded Wiping Edge: The sharp edge of a new wiper blade effectively removes water and debris. As the blade wears, this edge becomes rounded, resulting in streaking and smearing.
- Debris Embedded in the Rubber: Small particles of dirt, sand, and other road debris can become embedded in the rubber, acting like sandpaper and further damaging the windshield.
- Bent or Damaged Wiper Arm: While less common, a bent or damaged wiper arm can affect the pressure applied to the windshield, leading to uneven wiping and streaking.
Ignoring these warning signs can have serious consequences, especially during heavy rain, snow, or sleet. Clear visibility is paramount for safe driving, and worn wiper blades compromise this essential element.
The Wiper System: A Mechanical Ballet
At its heart, the windshield wiper system is a clever piece of mechanical engineering, converting rotary motion into a precise sweeping action. Let's break down the key components:
1. The Wiper Motor: The Power Source
The wiper motor, typically a small 12-volt electric motor, provides the driving force for the entire system. It's usually located under the cowl panel, the area between the windshield and the hood. The motor's speed is controlled by the wiper switch on the dashboard, allowing the driver to select different wiping speeds and intermittent settings.
2. The Linkage System: Converting Rotary to Linear Motion
The motor's rotary motion is translated into a back-and-forth, or reciprocating, motion by a linkage system. This system typically consists of a series of interconnected arms and pivots. A rotating crank arm attached to the motor drives the linkage, pushing and pulling the wiper arms in a synchronized fashion. Think of it like the connecting rods in an internal combustion engine, only instead of driving pistons, they're driving wiper arms. The complexity of the linkage system varies depending on the vehicle and the number of wipers.
3. The Wiper Arms: The Connection to the Blades
The wiper arms are metal arms that extend from the linkage system to the windshield. They provide the leverage and downward pressure necessary to keep the wiper blades in contact with the glass. The arms are spring-loaded to ensure consistent pressure across the entire blade length. Different vehicles utilize different types of wiper arm attachments, which we'll discuss shortly.
4. The Wiper Blades: The Point of Contact
Finally, we arrive at the wiper blades themselves. A wiper blade consists of a rubber element, also known as the squeegee, held in place by a metal or plastic frame. The frame provides support and distributes pressure evenly across the rubber element. The rubber element is designed with a sharp wiping edge that efficiently removes water and debris from the windshield. Different blade designs exist, including:
- Conventional Blades: These are the most common type, consisting of a rubber element supported by a series of metal claws or yokes. They are generally the most affordable option.
- Beam Blades: Also known as flat blades, these blades have a single, continuous spring steel beam that applies pressure evenly across the entire blade length. They offer improved performance and a sleeker appearance compared to conventional blades.
- Hybrid Blades: These blades combine the features of conventional and beam blades, offering a balance of performance and cost.
Replacing Wiper Blades: A Step-by-Step Guide
Now that we understand the system, let's walk through the process of replacing wiper blades:
1. Preparation: Gathering Supplies and Safety
Before you begin, gather the necessary supplies:
- New Wiper Blades: Ensure you purchase the correct size and type for your vehicle. Consult your owner's manual or use an online parts finder.
- Gloves: Protect your hands from dirt and grime.
- A Towel or Rag: To protect the windshield from accidental scratches.
- (Optional) Small Flathead Screwdriver: May be needed for certain attachment types.
Safety First: Before starting, ensure the ignition is off and the wiper switch is in the "off" position. This prevents the wipers from activating accidentally while you are working on them.
2. Identifying the Attachment Type
Different vehicles utilize various wiper arm attachment methods. Common types include:
- J-Hook: This is the most common type. The wiper blade has a "J" shaped hook that slides onto a pin on the wiper arm.
- Pinch Tab: These blades are held in place by a tab that needs to be pinched or depressed to release the blade.
- Side Pin: These blades have a pin that slides into a hole on the side of the wiper arm.
- Bayonet: These blades require a twisting motion to lock and unlock them from the wiper arm.
Carefully examine your wiper arm and blade to identify the attachment type. If you are unsure, consult your owner's manual or search online for instructions specific to your vehicle.
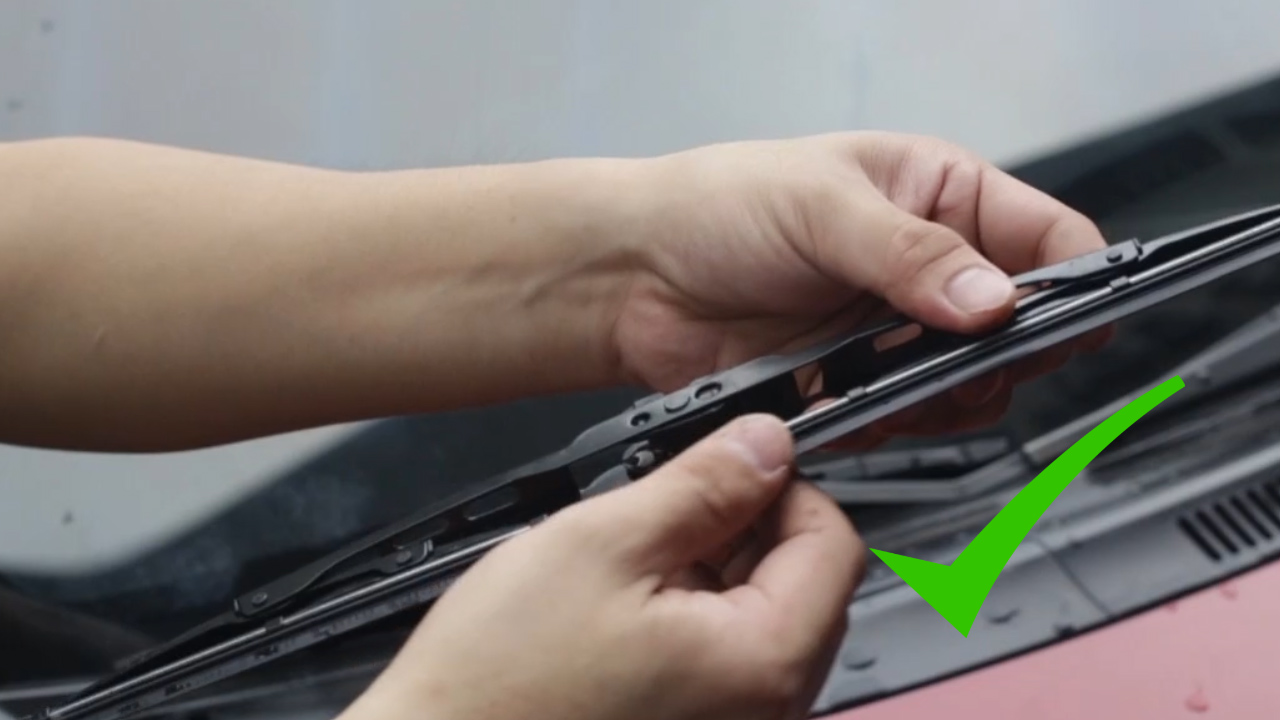
3. Removing the Old Wiper Blade
Once you have identified the attachment type, follow these steps to remove the old wiper blade:
- For J-Hook Attachments: Lift the wiper arm away from the windshield. Rotate the old wiper blade so that it is perpendicular to the arm. Depress the small tab (if present) and slide the blade down and off the J-hook.
- For Pinch Tab Attachments: Lift the wiper arm away from the windshield. Locate the pinch tabs on the blade's attachment point. Pinch the tabs together and pull the blade away from the arm.
- For Side Pin Attachments: Lift the wiper arm away from the windshield. Locate the pin that secures the blade to the arm. Depending on the design, you may need to slide or rotate the pin to release the blade.
- For Bayonet Attachments: Lift the wiper arm away from the windshield. Rotate the blade 90 degrees to unlock it from the arm. Pull the blade away from the arm.
Important: When the wiper blade is removed, carefully lower the wiper arm back to the windshield. Place a towel or rag between the arm and the glass to prevent accidental scratches.
4. Installing the New Wiper Blade
Installation is essentially the reverse of removal:
- For J-Hook Attachments: Slide the new wiper blade onto the J-hook until it clicks into place. Ensure the blade is securely attached.
- For Pinch Tab Attachments: Align the new wiper blade with the arm and push it onto the attachment point until the pinch tabs click into place.
- For Side Pin Attachments: Align the new wiper blade with the arm and slide the pin through the hole. Ensure the pin is securely in place.
- For Bayonet Attachments: Align the new wiper blade with the arm and push it onto the attachment point. Rotate the blade 90 degrees to lock it in place.
5. Testing and Final Checks
Once you have installed the new wiper blades, lower the wiper arms back onto the windshield. Turn on the ignition and activate the wipers to test their operation. Ensure that the blades wipe cleanly and smoothly without streaking or smearing. If you notice any problems, double-check the installation to ensure the blades are properly attached.
Pros, Cons, and Use Cases
Pros:
- Improved Visibility: The primary benefit, enhancing safety during inclement weather.
- Cost-Effective: Replacing wiper blades is a relatively inexpensive maintenance task.
- Easy DIY Project: Can be completed at home with minimal tools and effort.
- Prevents Windshield Damage: Worn blades can scratch the windshield over time.
Cons:
- Blade Deterioration: Wiper blades require periodic replacement, typically every 6-12 months.
- Incorrect Installation: Improper installation can damage the wiper arms or blades.
- Limited Lifespan: Exposure to harsh weather conditions can shorten blade lifespan.
Use Cases:
- Routine Maintenance: Replace wiper blades as part of your regular vehicle maintenance schedule.
- Pre-Trip Inspection: Check wiper blades before long road trips, especially during seasons with frequent rain or snow.
- After Extreme Weather: Inspect wiper blades after exposure to extreme heat, cold, or heavy storms.
Manufacturer Examples:
Many manufacturers offer a range of wiper blades designed for different vehicles and driving conditions. Bosch is known for its Icon beam blades, while Rain-X offers blades with water-repelling coatings. Trico provides a variety of conventional and beam blade options, and some manufacturers, like Michelin, offer blades with long-lasting rubber compounds.
Real-World Insights and Recommendations
While the steps outlined above are generally applicable, here are some additional insights based on real-world use:
- Clean Your Windshield Regularly: Keeping your windshield clean can extend the lifespan of your wiper blades. Use a glass cleaner to remove dirt, grime, and bug splatters.
- Lift Wiper Blades in Winter: During freezing temperatures, lift the wiper blades away from the windshield to prevent them from sticking to the glass. This can also prevent the rubber from tearing if ice forms.
- Use Wiper Fluid: Always use windshield washer fluid when operating the wipers. Never use them on a dry windshield, as this can quickly damage the rubber element.
- Consider Silicone Blades: While often more expensive initially, silicone wiper blades can last significantly longer than traditional rubber blades, offering a potentially better long-term value.
- Inspect Wiper Arms: Periodically inspect the wiper arms for damage or bending. If the arms are bent, they may need to be replaced to ensure proper blade contact with the windshield.
Replacing wiper blades is a simple yet important task that contributes significantly to driving safety. By understanding the wiper system and following these guidelines, you can confidently maintain your vehicle's visibility and ensure a safer driving experience. Don't wait for that hazy film to appear – proactive maintenance is key!